
A few weeks back, a client called me in a bit of a panic. Their legal team had turned on content approval for a contracts library in SharePoint, but nothing was moving. Documents sat in Pending status for days, and nobody outside the legal team even knew a review was needed. The approvers had no idea a contract was waiting on them.
Here’s the thing most people don’t realize: SharePoint’s built-in content approval feature only changes a status field behind the scenes. It does not send a single notification to anyone. If you want approvers to actually get an email, and you want the document owner to hear back once a decision is made, you have to build that logic yourself with Power Automate, Microsoft’s cloud automation tool that connects apps and services through flows.
The good news is that once you know which pieces fit together, this is a solid afternoon project. In this guide, I’ll walk you through building a complete document approval process in SharePoint using Power Automate, from turning on content approval to sending the final approved-or-rejected email, using the exact action I rely on for this: Set content approval status.
What Content Approval Actually Does (and Why It Stays Silent)
Before touching Power Automate, it helps to understand what you’re automating. Content approval is a SharePoint document library setting that adds a hidden field called ModerationStatus to every file.
This field can hold one of three values: Pending, Approved, or Rejected. While a file sits in Pending, only the person who uploaded it and users with approval permissions can see it. Everyone else is locked out until someone approves it.
This is genuinely useful for libraries where content quality matters, like policy documents, contracts, or published reports. The problem is that SharePoint changes this status quietly, with no email or Teams message. Approvers have to remember to log in and manually check a filtered view, which almost never happens consistently.
Power Automate fixes this gap by watching for that status change and layering an actual notification and decision workflow on top of it.
The flow you’ll build is an automated cloud flow, meaning it runs automatically whenever a triggering event happens, as opposed to an instant flow that someone starts manually or a scheduled flow that runs on a timer. In our case, the trigger is a file being uploaded or modified in a document library.
Set Up a Document Approval Process in SharePoint Using Power Automate
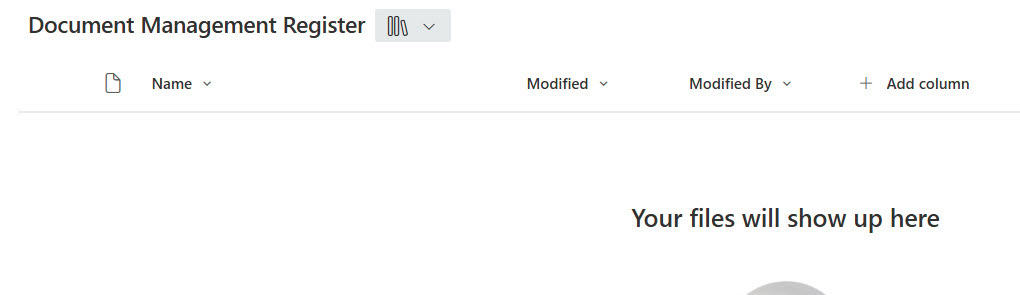
For this example, I created a SharePoint document library called Document Management Register.
Step 1: Turn On Content Approval for Your Document Library
You can’t build this flow until content approval exists on your document library (SharePoint’s storage container for files, as opposed to a list, which stores structured data rows). For this walkthrough, I’m using a library called Document Management Register.
Here’s how to enable it:
- Open your document library and go to Library settings.
- Under General Settings, click Versioning settings.
- Set Require content approval for submitted items? to Yes.
- If you want a full history of changes, also enable Create major and minor (draft) versions. This keeps a draft copy every time someone edits a file, separate from the officially published version.
- Click OK to save.
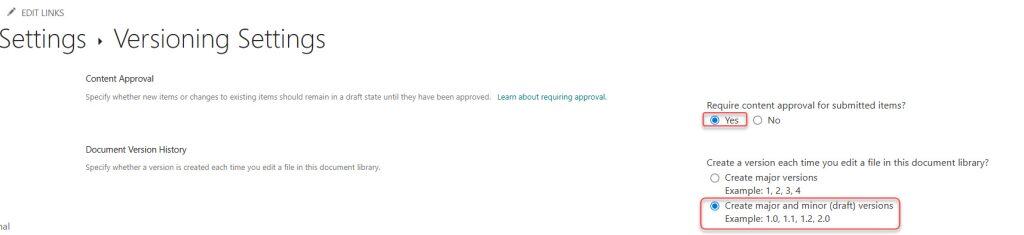
This single setting is what creates the ModerationStatus field the whole flow depends on. Skip it, and your trigger condition later will throw an error because the field simply won’t exist.
Following SharePoint document library best practices matters here too. If your library already has messy folder structures or inconsistent metadata, layering an approval process on top just adds friction. It’s worth cleaning up column design first, especially if this library is part of a larger SharePoint document management system you’re rolling out company-wide. For a deeper look at how the moderation status field behaves, check out this breakdown of content approval in SharePoint.
Pro tip: I’ve found that a lot of teams enable content approval and assume it works like an approval workflow out of the box. It doesn’t. Set expectations with your business users upfront that “approval” here just means the file is hidden from regular viewers until someone changes its status. The workflow logic is entirely on you to build.
Step 2: Build the Trigger for Your Flow
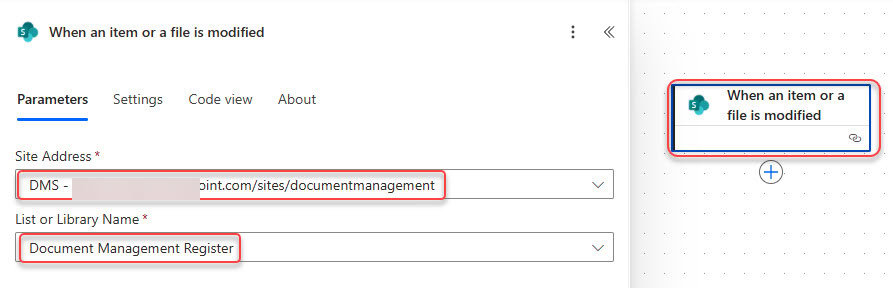
Open Power Automate and create a new automated cloud flow. Search for the SharePoint connector and choose the When a file is created or modified (properties only) trigger.
I specifically use “properties only” here, not the standard “when a file is created” trigger, because content approval is a property change, not always a brand-new file event. A user might upload a document today, get it rejected, then update and resubmit it tomorrow. That resubmission changes the ModerationStatus property but doesn’t create a new file, so you need a trigger that watches property changes, not just creation events.
Configure it with:
- Site Address: the URL of your SharePoint site.
- Library Name: Document Management Register (or whatever your library is called).
Step 3: Add a Trigger Condition So the Flow Only Fires on Pending Documents
This step is the one people skip, and it’s the one that causes the most headaches. Without it, your flow will fire every single time a file’s properties change, including when your own flow updates the approval status later. That creates an infinite loop where the flow keeps triggering itself.
To fix this, add a trigger condition, a small expression that Power Automate checks before it even starts running the flow. Open the trigger’s three-dot menu, go to Settings, and add this under Trigger Conditions:
@equals(triggerOutputs()?['body/{ModerationStatus}'],'Pending')
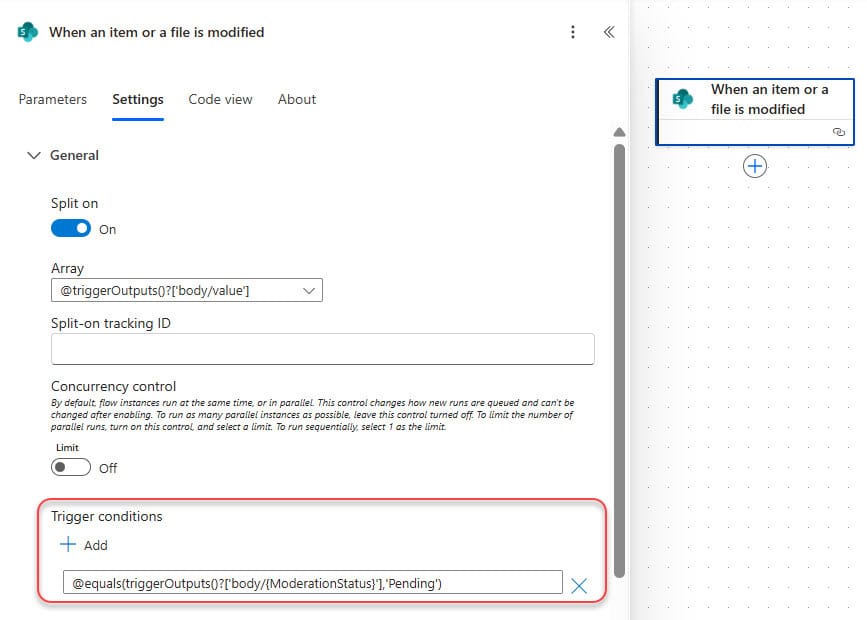
In plain language, this says “only actually run this flow if the document’s approval status is currently Pending.” Since Approved and Rejected statuses won’t match, the flow stops itself before doing any real work when those changes come through. If you haven’t worked with these expressions before, this article on Power Automate trigger conditions covers the syntax in more detail.
Step 4: Get the File’s ETag Before You Go Further
Add a Get file metadata action right after your trigger, using the ID from the trigger output to identify the file. You need this step because later in the flow you’ll call the Set content approval status action, and that action requires an ETag, a unique value SharePoint assigns to every version of a file to prevent conflicting updates.
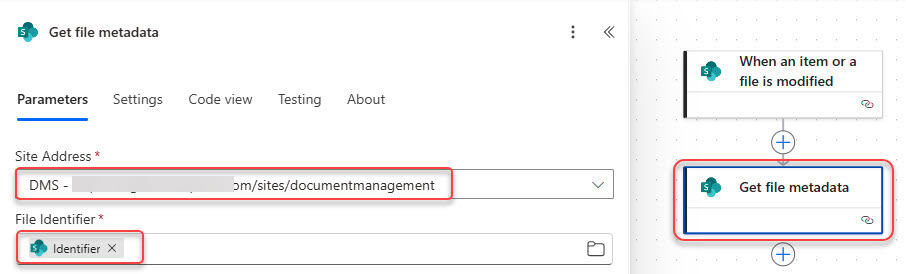
Think of the ETag as a fingerprint of the file’s current state. If two people (or two flow runs) try to update the same file at the same time, SharePoint uses the ETag to detect the conflict and reject the second update. Grabbing it now, right after the trigger fires, gives you the freshest possible value to pass along later.
In my experience, this is the step that trips people up the most. If you skip Get file metadata and try to hardcode or guess the ETag, you’ll almost always run into the error described in this eTag mismatch troubleshooting guide. Always pull the ETag dynamically inside the same flow run.
Step 5: Add the Start and Wait for an Approval Action
This is the heart of the flow. Add the Start and wait for an approval action, and choose the Approve/Reject – First to respond option. I use “first to respond” rather than “everyone must approve” because a document review usually only needs one qualified sign-off, not a unanimous vote. Whoever gets to it first makes the call, and the flow moves on immediately instead of waiting on everyone.
Fill in the fields like this:
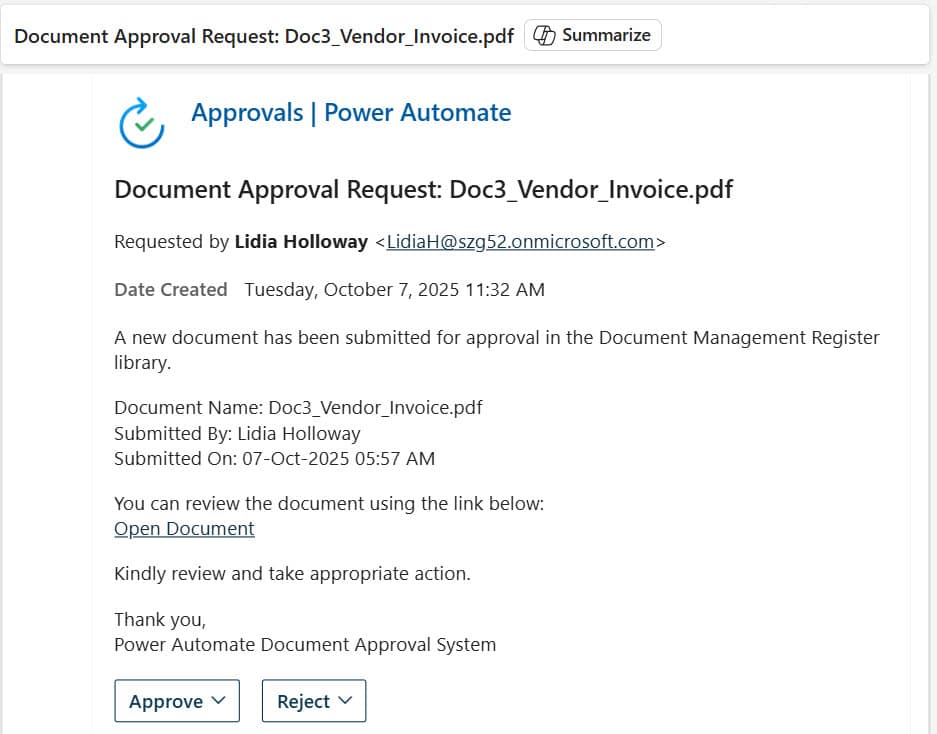
- Title: Document Approval Request: @{triggerOutputs()?[‘body/{FilenameWithExtension}’]}
- Assigned to: the email addresses of your approvers.
- Details:
A new document has been submitted for approval in the Document Management Register library.

Document Name: @{triggerBody()?['{FilenameWithExtension}']}
Submitted By: @{triggerBody()?['Author/DisplayName']}
Submitted On: @{formatDateTime(triggerOutputs()?['body/Created'], 'dd-MMM-yyyy hh:mm tt')}

You can review the document using the link below:
Open Document: @{triggerBody()?['{Link}']}

Kindly review and take appropriate action.
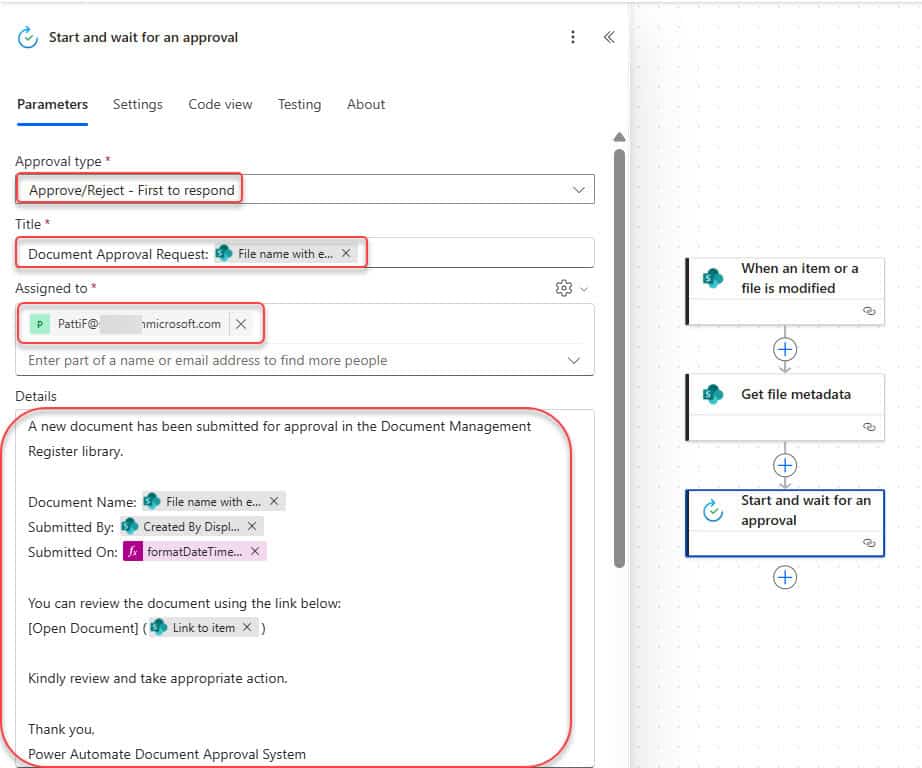
Everything after the @ symbol here is dynamic content, values pulled automatically from earlier steps in the flow rather than typed manually. If dynamic content and expressions are still new to you, this guide on Power Automate dynamic content explains how referencing works between actions.
A few things worth adding depending on your process. If approvers need to see the actual file without leaving their inbox, you can add attachments to the approval request so the document itself comes through in the email.
If a simple Approve or Reject isn’t enough context for your reviewers, look at creating custom responses in Power Automate approvals so they can pick something like “Needs Revisions” instead. And if your approvers tend to sit on requests for weeks, set an approval timeout so the flow doesn’t wait forever on a single unresponsive reviewer. For libraries with rotating reviewers, you can also route the request to a SharePoint group’s members instead of hardcoding individual names.
Step 6: Branch the Flow Based on the Decision
Add a Condition action, which checks whether something is true or false and routes the flow down a different path depending on the answer. Set the condition to check:
outputs('Start_and_wait_for_an_approval')?['body/outcome'] is equal to Approve
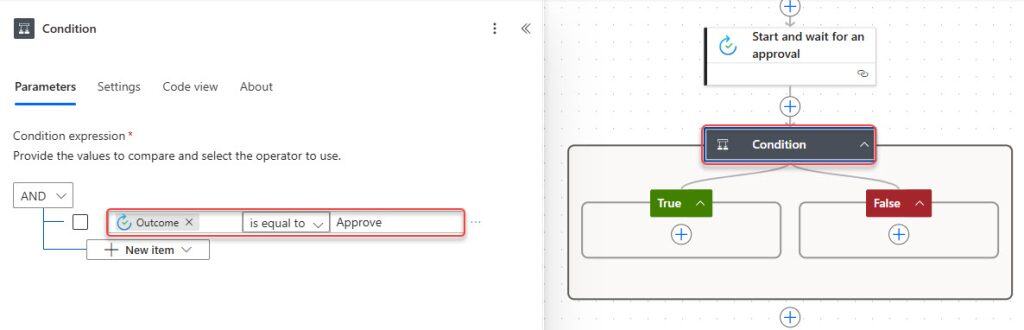
This one expression decides which branch runs next. If you need to check more than one condition at once, say approval outcome plus document type, this guide on Power Automate multiple conditions shows how to combine them with AND/OR logic.
True Branch: Approving the Document
In the Yes branch, add the Set content approval status action with these parameters:
- Site Address: your site URL.
- Library Name: Document Management Register.
- Id: the file ID from your trigger.
- Action: Approved.
- Comments: body(‘Start_and_wait_for_an_approval’)?[‘responses’][0]?[‘comments’]
- ETag: the ETag value from your Get file metadata step.
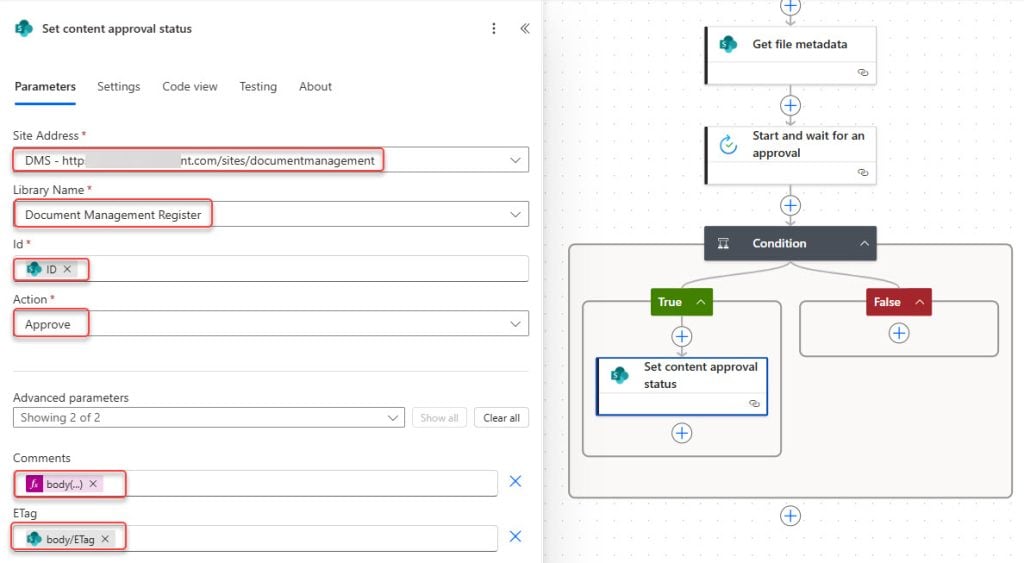
This is the action that actually changes the ModerationStatus field back to Approved, which unhides the document for everyone in the library. Right after it, add a Send an email action to notify the document owner:
- To: @{triggerBody()?[‘Author/Email’]}
- Subject: Your document “@{triggerBody()?[‘{FilenameWithExtension}’]}” has been approved
- Body: include the document name, who approved it, and a timestamp using @{formatDateTime(utcNow(),’dd-MMM-yyyy hh:mm tt’)}.
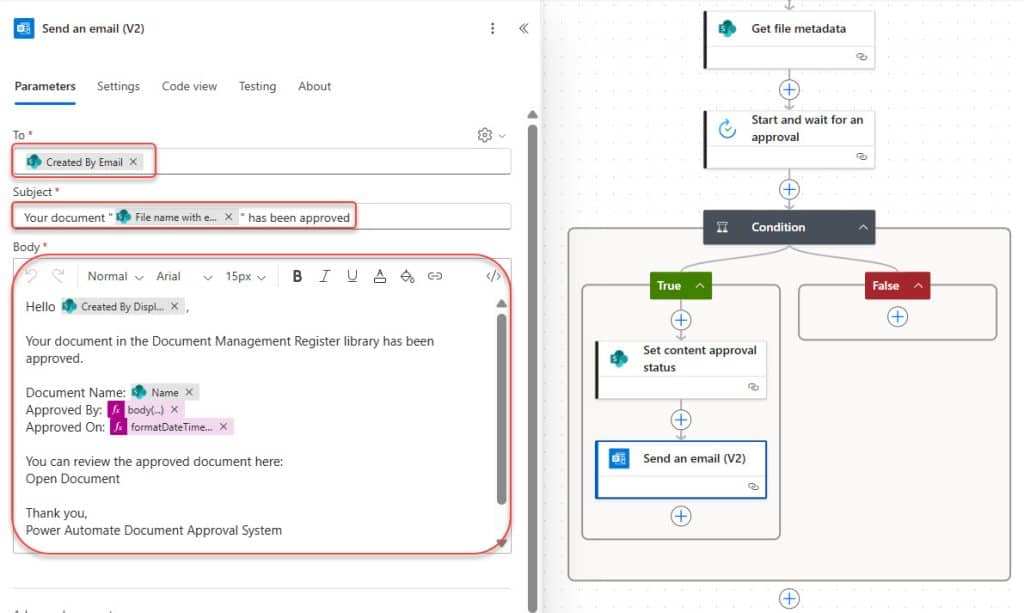
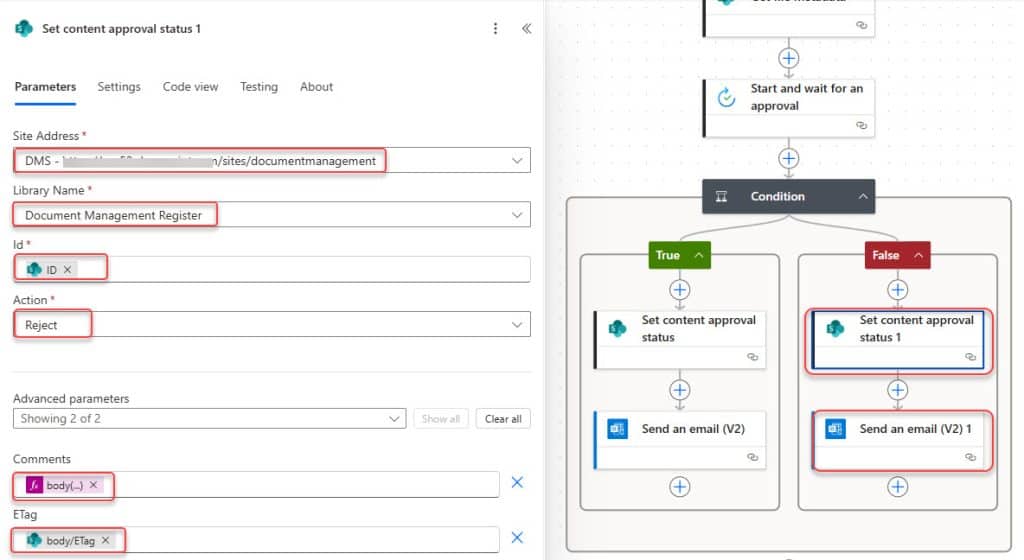
False Branch: Rejecting the Document
Mirror the same two actions in the No branch. Set Action to Rejected in the Set content approval status action, and adjust the email subject and body to let the author know the document needs changes, ideally including the rejection comments from the approver’s response.
Step 7: Test the Complete Flow
Once everything is wired up, test it exactly the way a real user would:
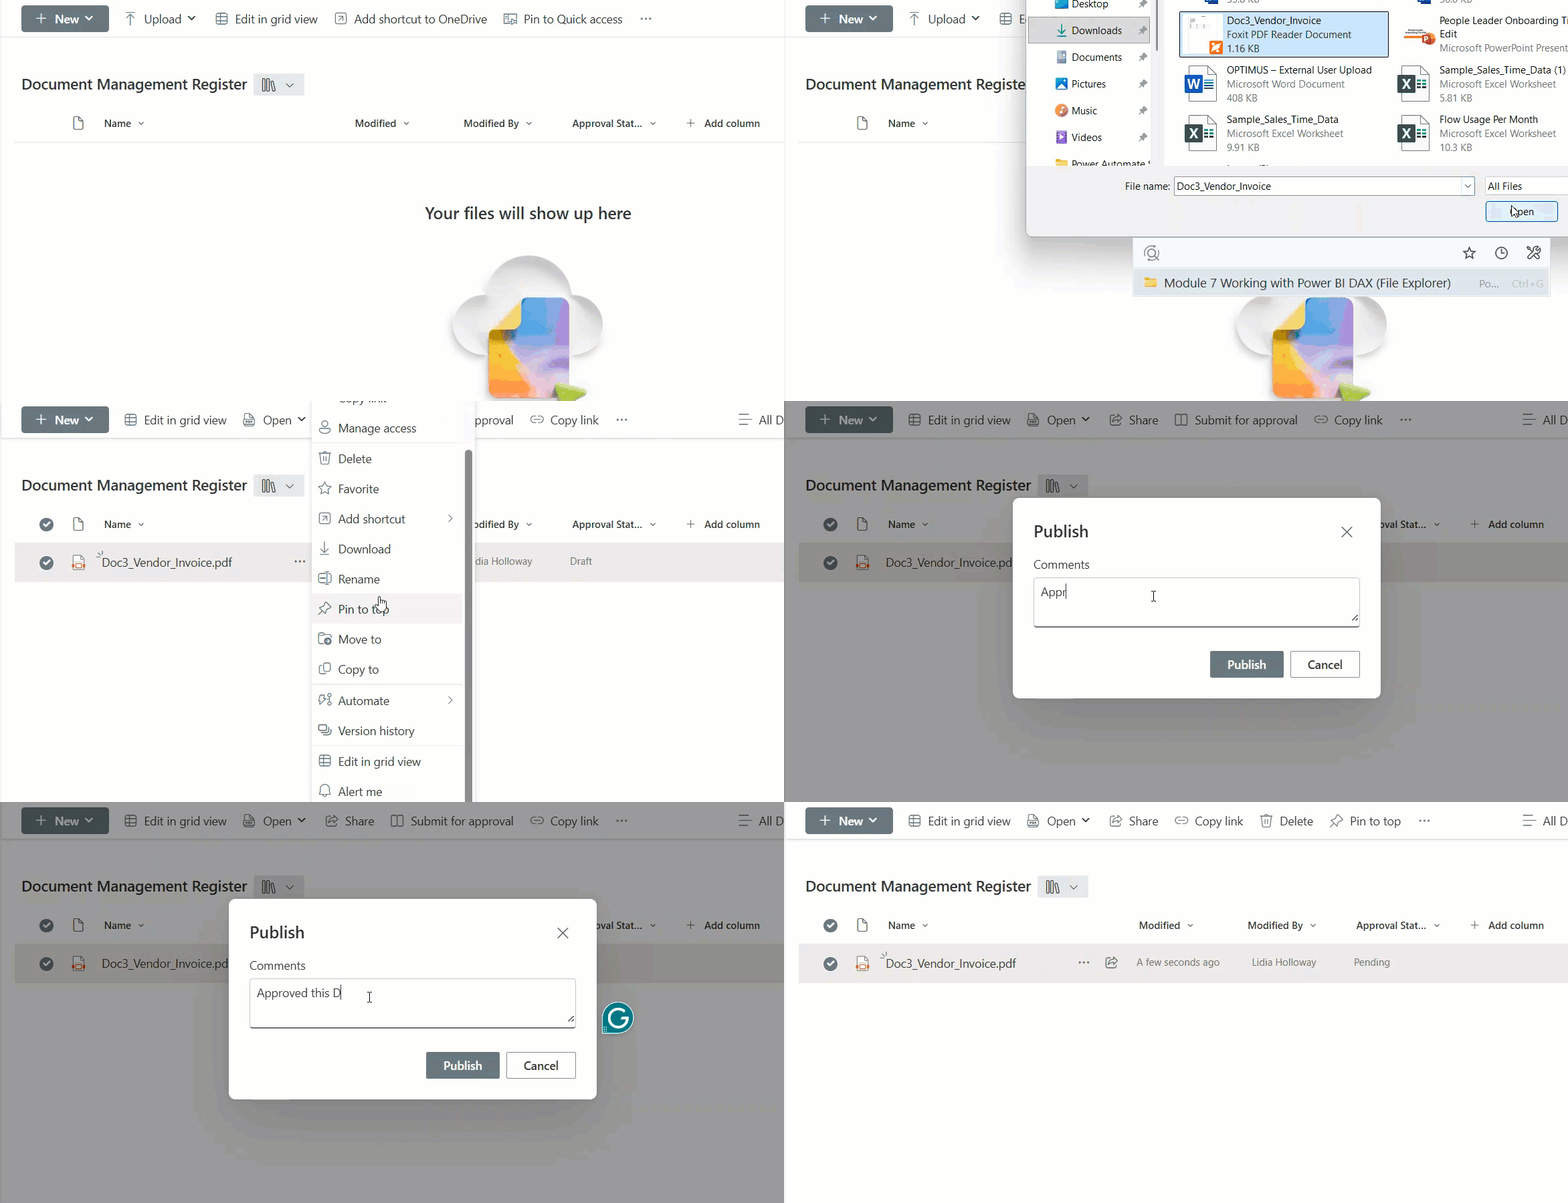
- Upload a new file to the Document Management Register library, or edit and resubmit an existing one.
- Confirm the approvers receive the approval request email within a minute or two.
- Have an approver click Approve (or Reject) and add a comment.
- Check that the document owner receives the correct follow-up email.
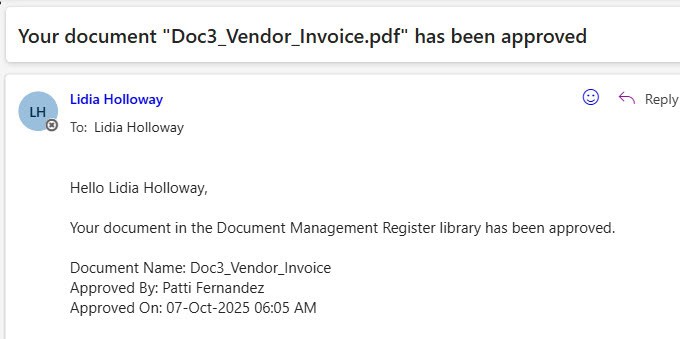
- Open the library and confirm the file’s status column now shows Approved or Rejected instead of Pending.

If any step silently fails, check your flow’s run history first. Each action shows its inputs and outputs, making it easy to spot whether the ETag was stale or the trigger condition blocked the run.
Taking the Approval Process Further
Once the basic flow works, a few extensions are worth considering depending on how your organization operates. If your team lives in Microsoft Teams rather than email, you can route the same request through Teams approvals using Power Automate instead of, or alongside, email.
For documents that legally require more than one sign-off, like a contract needing both legal and finance review, look at building a sequential approval flow so each approver reviews it in order rather than all at once. And if approvers are frequently away from their inbox, a mobile notification action can push an alert straight to their phone the moment a request lands.
Things to Keep in Mind
- Always add the trigger condition. Without filtering for Pending status, your flow will re-trigger itself every time it updates the ModerationStatus field, creating an endless loop that burns through your flow run quota.
- Pull the ETag fresh every run. Reusing an old ETag or skipping the Get file metadata step is the number one cause of approval status update failures.
- Check your connection permissions. The SharePoint connection used in the flow needs edit permissions on the library. If it’s built under a personal account and that person leaves the company, the flow breaks silently.
- Set a realistic approval timeout. Documents sitting in Pending indefinitely because an approver went on leave is a common real-world failure point, and a timeout with an escalation email solves it cleanly.
- Design your library columns before enabling approval. Retrofitting content approval onto a library with years of unorganized files creates a backlog of documents that suddenly disappear from view, which confuses users fast.
- Add error handling around your Set content approval status action. Wrapping key actions with a configured run-after path, similar to the approach in this Power Automate exception handling guide, keeps one failed update from silently stalling the whole approval.
Frequently Asked Questions
Why doesn’t SharePoint send an approval email automatically when content approval is turned on?
Content approval is purely a status field feature built into document libraries. It changes visibility and a moderation status value, but Microsoft never built a notification system on top of it. You need Power Automate or a similar tool to detect the status change and send the actual emails.
What is the ModerationStatus field in SharePoint?
It’s a hidden field that appears on every file once content approval is enabled. It holds one of three values: Pending, Approved, or Rejected, and it controls whether regular users can see the file in the library.
Why do I get an ETag mismatch error when running this flow?
This usually happens when the ETag value passed into the Set content approval status action is outdated or was pulled from a different point in the flow than expected. Always retrieve it with a Get file metadata action placed right after your trigger, in the same run.
Can I use a Power Apps form instead of email for approvers to respond?
Yes, you can trigger the same Start and wait for an approval action from a Power Apps button, or build a custom form that writes directly to a status column. Email is simpler to set up, but a custom form gives approvers a more guided experience if they’re less comfortable with email-based approvals.
Can more than one person approve the same document?
Yes. If you need multiple sign-offs in a specific order, look at building a sequential approval flow instead of the first-to-respond approach used in this guide. If you just need any one qualified reviewer to approve it, first-to-respond, as shown here, is the simpler and faster option.
Will this flow work if I have major and minor versioning enabled too?
Yes, content approval and major/minor versioning work together without conflict. The document stays in a minor (draft) version until it’s approved, at which point it becomes the current major version visible to everyone.
This flow takes SharePoint’s silent content approval feature and turns it into a real, notification-driven approval process using a trigger condition, an approval action, and the Set content approval status action working together. Stick to the first-to-respond approval pattern for single sign-offs, and branch out into sequential or Teams-based approvals once your process needs more than one reviewer. I hope you found this article helpful.
You may also like:
- Power Automate save email attachment to SharePoint
- Delete all files in a SharePoint folder using Power Automate
- Copy list items to another list in SharePoint using Power Automate
- Send approval and create an item when a SharePoint list item is created
- Build a leave request approval flow in Power Automate

Hey! I’m Bijay Kumar, founder of SPGuides.com and a Microsoft Business Applications MVP (Power Automate, Power Apps). I launched this site in 2020 because I truly enjoy working with SharePoint, Power Platform, and SharePoint Framework (SPFx), and wanted to share that passion through step-by-step tutorials, guides, and training videos. My mission is to help you learn these technologies so you can utilize SharePoint, enhance productivity, and potentially build business solutions along the way.

