
Not every employee in a company gets access to Power Apps, and honestly, that’s pretty normal. Many organizations skip Power Apps because it requires extra licensing, and not every team wants to invest in that.
Recently, I worked with a manufacturing company that encountered this exact issue. Their HR team wanted a simple approval process for leave requests, new joiner setups, and other small day-to-day requests. But since most employees didn’t have Power Apps licenses, they needed something everyone could use at no additional cost.
That’s when we decided to use Microsoft Forms. Anyone can fill out a form from any device, and it doesn’t require a license to submit a response. Once the form is submitted, Power Automate can automatically pick it up and send the approval to the manager.
In this tutorial, I will show you how to create an approval workflow using Microsoft Forms and Power Automate.
Microsoft Form Approval to a Manager Using Power Automate
For this example, I created a Microsoft Form for Leave Requests.

I created two SharePoint lists to store the submitted leave details:

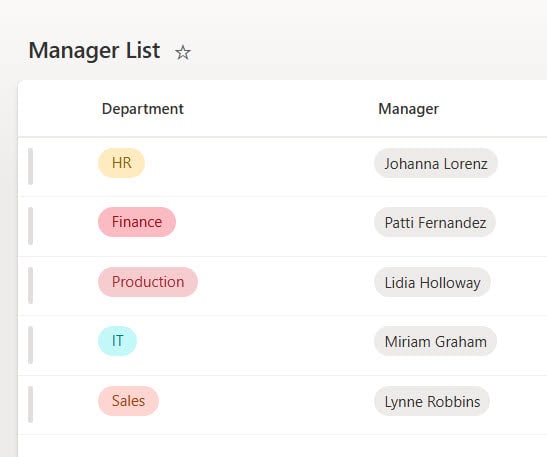
Manager’s name of one department:
Now follow the steps below:
Save the Form Response in SharePoint List
- Go to Power Automate. Click on Create > Automated cloud flow. Name: Generate QR Code for Registrations. Select trigger: When a new response is submitted. Select the Leave Request Form from the dropdown.
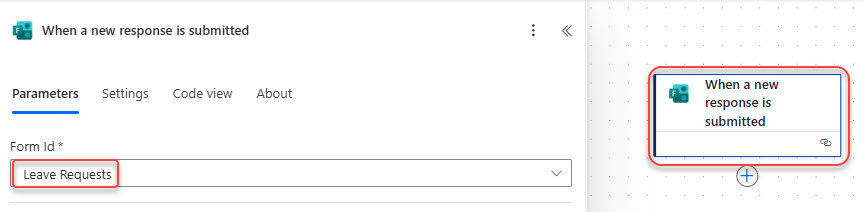
- To retrieve the response, add the Get response details action from the Microsoft Forms connector. Then, select the Form ID from the dropdown menu and choose the Response ID from the dynamic content of the ‘When a new response is submitted’ trigger.

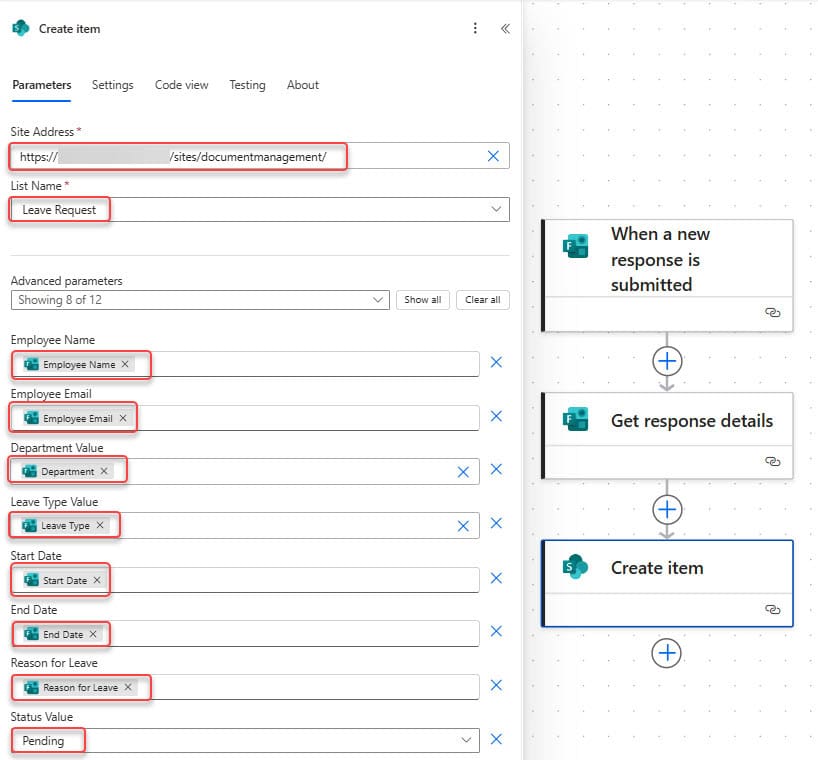
- Add the Create item action and provide the parameters below to store the form data in our SharePoint list.
- Select your site, choose the Leave Requests SharePoint list, then map all Microsoft Forms fields to the SharePoint columns.
- Employee Name: From response
- Employee Email: From response
- Department: From response
- Leave Type: From response
- Start Date: From response
- End Date: From response
- Reason: From response
- Manager Email: From response
- Status: Pending
Add Form Attachment to the SharePoint List
Now I will show you how we can add the Microsoft Form attachment to the SharePoint list and store all attachments in an array variable so that we can add them to the approval action.
- Add a Compose action and provide the following expression:
json(outputs('Get_response_details')?['body/r69af4678a54143f78f975d954f0eac5c'])Replace the r69af4678a54143f78f975d954f0eac5c with your attachment field ID.

- Add an Initialize variables, provide the below parameter to store the attachments:
- Name: varAttch
- Type: Array

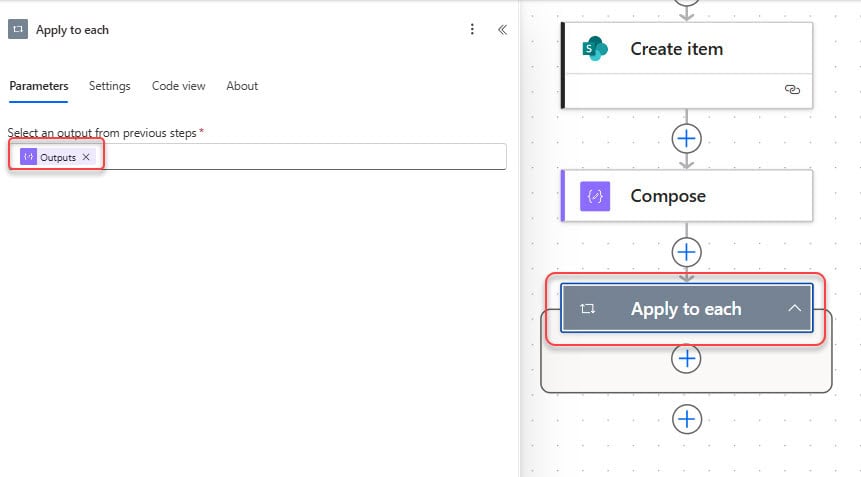
- Then, add Apply to each loop and provider output of the compose action in the ‘Select an output from previous steps’.
- Now, add the Get file content (OneDrive) action inside the ‘Apply to each’ to retrieve the content of a file.
- File: Insert the expression as item()?[‘id’].

- After that, add the ‘Add attachment‘ action to add the file as an attachment to the SharePoint list item. Provide Site Address and List Name.
- Id: Choose ID from the dynamic content of the create item action.
- File Name: Insert the expression as item()?[‘name’].
- File Content: Select File content from the dynamic content of the Get file content action.

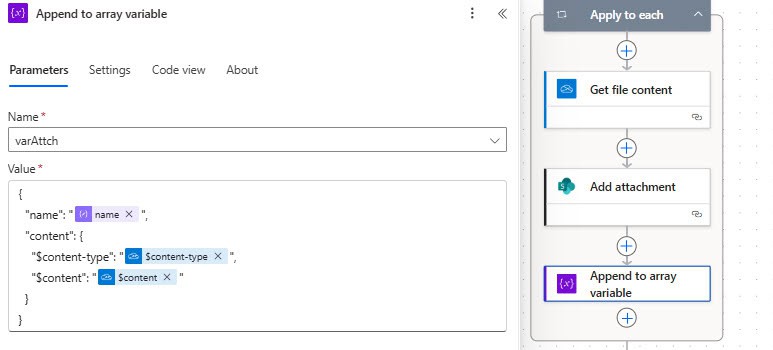
- Then, add append to the array variable and provide the parameters below:
- Name: varAttch
- Value:
{
  "name": "@{item()?['name']}",
  "content": {
    "$content-type": "@{body('Get_file_content')?['$content-type']}",
    "$content": "@{body('Get_file_content')?['$content']}"
  }
}
Based on Department Get the Manager Name and Email
Now, based on the department, we need to get the manager’s details.
- Add two Initialize variables with string type to store the manager’s email and name.

- Add a Get Items action and provide the parameters below to get the manager’s name and email. Provide Site Address and List Name.
- Filter Query:
Department eq '@{outputs('Get_response_details')?['body/rad997569307b4974a28e242cac1ccaf9']}'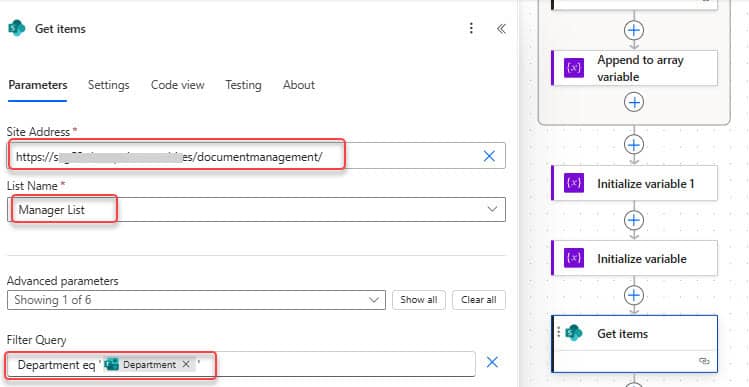
- Add Apply to each action again and provide the Get Items action body. Inside that, add two set-variable actions: one for name and another for email.
items('Apply_to_each_1')?['Manager/Email']
items('Apply_to_each_1')?['Manager/DisplayName']
This is how we can dynamically get the manager’s email using Power Automate.
Set the Approval Action
We now have the manager’s name and email, and we have also saved the data in the SharePoint list so that we can proceed with the approval process.
- Now, add the Start and wait for an approval action. Provide parameters below:
- Approval type: Approve/Reject – First to respond
- Title: Leave Request Submitted by @{outputs(‘Create_item’)?[‘body/EmployeeName’]}
- Assigned to: @{variables(‘varEmail’)}
- Attachments: @{variables(‘varAttch’)}
- Details:
Hello @{variables('varName')},

A new leave request has been submitted and is awaiting your approval.

Employee Name: @{outputs('Create_item')?['body/EmployeeName']}
Department: @{outputs('Create_item')?['body/Department/Value']}
Leave Type: @{outputs('Get_response_details')?['body/LeaveType']}
Start Date: @{outputs('Get_response_details')?['body/StartDate']}
End Date: @{outputs('Get_response_details')?['body/EndDate']}
Reason: @{outputs('Get_response_details')?['body/Reason']}

You can review the submitted leave request using the link below:
[Open Request](@{outputs('Create_item')?['body/{Link}']})

Kindly review and take appropriate action.

Thank you,
Power Automate Leave Request System
- Next, add a Condition action to check the outcome of the approval.
outputs('Start_and_wait_for_an_approval')?['body/outcome'] is equal to Approve
- In the True section, add the Update item action and provide the parameters below:
- Site Address: Provide the site address.
- Library Name: library name.
- Id: Use the ID from the create item action.
- Status Value: Approve
- Manager Comments: body(‘Start_and_wait_for_an_approval’)?[‘responses’][0]?[‘comments’]

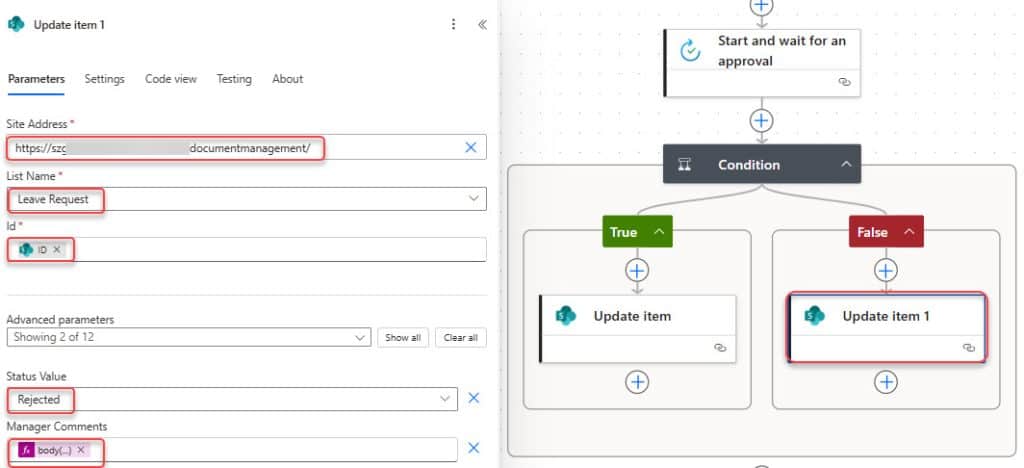
- In the False branch of the condition (when the outcome is not Approve): Add Update item action:
- Site Address: Provide the site address.
- Library Name: library name.
- Id: Use the ID from the create item action.
- Status Value: Reject
- Manager Comments: body(‘Start_and_wait_for_an_approval’)?[‘responses’][0]?[‘comments’]
- If you want, you can add a ‘Send an email (V2)‘ action after the Update item action.
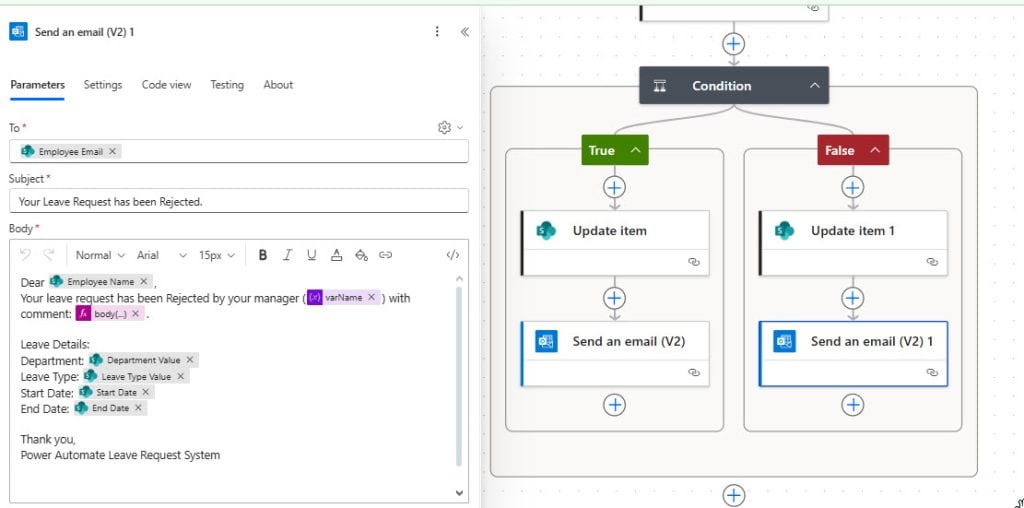
Now that our approval flow is completed, we need to test and check that everything is working fine.
Test the Approval Workflow in Power Automate Using Microsoft Forms
Click Save in the top-right corner of Power Automate. Wait for the confirmation message: Your flow is ready to go.
Submit a leave request from Microsoft Forms.

After some time, you can see the flow will create the item in the Sharepoint list.

Then the manager will receive the approval email like below:
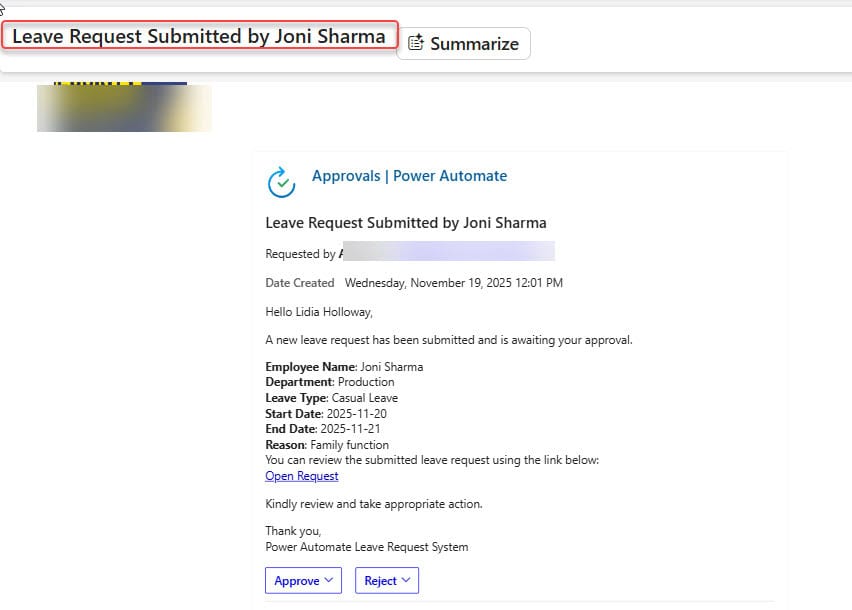
Once the Manager approves, the employee will receive a conference email.

You may also like:
- Power Automate save email attachment to SharePoint
- Power Automate Start and Wait for an Approval
- User Does Not Have ReadAccess for Connection Reference in Power Automate
- Delete all files in a SharePoint folder using Power Automate
- Copy List Items To Another List In SharePoint Using Power Automate
- When an item is created in a SharePoint list send approval

Hey! I’m Bijay Kumar, founder of SPGuides.com and a Microsoft Business Applications MVP (Power Automate, Power Apps). I launched this site in 2020 because I truly enjoy working with SharePoint, Power Platform, and SharePoint Framework (SPFx), and wanted to share that passion through step-by-step tutorials, guides, and training videos. My mission is to help you learn these technologies so you can utilize SharePoint, enhance productivity, and potentially build business solutions along the way.