
When you create flows in Power Automate for one of my clients, many processes require decisions based on multiple conditions. For example, you might want to send an email only if a document is approved and its value exceeds $ 50,000 or trigger a different action if an item’s status is either “Pending” or “In Progress.”
In this Power Automate tutorial, we’ll look at the different ways to handle multiple conditions inside your flows:
- How to use AND / OR conditions in a single Condition control
- How to nest multiple Condition controls
- When to use a Switch control instead of multiple Conditions
- How to use the Filter array to apply conditions on an array
Power Automate Multiple Conditions
In real life, we don’t always make decisions based on just one thing. The same applies in Power Automate.
We use multiple conditions when:
- We want to check more than one rule before doing something.
- For example: Approve leave only if it is “Sick Leave” and the days are less than 3.
- It helps us make better and smarter decisions in the flow.
- It saves time by avoiding extra steps.
- It keeps the flow clean and easy to manage.
By using multiple conditions, we ensure that the flow runs only when all the required conditions are true, or runs in different ways based on the different conditions.
Using multiple conditions in Power Automate allows us to:
- Control the flow based on various values.
- Combine AND / OR logic to handle complex business scenarios.
- Make decisions dynamically based on multiple input values (e.g., leave type and number of days requested).
- Reduce the number of condition blocks needed by combining logic efficiently.
Whether you’re automating approvals, filtering SharePoint data, or handling multiple conditions properly, it makes our flow easier to manage.
Method 1: Power Automate Multiple Conditions in Same Condition Control
Imagine you’re managing an Employee Leave request in a SharePoint list named “Leave Requests“, which stores employee leave applications.

Now, let’s say you want to automate the approval process for Sick Leave requests. The business rule is simple: If the Leave Type is “Sick Leave” and the number of Days Requested is two or less, the request should be automatically approved. However, if it exceeds 2 days, then it needs approval.
Now follow the steps below:
- Create an automated cloud flow. Give the flow a name and select the trigger ‘When an item is created’. Also, provide the Site Address and List Name.

- Then add a condition action to check the leave Type is “Sick Leave” and the number of Days Requested is two or less. To do this, add the below expression in the condition action.
@{triggerBody()?['LeaveType/Value']} is equal to Sick Leave@{triggerBody()?['LeaveDays']} is less or equal to 2
This checks if the Leave Type is Sick Leave and the number of days is less than or equal to 2.
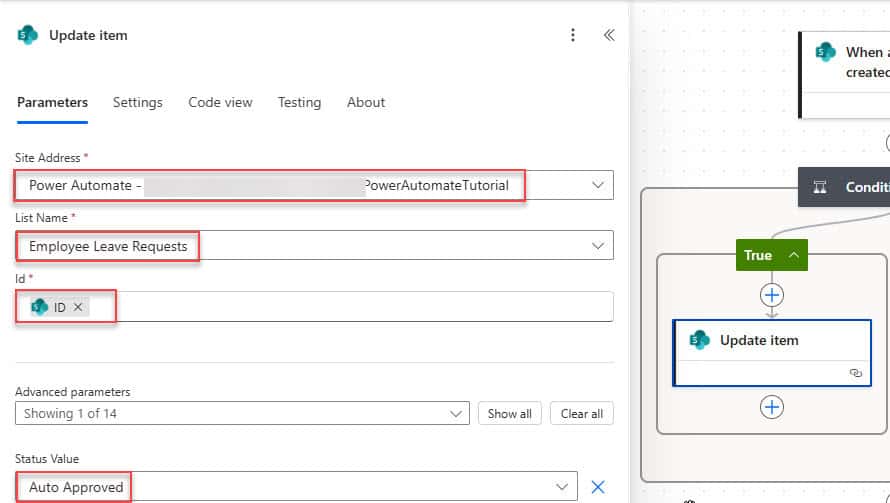
- In the True section, click on Add an action. Search for Update item and select it. Provide the following parameters:
- Site Address: Your SharePoint site
- List Name: Leave Requests
- Id: ID (from dynamic content)
- Status: Set to Auto Approved
- After the Update item action, click on Add an action. Select Send an email (V2) from Outlook. Add required field:
- To: Requester Email (from dynamic content)
- Subject: Leave Approved
- Body:
Hi @{triggerBody()?['EmployeeName/DisplayName']},
Your Sick Leave request has been approved automatically as it is within 2 days.
Regards,
HR Team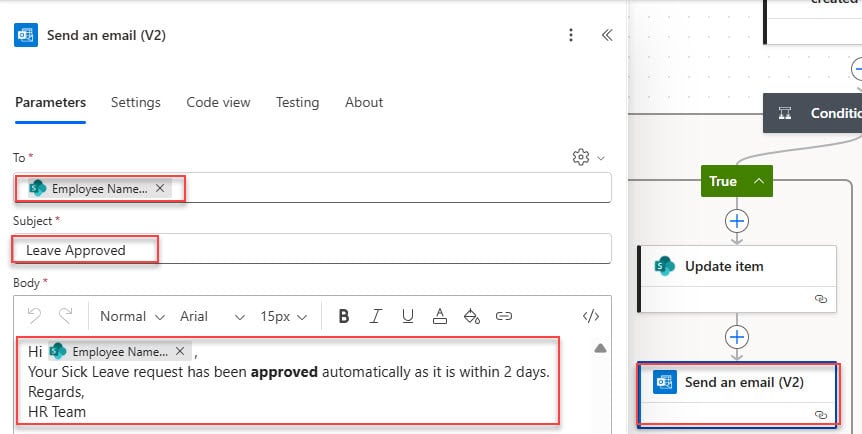
Then, in the false section, you can add Start and wait for an approval action.
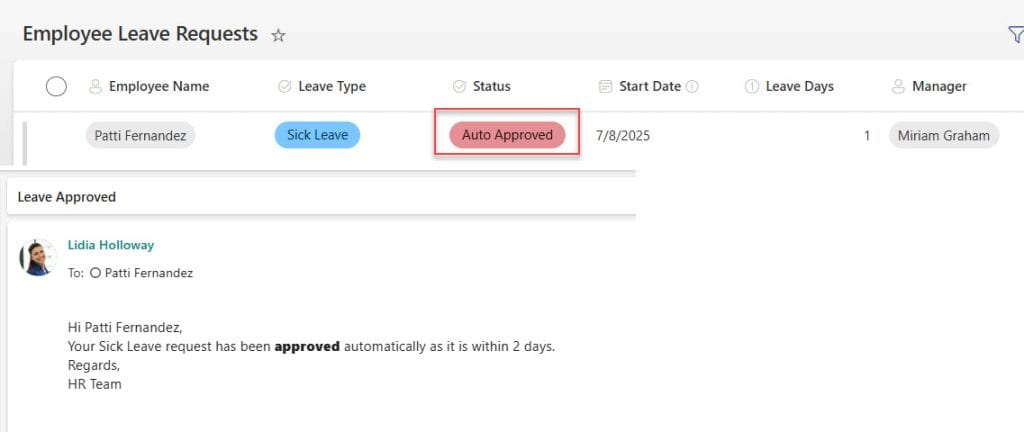
- Click Save in the top-right corner. Go to your SharePoint list and create a test item.

Wait a few seconds and check if the status is updated to ‘Approved’, and you will receive an approval email.
IF you want more about the condition action, check out IF Expression in Power Automate.
This is how you can use multiple conditions in a single Condition control to process leave requests in Power Automate automatically.
Use this method when you want to check two or more simple conditions together in a single step. It’s best for straightforward AND/OR logic without the need for complex branching.
Method 2: Nested Condition Controls in Power Automate
Imagine you’re managing an onboarding system in a SharePoint list named “New Employees”, which stores new hire information.

Now, let’s say you want to assign roles to new employees based on two conditions:
- If the Department is “HR”, then:
- If the employee has five or more years of experience, assign them as “Senior HR Manager.“
- Otherwise, assign them as “HR Executive”
- If the Department is not HR, no action is needed.
Follow the steps below:
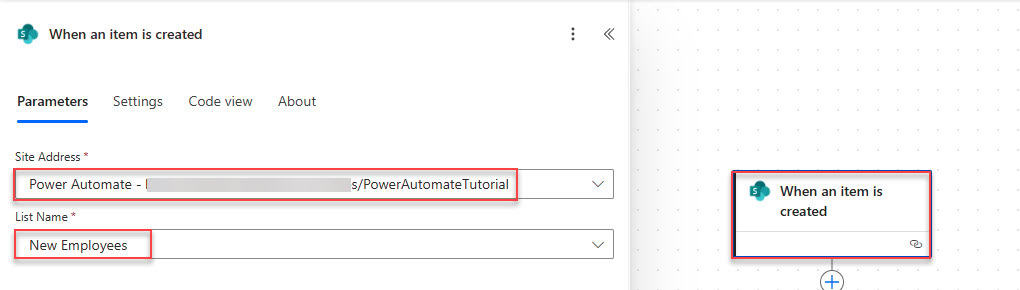
- Create an automated cloud flow. Give the flow a name and select the trigger “When an item is created“. Provide the Site Address and List Name (e.g., New Employees).
- Add the first Condition to check the Department. In the condition, set:
@{triggerBody()?['Department/Value']} is equal to HRThis checks whether the employee is part of the HR department.

- Click Add an action inside the “True” section. Add another Condition control. In the new condition, set:
@{triggerBody()?['EmployeeExperience']} is greater than or equal to 5This checks whether the employee has at least 5 years of experience.

- In the “True” branch of the second condition. Add an Update item action. Provide the following parameters:
- Site Address: Your SharePoint site
- List Name: New Employees
- Id: ID (from dynamic content)
- Role: Set to Senior HR Manager
- In the “False” branch of the second condition. Add an Update item action. Provide the following parameters:
- Site Address: Your SharePoint site
- List Name: New Employees
- Id: ID (from dynamic content)
- Role: Set to Senior HR Manager

You can leave it empty if no action is needed for non-HR departments. Alternatively, you may add logging, notification, or assignment to other departments as needed.
- Click Save in the top-right corner. Go to your SharePoint list and create a test item.

After the flow runs, the Role should be updated to Senior HR Manager.
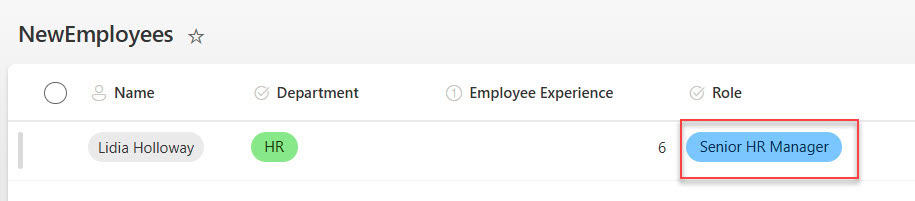
This is how you can use nested condition controls in Power Automate.
Use this method when your decision-making process requires multiple steps, where one condition depends on the outcome of another. It’s best suited when you need to handle layered logic, where the second condition is only relevant if the first one is true.
Method 3: Switch Control for Multiple Cases in Power Automate
Let’s say you manage a SharePoint list named “Support Tickets” that collects issue reports from end users. The list includes:
- Ticket ID: (Single line of text)
- Client Name: (Single line of text)
- Client Email: (Single line of text)
- Issue Description: (Multiple lines of text)
- Priority: (Choice) Low, Medium, High, Critical
- Status: (Choice) Open, In Progress, Closed, Resolved
- Assigned To: (Person or Group)
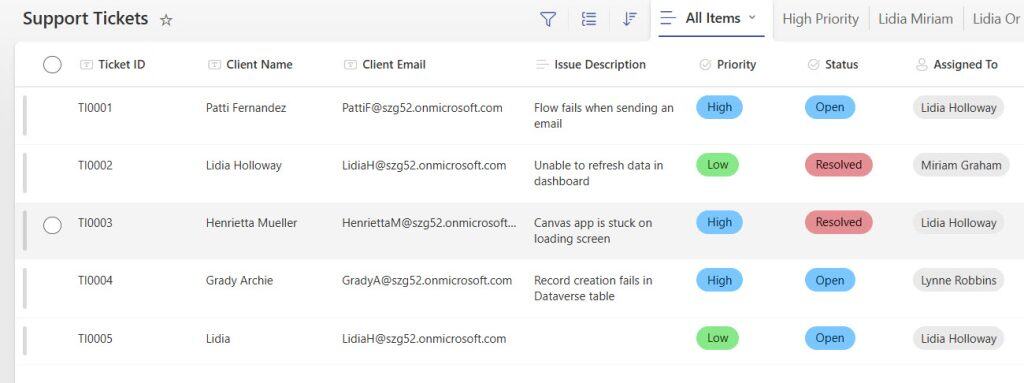
Now you want to automatically assign the ticket to the correct person based on its priority:
- Low: Assign to Intern (Johanna Lorenz)
- Medium: Assign to Support Agent (Joni Sherman)
- High: Assign to Senior Engineer (Miriam Graham)
- Critical: Assign to Escalation Manager (Lidia Holloway)
Follow the steps below to use a Switch control:
- Go to Power Automate. Click Create from the left navigation. Select Automated cloud flow. Enter a name like Route Support Ticket by Priority. Choose the trigger: When an item is created. Click on Create. In the Site Address, select your SharePoint site. In List Name, select Support Tickets.
- Click on + New Step. Search for Switch, and add the Switch control. In the On field, select the dynamic content Priority.
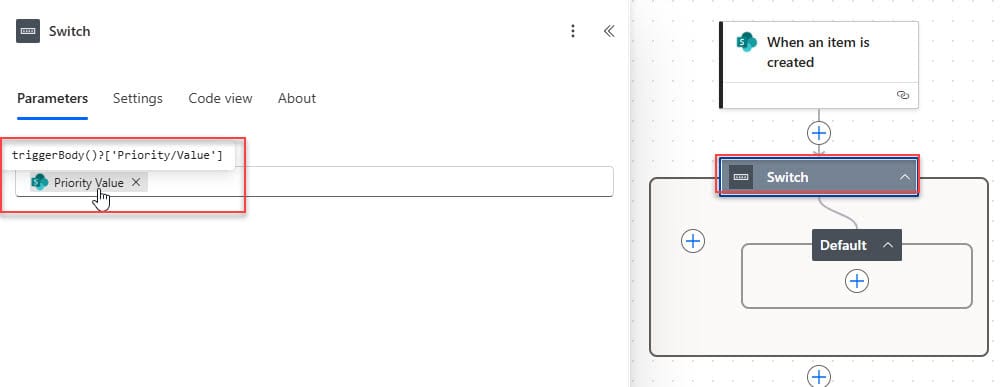
This means the flow will switch based on the value of the “Priority” field in the SharePoint item.
You will now add a case for each possible value in the Priority column.
- Click + Add a case and set it to Low. Inside this case, click Add an action. Select Update item. Provide the following parameters:
- Site Address: Your SharePoint site
- List Name: Support Tickets
- Id: ID From dynamic content
- Assigned To: Johanna Lorenz

- Add a new case: Medium. Add Update item. Set Assigned To: Joni Sherman.
- Add a new case: High. Add Update item. Set Assigned To: Miriam Graham.
- Add a new case: Critical. Add Update item. Set Assigned To: Lidia Holloway.
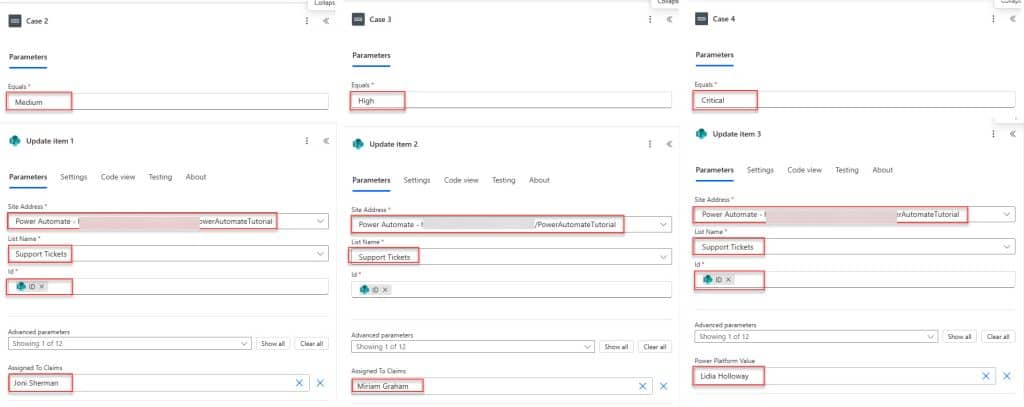
- Click Save. Go to your SharePoint list and create a test item with.

After the flow runs, the ticket should be assigned to a Senior Engineer (Miriam Graham).
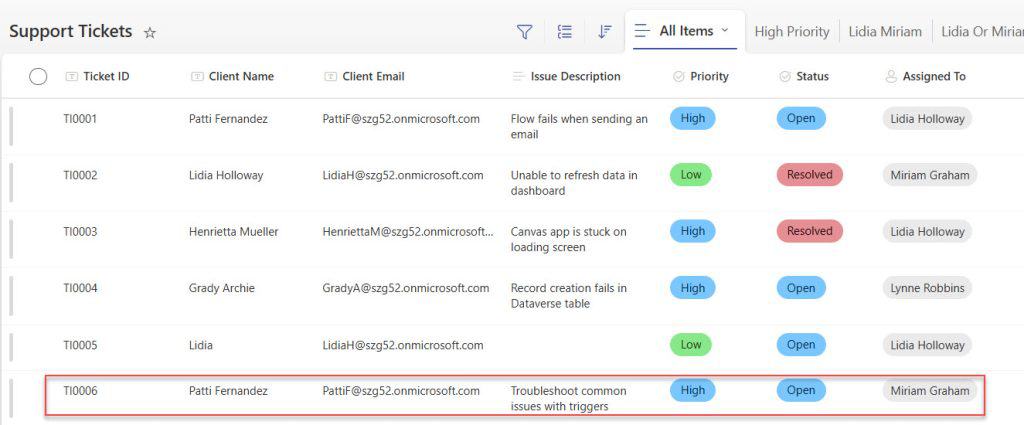
This is how you can use a Switch control in Power Automate to handle multiple values from a single field.
Use this method when you have a field that contains specific known values and you want to run different actions for each one.
Method 4: Power Automate Filter Array Multiple Conditions
You have a SharePoint list named Customer Requests, with the following columns:
- Request ID (Single line of text)
- Request Title (Single line of text)
- Customer Name (Single line of text)
- Request Details (Multiple lines of text)
- Priority (Choice): Low, Medium, High, Urgent
- Assigned To (Person or Group)
- Status (Choice): New, In Progress, Resolved

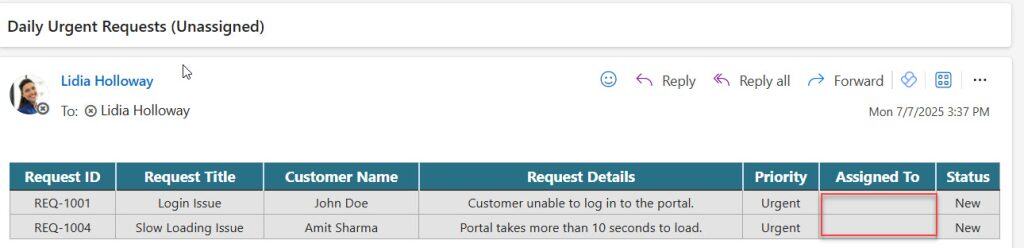
Your goal is to identify all requests that are:
- Marked as Urgent
- Not yet assigned to anyone
You would like to send this filtered list to the manager daily.
Follow the steps below to use Filter Array with multiple conditions:
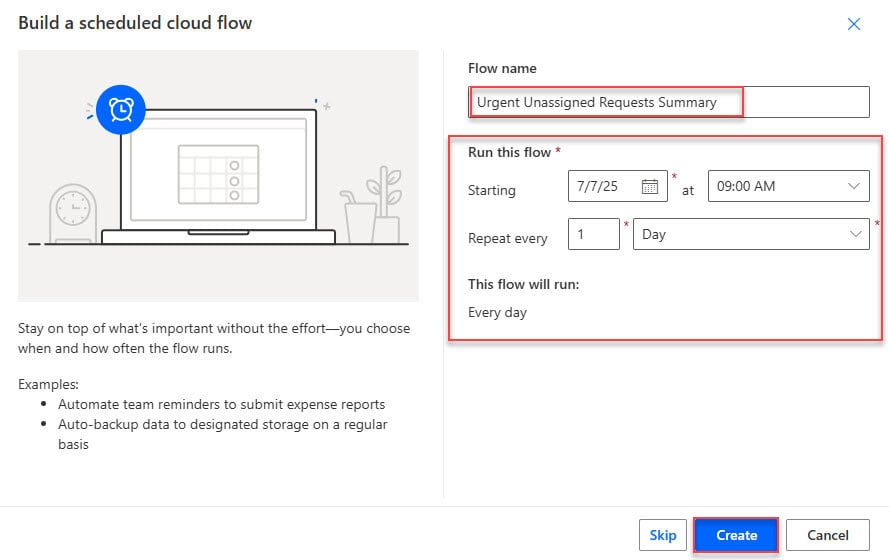
- Go to Power Automate. Click Create > Scheduled cloud flow. Name it Urgent Unassigned Requests Summary. Set the schedule to run daily (e.g., 9:00 AM). Click Create.
- Click on + New Step. Search for Get items (SharePoint) and select it. Provide the below value:
- Site Address: Your SharePoint site
- List Name: Customer Requests
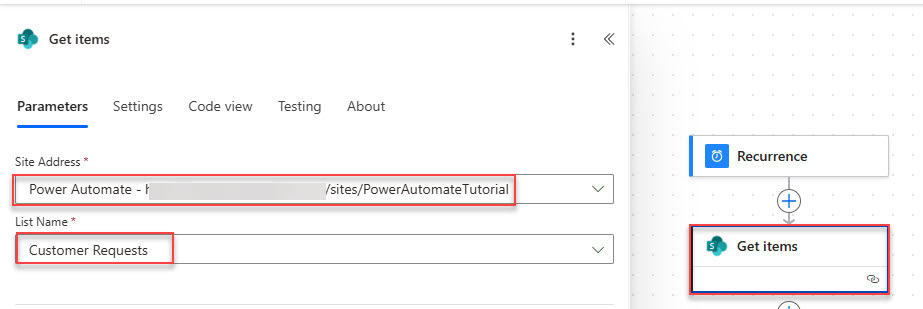
- Click + New Step. Search for Filter array and add it. In the From field, select a value from the Get items output. Click Edit in advanced mode. Paste the following expression:
@and(equals(item()?['Priority/Value'], 'Urgent'), empty(item()?['AssignedTo/Claims']))
This filters the array for items where Priority is “Urgent” and Assigned To is blank.
Then, you can add a ‘Create HTML table‘ action. Next, add Send an email (V2). Every day manager will receive this type of email.
Use the Filter array when working with a collection of items (such as from SharePoint or Excel), and you need to apply multiple filters simultaneously without using loops or complicated branching.
In this Power Automate tutorial, we explored different ways to apply multiple conditions in your flows:
- We learned how to use AND / OR conditions in a single Condition control to check multiple rules in one step.
- We used Nested Condition controls when decisions needed to be made step by step.
- We used a Switch control to handle multiple possible values in a cleaner way than stacking multiple conditions.
- Finally, we used the Filter array action to filter collections like SharePoint list items based on multiple criteria.
You may like the following tutorials:
- Generate QR Code Using Power Automate
- Create a File in Power Automate
- Power Automate Copy Folder Structure
- Power Automate Email Body Formatting

Hey! I’m Bijay Kumar, founder of SPGuides.com and a Microsoft Business Applications MVP (Power Automate, Power Apps). I launched this site in 2020 because I truly enjoy working with SharePoint, Power Platform, and SharePoint Framework (SPFx), and wanted to share that passion through step-by-step tutorials, guides, and training videos. My mission is to help you learn these technologies so you can utilize SharePoint, enhance productivity, and potentially build business solutions along the way.