
When I was working on an Expense Reimbursement application, I realized something important: the approver can’t make a proper decision just by looking at basic details. They need to see the actual invoice, bill, or receipt before approving the request. Without these attachments, the approval process becomes slow, confusing, and sometimes even incorrect.
To avoid this, we can attach the invoice or any supporting document directly to the approval request. This way, the approver can instantly open the file in Outlook or Microsoft Teams and take action without any delays.
In this tutorial, I will show you how to add attachments in an approval using Power Automate.
Add Attachments in Approval Using Power Automate
In this tutorial, I will show you how to add attachments in an approval flow using two different methods:
- When the attachment is stored in a SharePoint List
- When the attachment is stored in a SharePoint Document Library
For this example, I am using a single-level approval, but the same steps also work for sequential or parallel approvals.
For this example, I created:
- A SharePoint List named Expense Claims – where users submit their requests along with attachments.

- A SharePoint Document Library named Expense Documents – where supporting files such as invoices and receipts are stored.

Now, let’s look at how you can attach these documents directly to the approval request in Power Automate.
Add Attachments in the Approval From SharePoint List
Here, I will show you how to attach files that are uploaded directly to the Expense Claims SharePoint list item. Since SharePoint lists support default attachments, users can upload bills, invoices, or receipts while submitting the form.
Follow the steps below:
- Go to Power Automate -> Create an Automated Cloud Flow with a trigger, When a new item is created. Then provide the site address and list name.
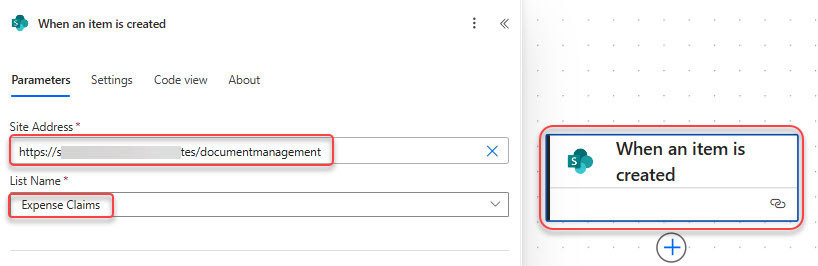
- Add an Initialize variable action with type array:

- Next, add the ‘Get attachments‘ action and provide the parameters below:
- Site Address: Select your SharePoint site
- List Name: Expense Claims
- Id: ID from the trigger
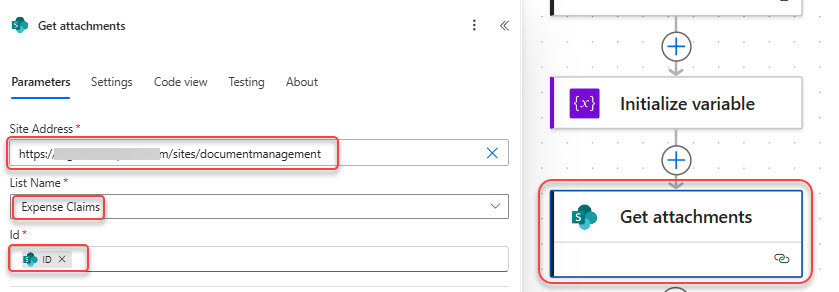
This retrieves all attachments uploaded to the list item.
- Next, add Get attachment content and provide the parameters:
- Site Address: Select your SharePoint site
- List Name: Expense Claims
- Id: ID from the trigger
- File Identifier -> Id from the Get attachments action. It will add a For each loop.

This step gets the actual file content that will be attached to the approval request.
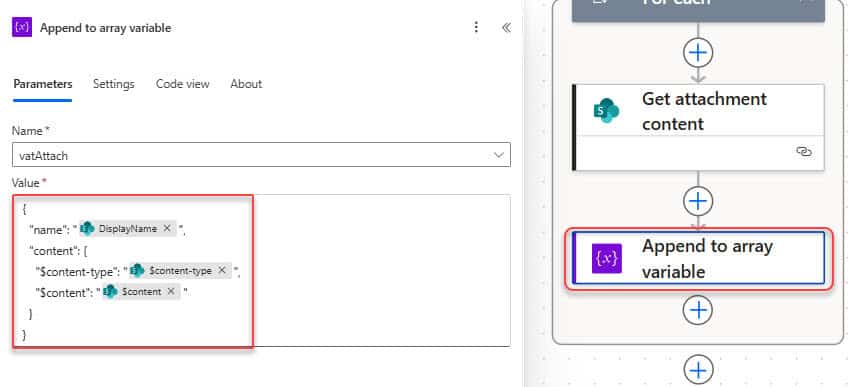
- Inside the For each, add append to the array variable and provide the parameters below:
- Name: varAttach
- Value:
{
  "name": "@{items('For_each')?['DisplayName']}",
  "content": {
    "$content-type": "@{body('Get_attachment_content')?['$content-type']}",
    "$content": "@{body('Get_attachment_content')?['$content']}"
  }
}
or
{
  "name": "@{items('For_each')?['DisplayName']}",
  "content": "@{base64(body('Get_attachment_content'))}"
}
- Add the Start and wait for an approval action, and provide the following parameters:
- Approval Type: Approve/Reject – First to respond
- Title: Expense Claim – @{triggerBody()?[‘EmployeeName/DisplayName’]}
- Assigned To: Approver (choose from dynamic content)
- Details: Add expense information such as:
A new Expense has been created in the Expense Claim list.

**Requested By**: @{triggerBody()?['EmployeeName/DisplayName']}
**Expense Amount**: @{triggerBody()?['ExpenseAmount']}
**Expense Purpose**: @{triggerBody()?['ExpensePurpose']}
Please review the request and choose an action based on the requirement.
- Now scroll down and select the Attachments section. Then click ‘switch to input entire array’ and provide the array variable.
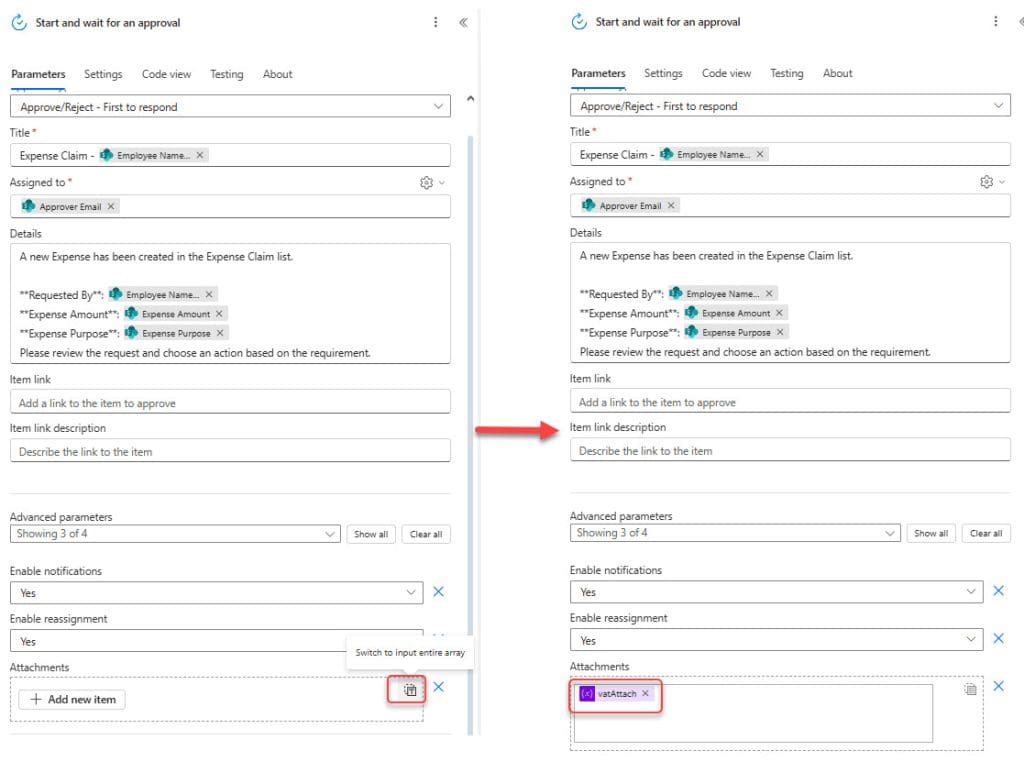
This will attach every file submitted in the list item directly to the approval notification.
Test The Approval Flow With SharePoint List Attachments
Now that our flow is ready, let’s test it to ensure the attachments are added correctly to the approval request.
Go to your Expense Claims SharePoint list and add a new expense request.
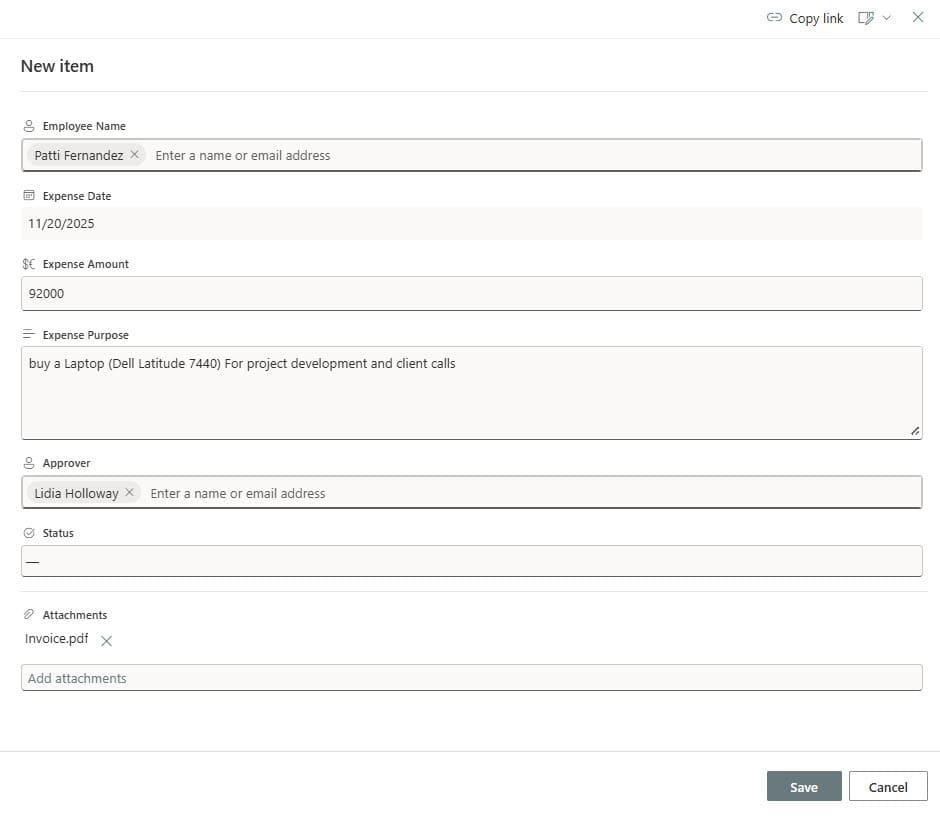
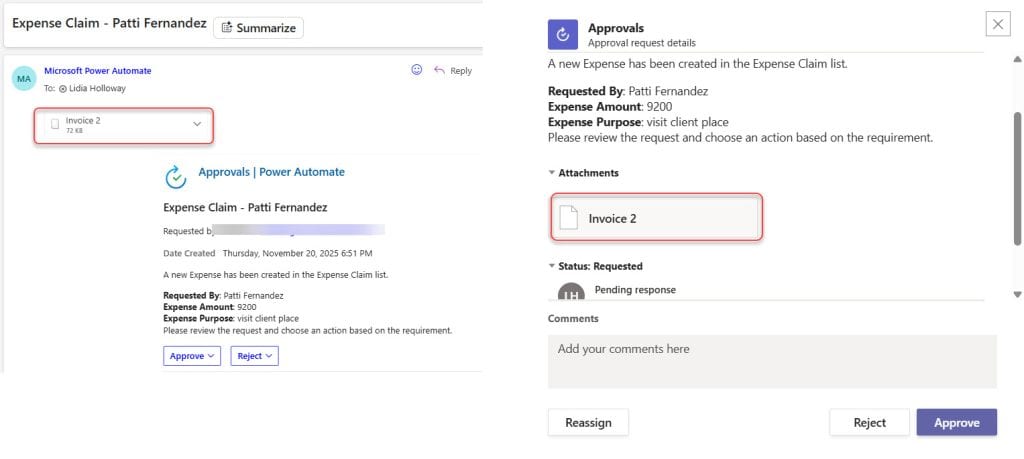
Then the approver will receive approval in both Outlook and Teams with an attachment.

Add Attachments in the Approval From the SharePoint Document Library
In some scenarios, users do not upload attachments directly to the SharePoint list. Instead, all supporting documents, such as invoices, receipts, tickets, and bills, are stored in a SharePoint Document Library.
For example, in my Expense Reimbursement application, the finance team stored all invoices in a separate Expense Documents library for better file management and auditing.
If your files are stored in a document library, you can still attach them to the approval request. Here’s how to do it.
- Go to Power Automate -> Create an Automated Cloud Flow with a trigger, When an item or a file is modified. Then provide the site address and list name.
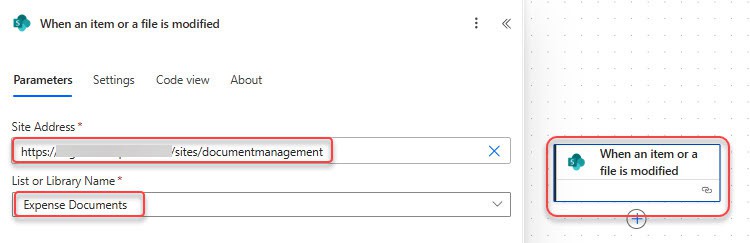
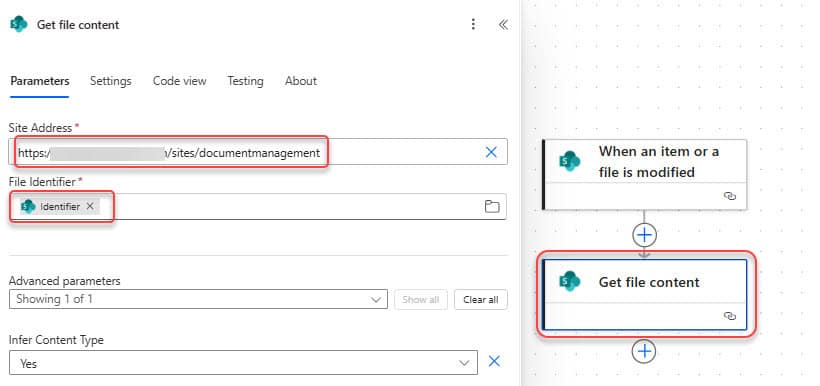
- Next, add the Get file content and provide the site address, then the File Identifier from the trigger.
- Add the Start and wait for an approval action, and provide the following parameters:
- Approval Type: Approve/Reject – First to respond
- Title: Expense Claim – @{triggerBody()?[‘EmployeeName/DisplayName’]}
- Assigned To: Approver (choose from dynamic content)
- Details: Add expense information such as:
A new Expense has been created in the Expense Claim list.

**Requested By**: @{triggerBody()?['EmployeeName/DisplayName']}
**Expense Amount**: @{triggerBody()?['ExpenseAmount']}
**Expense Purpose**: @{triggerBody()?['ExpensePurpose']}
Please review the request and choose an action based on the requirement.
- Now scroll down and select the Attachments section. Then click ‘+ Add new item’ and provide the following:
- Name-1: @{triggerBody()?[‘{Name}’]}
- Content-1: File Content from Get attachment content
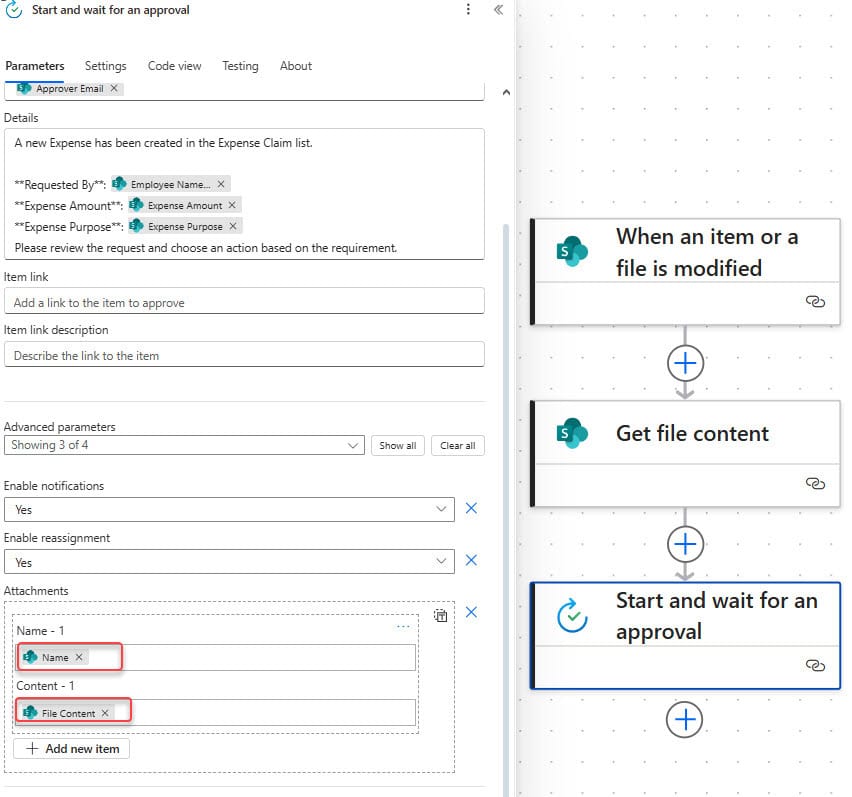
Test The Approval Flow With Document Library Attachments
Upload or modify a file in the Expense Documents library.

The approver will receive the approval notification with the attached invoice/file.
In this tutorial, I showed how to add attachments to an approval in Power Automate through two methods: one with files stored in a SharePoint list and another with files stored in a SharePoint document library. These methods help you create a smooth and reliable approval experience across Outlook and Microsoft Teams.
You may also like:
- Create Custom Responses in Power Automate Approvals
- Sequential Approval Flow in Power Automate
- Power Automate save email attachment to SharePoint
- Delete all files in a SharePoint folder using Power Automate
- Copy List Items To Another List In SharePoint Using Power Automate

Hey! I’m Bijay Kumar, founder of SPGuides.com and a Microsoft Business Applications MVP (Power Automate, Power Apps). I launched this site in 2020 because I truly enjoy working with SharePoint, Power Platform, and SharePoint Framework (SPFx), and wanted to share that passion through step-by-step tutorials, guides, and training videos. My mission is to help you learn these technologies so you can utilize SharePoint, enhance productivity, and potentially build business solutions along the way.