
Recently, I was working on an Expense Reimbursement System using Power Automate, where employees submit their expense claims through a Microsoft Form. Everything was working smoothly except for one issue.
The form only captured the employee’s email address, not their full name.
However, for the approval email and to store proper audit records in SharePoint, I needed to display the employee’s Display Name, not just their email.
Therefore, I needed to find a way to convert the email address into a full name using Power Automate.
In this tutorial, I’ll show you exactly how to get the Display Name from an Email in Power Automate using the Get User Profile (V2) action.
Get Display Name From Email
For this example, I created A Microsoft Form Expense Claim Form.

I created a SharePoint list to store the submitted expense details:

Now follow the steps below:
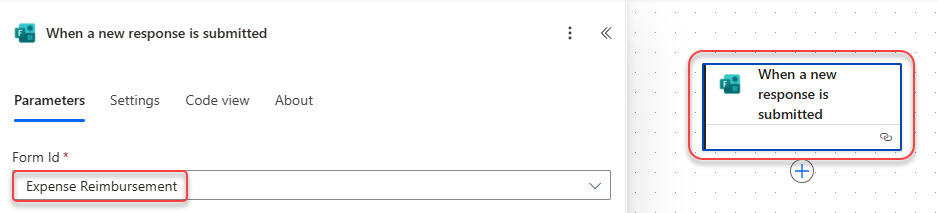
- Go to Power Automate. Click on Create > Automated cloud flow. Name: Expense Reimbursement. Select trigger: When a new response is submitted. Select your Microsoft Form from the dropdown.
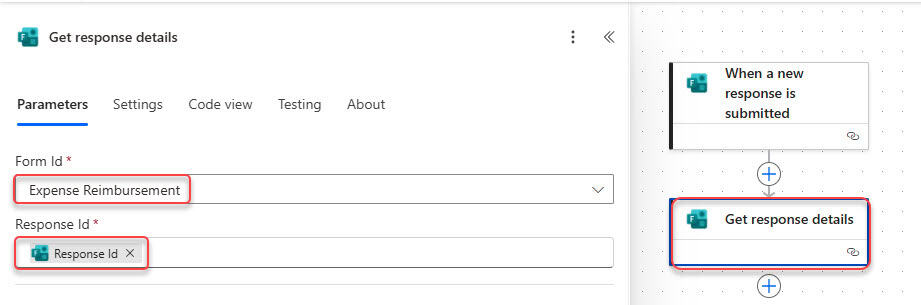
- To retrieve the response, add the Get response details action from the Microsoft Forms connector. Then, select the Form ID from the dropdown menu and choose the Response ID from the dynamic content of the ‘When a new response is submitted’ trigger.
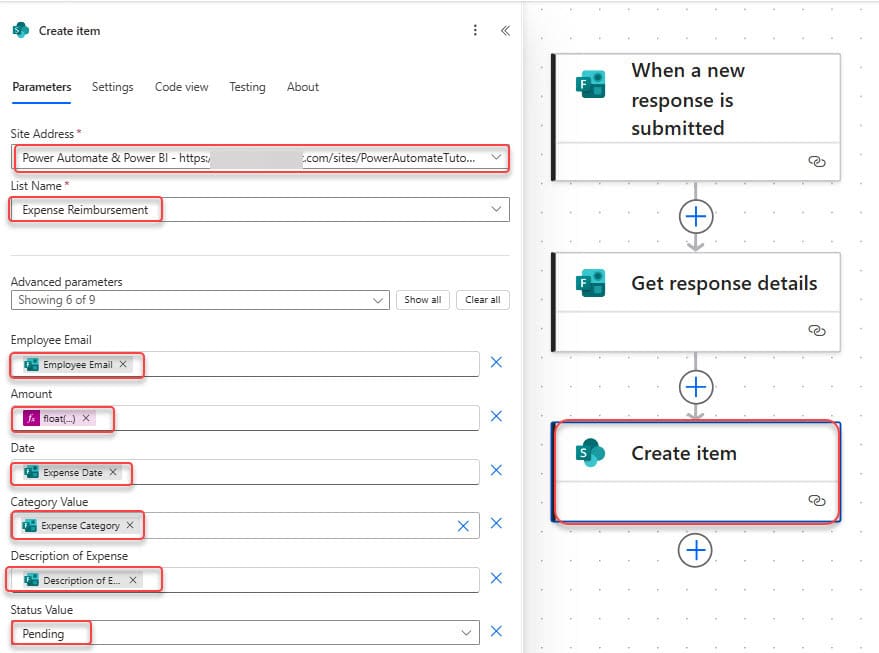
- Add the Create item action to store the form data in your SharePoint list.
- Add the ‘Get User Profile (V2)‘ action to ‘Fetch Display Name’. In the User (UPN) field, enter the Employee Email that was provided in the form.

- Then add the ‘Get manager (V2)‘ action to get the manager’s email. In the User (UPN) field, enter the Employee Email that was provided in the form.

- Now, add the Start and wait for an approval action. Provide parameters below:
- Approval type: Approve/Reject – First to respond
- Title: Expense Claim Submitted by @{outputs(‘Get_user_profile_(V2)’)?[‘body/displayName’]}
- Assigned to: Manager Email (from the “Get manager (V2)” action)
- Details:
A new expense claim has been submitted and is awaiting your approval.

Employee Name: @{outputs('Get_user_profile_(V2)')?['body/displayName']}
Submitted On: @{formatDateTime(utcNow(), 'dd-MMM-yyyy hh:mm tt')}
Expense Category: @{outputs('Get_response_details')?['body/r81126102feaa47da87eb87753f33573d']}
Amount: ₹ @{outputs('Get_response_details')?['body/ra7497dfc066046099ac252579c642c6a']}

You can review the submitted expense details using the link below: [Open Request] (@{outputs('Create_item')?['body/{Link}']})

Kindly review and take appropriate action.

Thank you,
Power Automate  Expense Claim System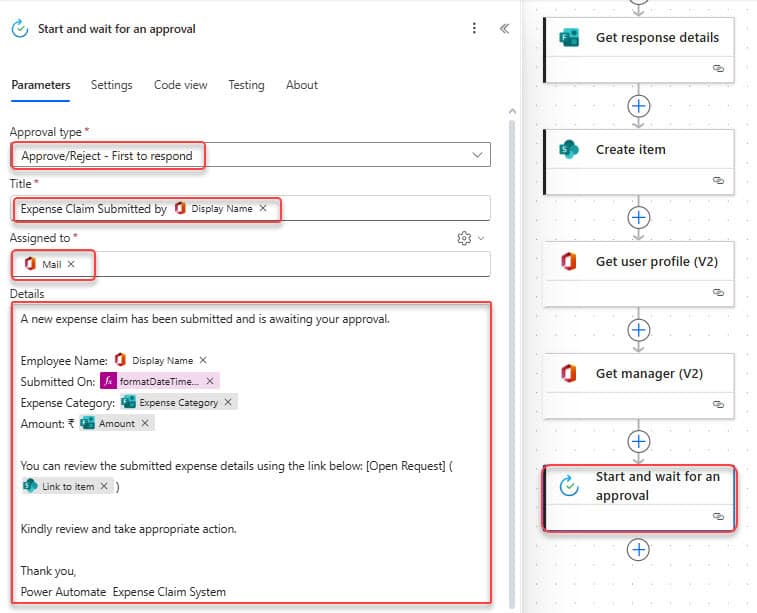
- Add a Condition action to check the outcome of the approval.
outputs('Start_and_wait_for_an_approval')?['body/outcome'] is equal to Approve- In the True section, add the Update item action and provide the parameters below:
- Site Address: Provide the site address.
- Library Name: library name.
- Id: Use the ID from the create item action.
- Status Value: Approve
- Comment: body(‘Start_and_wait_for_an_approval’)?[‘responses’][0]?[‘comments’]