
Our IT manager keeps new hardware purchases in a spreadsheet and saves it as a CSV file in SharePoint. She wanted those rows in the Dataverse Assets table without anyone retyping six laptops and monitors by hand.
In this tutorial, we’ll build a power automate import csv to dataverse flow that reads assets.csv, splits it into rows and columns, and adds each line with Add a new row. We’ll also fix the hidden line endings and blank last line that break most CSV flows.
Here’s what we’re building. This is the Assets table after one run: six new rows, ASSET-1005 to ASSET-1010, with the asset tags filled in by Dataverse.

Before You Start
The Dataverse connector is Premium, so you need a premium Power Automate license plus create rights on the table. If Dataverse is new to you, start with what Microsoft Dataverse is and how it stores data.
I built this against an Asset table. A Dataverse table holds rows (records) and columns (fields), like a SharePoint list. Here’s how to create a Dataverse table with the columns you need if you’re starting from scratch.
| Column | Logical name | Type | Notes |
|---|---|---|---|
| Asset Name | cr85a_assetname | Text (primary column) | Business required |
| Asset Tag | cr85a_assettag | Autonumber | ASSET-{SEQNUM:4}, filled by Dataverse |
| Serial Number | cr85a_serialnumber | Text | LT14-90412 |
| Category | cr85a_category | Choice | Laptop 100000000 … Docking Station 100000004 |
| Purchase Date | cr85a_purchasedate | Date only | 2026-04-06 |
| Purchase Price | cr85a_purchaseprice | Currency | 1189.00 |
| Assigned To | cr85a_assignedto | Text | Lynne Robbins |
The cr85a_ prefix comes from my publisher, so yours will differ. The file assets.csv sits in Shared Documents on /sites/SPGuides, with a header and six rows:
Asset Name,Serial Number,Category,Purchase Date,Purchase Price,Assigned To
Lenovo ThinkPad T14,LT14-90412,Laptop,2026-04-06,1189.00,Lynne Robbins
Dell P2425H Monitor,P2425H-3381,Monitor,2026-04-06,219.99,Lynne Robbins
Brother HL-L2460DW,HLL2460-7720,Printer,2026-04-20,169.99,Front Desk
Samsung Galaxy S25,SGS25-11845,Phone,2026-05-11,799.99,Grady Archie
Dell WD22TB4 Dock,WD22-56013,Docking Station,2026-05-11,289.00,Grady Archie
Surface Laptop 7,SL7-24890,Laptop,2026-06-01,1499.00,Diego Siciliani
Step 1: Create the Flow and Read the CSV File
- Go to make.powerautomate.com and pick the environment that holds your table (top right).
- Select Create > Instant cloud flow, name it Assets – Import CSV to Dataverse, choose Manually trigger a flow, and select Create.
- Select + > Add an action, search Get file content using path, and pick the SharePoint action.
- Set Site Address, File Path /Shared Documents/assets.csv, and Infer Content Type Yes.
Infer Content Type works out the file type from the extension. The plain Get file content action wants a file identifier instead of a path; our Power Automate tutorials hub covers both SharePoint actions.
Checkpoint: the flow has two cards: the manual trigger and Get file content using path pointing at assets.csv.
Step 2: Store the File as Text with Compose
A Compose action holds a value that later steps can reuse.
- Add a Compose action (Data Operation) and rename it CSV text.
- In Inputs, pick File Content from the Get file content using path dynamic content.
@{body('Get_file_content_using_path')}For our .csv file, the body came back as plain text, so no base64 decoding step was needed:
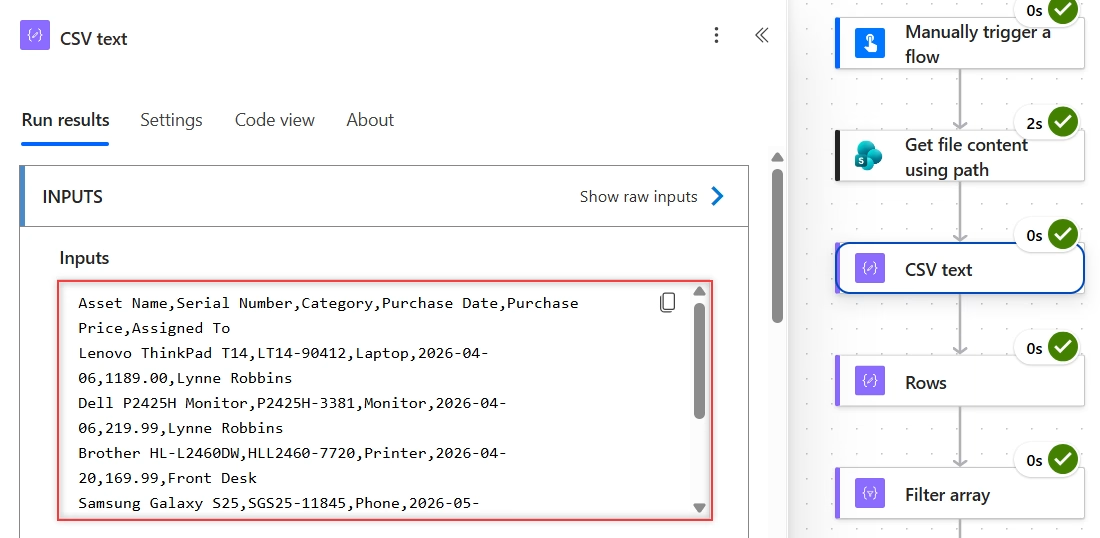
Checkpoint: the CSV text input shows readable lines starting with Asset Name,Serial Number,Category, not a long encoded string.
Step 3: Split the Text into Rows
Next, we turn the string into an array (a list) with one item per line.
- Add another Compose and rename it Rows.
- Click in Inputs, open the expression editor (fx), paste the expression below, and select Add.
skip(split(replace(outputs('CSV_text'), decodeUriComponent('%0D'), ''), decodeUriComponent('%0A')), 1)decodeUriComponent('%0D') is a carriage return and decodeUriComponent('%0A') is a line feed. Our file uses CRLF line endings, so replace() strips the carriage returns first.
Then split() cuts the text at each line feed, and skip(..., 1) drops the header row. Without the replace, the last column of every row would end with a hidden return.

Checkpoint: the Rows output starts with Lenovo ThinkPad T14,LT14-90412,Laptop,2026... and the header is gone.
Step 4: Remove the Blank Last Line with Filter array
CSV files usually end with a line break, so the split leaves an empty last item. Filter array keeps only matching items.
- Add a Filter array action.
- Set From to the Outputs of Rows.
- Select Edit in advanced mode and enter the condition below.
@not(empty(item()))empty() returns true for an empty string, so not(empty(item())) keeps every line that has content.
Checkpoint: Filter array returns six items, one per asset.
Step 5: Loop Through the Rows and Split the Columns
Apply to each runs its actions once for every item in an array. Inside it, we split each line at the commas.
- Add an Apply to each action and set its input to the Body of Filter array.
- Inside the loop, add a Compose named Columns with this expression:
split(items('Apply_to_each'), ',')Now outputs('Columns')[0] is the Asset Name, [1] the Serial Number, and so on up to [5] for Assigned To. Positions start at zero. Our guide to count and list rows from a Dataverse table has more array expressions.
Checkpoint: the loop card shows Columns as its first action.
Step 6: Map the Columns in Add a New Row
- Inside the loop, under Columns, add the Microsoft Dataverse Add a new row action.
- Set Table name to Assets.
- Set Asset Name to the expression
outputs('Columns')[0]. - Under Advanced parameters, select Show all, then set Serial Number
[1], Purchase Date[3]and Assigned To[5]the same way. - Set Category and Purchase Price with the two expressions below.
Leave Asset Tag empty, because the autonumber column fills itself. The Add a new row action in Power Automate explains every box on this card.
A choice column stores a number, not the label, so this expression looks up the number for the CSV text:
json('{"Laptop":100000000,"Monitor":100000001,"Printer":100000002,"Phone":100000003,"Docking Station":100000004}')?[outputs('Columns')[2]]“Laptop” becomes 100000000. You’ll find the values in the column’s choice list; our post on Dataverse choice columns in Power Apps shows where. The currency column wants a number, so we convert the text:
float(outputs('Columns')[4])Purchase Date is already yyyy-MM-dd (2026-04-06), which a date only column accepts. My designer showed raw names like cr85a_assetname because I created the flow from JSON; by hand you’ll see friendly names. Here’s the Code view to copy:
{
  "entityName": "cr85a_assets",
  "item/cr85a_assetname": "@{outputs('Columns')[0]}",
  "item/cr85a_serialnumber": "@{outputs('Columns')[1]}",
  "item/cr85a_category": "@json('{\"Laptop\":100000000,\"Monitor\":100000001,\"Printer\":100000002,\"Phone\":100000003,\"Docking Station\":100000004}')?[outputs('Columns')[2]]",
  "item/cr85a_purchasedate": "@{outputs('Columns')[3]}",
  "item/cr85a_purchaseprice": "@float(outputs('Columns')[4])",
  "item/cr85a_assignedto": "@{outputs('Columns')[5]}"
}
After the loop, I added one more Compose named Rows imported to report the count:
length(body('Filter_array'))Checkpoint: Code view lists six item/ parameters and the Category value starts with @json(.
Test the Flow
- Select Save, then Test > Manually > Run flow.
- Open the run from the flow’s run history and check each step.
My run on 10/21/2026 succeeded first try. Get file content took 2 seconds, and Apply to each ran six iterations in 2 seconds (about 0.4 seconds per row).

Rows imported returned 6. In the Assets table, the new rows run from ASSET-1005 (Lenovo ThinkPad T14) to ASSET-1010 (Surface Laptop 7), with Category and price (1189.00 on the ThinkPad) mapped correctly. To read them in a canvas app, see get data from Dataverse in Power Apps.
Make It Production-Ready
- Replace the manual trigger with the SharePoint trigger When a file is created (properties only), and use its file path or identifier in place of the fixed path, so a dropped file starts the import.
- Running the same file twice adds duplicates. Look up each serial number first, then update the existing row in Dataverse instead of adding a new one.
- Wrap the loop in a Scope with a Configure run after failure branch that alerts someone.
Troubleshooting
The last column has a hidden character or the price won’t convert. Your file uses CRLF line endings. Keep the replace() with %0D in the Rows expression.
An extra empty row or a failed last iteration. The file ends with a line break. Keep the Filter array step with not(empty(item())).
Category fails or stays empty. The CSV text must match a json() lookup key exactly, including capitals and spaces.
Columns shift to the right. A plain split() on commas breaks when a value contains a comma, like “Archie, Grady”. We didn’t test a quote-aware parser, so export with a different delimiter or remove those commas.
Other Ways to Import Data into Dataverse
For a one-time load, the maker portal is faster than a flow. Go to make.powerapps.com > Tables > Import > Import data from Excel, pick the table, upload your Excel or CSV file, and select Import once the mapping status says Mapping was successful.
You need the Environment Maker security role, and Microsoft notes this feature isn’t included in the Power Apps Developer Plan. If the table doesn’t exist yet, you can create a Dataverse table from an Excel or CSV file. For repeat loads with cleanup steps, Dataverse dataflows are another no-code option.
Importing an Excel workbook rather than a CSV? Use the Excel Online (Business) action List rows present in a table instead of Steps 1 to 5. Your data must be formatted as an Excel table, the action returns up to 256 rows by default (turn on pagination for more), and files can be up to 25 MB.
Where to Take It Next
- Going the other way? Here’s how to export a Dataverse table to Excel with a flow.
- Want different numbering for the imported rows? See Dataverse autonumber on the primary column.
- Need a filtered list of the new assets? Create a view in Dataverse for them.
If you’re loading and managing Dataverse data, these guides help next:
Frequently Asked Questions
Can Power Automate import a CSV file into Dataverse?
Yes. Read the file with Get file content using path, split it into rows with split() and skip(), then loop with Apply to each and Add a new row.
How do I import data into Dataverse without a flow?
In make.powerapps.com, select Tables > Import > Import data from Excel and upload the file. See Import data from Excel and export data to CSV.
How do I import data from Excel to Dataverse using Power Automate?
Format the data as an Excel table, then loop over List rows present in a table with Add a new row. See the Excel Online (Business) connector reference.
How do I set a choice column from CSV text?
Send the choice’s number, not its label. A json() lookup such as json(‘{“Laptop”:100000000}’)?[outputs(‘Columns’)[2]] turns the text into the number.
Why does my CSV import create an empty row or fail on the last line?
The file ends with a line break, so split() returns an empty last item. Filter it out with not(empty(item())).

Hey! I’m Bijay Kumar, founder of SPGuides.com and a Microsoft Business Applications MVP (Power Automate, Power Apps). I launched this site in 2020 because I truly enjoy working with SharePoint, Power Platform, and SharePoint Framework (SPFx), and wanted to share that passion through step-by-step tutorials, guides, and training videos. My mission is to help you learn these technologies so you can utilize SharePoint, enhance productivity, and potentially build business solutions along the way.