
When I was working on a document management approval process in Power Automate, I came across a requirement related to approval timeouts. You’re aware that by default, an approval can only remain pending for approximately 30 days, correct? However, in my case, the client requested that the approval remain active for an extended period.
So, I did some research and found a few different ways to handle this situation:
- Automatically approve the request after the timeout
- Add another approval when the first one times out
- Resubmit the same approval again
In this tutorial, I will explain all these methods so you can choose the one that best fits your own requirements.
Set Approval Timeout in Power Automate
By default, approvals in Power Automate expire after 30 days, but you can set your own timeout using the Timeout property.
Follow the steps below:
- Ensure you’ve already added the Start and waited for an approval action, and filled in all the required fields.
- Select Settings. Then, under the General section, find the Action timeout field.
- In the Timeout box, enter your preferred duration in ISO 8601 format.
For example:
- PT30S -> 30 seconds
- PT5M -> 5 minutes
- PT1H -> 1 hour
- P2D -> 2 days
- P29D -> 29 days
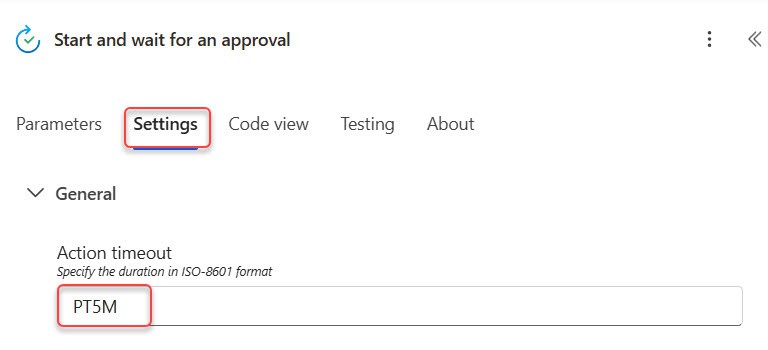
Note: When the timeout is reached, the approval action will automatically return a “TimedOut” status. You can handle this in your flow using a Condition to decide what happens next, for example, auto-approving, sending a reminder, or starting a new approval.
Set up The SharePoint Library
For this example, I’ve created a SharePoint document library named “Document Approvals” that stores information about each document that needs approval.
Here are the columns I’ve added:
- Status (Choice)
- Approval Date (Date and Time)
- Comments (Multiple lines of text)

Whenever a new document is uploaded/created in this library, the flow will automatically trigger and start the approval process.
Handle Approval Timeout in Power Automate
Before we learn how to handle the timeout, let’s first create a simple approval flow.
In this example, I’m adding one approval that triggers whenever a file is uploaded or created in the SharePoint document library. Once the approver responds, the flow will automatically update the file properties based on their decision.
Additionally, I’ll set the timeout to 1 minute. That means the approval will wait for only one minute for the approver’s response before it times out.
Follow the steps below:
- Open Power Automate, create an automated cloud flow with a trigger (When a file is created (properties only)). Select your SharePoint site and document library.

- Add the Start and wait for an approval action. Choose the Approve/Reject – First to respond option and provide the parameters below:
- Title: Document Approval Request: @{triggerOutputs()?[‘body/{FilenameWithExtension}’]}
- Assigned to: Give the approver’s email address.
- Details:
A new document has been submitted for approval in the Document Approval library.

Document Name: @{triggerBody()?['{FilenameWithExtension}']}
Submitted By: @{triggerBody()?['Author/DisplayName']}
Submitted On: @{formatDateTime(triggerOutputs()?['body/Created'], 'dd-MMM-yyyy hh:mm tt')}

You can review the document using the link below:
[Open Document] (@{triggerBody()?['{Link}']})

Kindly review and take appropriate action.

Thank you,
Power Automate Document Approval System