
When working with Power BI, I need to check if a column contains a specific word or value and then create a new column based on that. At first, I struggled with this because there are many different “contains” scenarios in Power Query. After working on e-commerce dashboard projects, I learned some easy, reliable ways to do so.
In this tutorial, I will show how to add a column in Power Query. Also, I will cover the following topic:
- How to use Power Query M Code to Add a Column If Contains
- Multiple Keywords Using IF Contains in Power Query
- Add Column If Contains Number / Special Text in Power BI Power Query
- Add Column If Contains in Another Column (Power Query)
- Add Column If Column Contains Blank or Null in Power BI
Add Column If Contains in Power Query in Power BI
For this example, let’s use a simple Excel table named Orders.
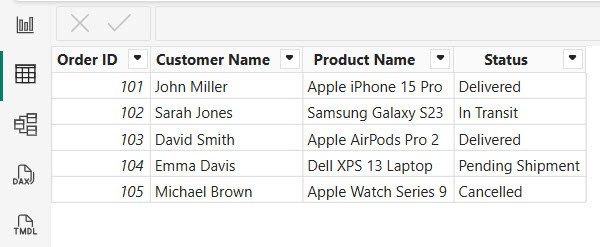
Now I want to add a new column in Power Query that checks whether ProductName contains “Apple”, then marks it as “Apple Product”; otherwise, it marks it as “Other Brand.”
To do this, follow the steps below:
- In Power BI Desktop, open Power Query Editor. In the Queries pane, select the Orders table.
- Go to the Add Column tab. Click on Custom Column.

- A pop-up will open. Enter the following details:
- New column name: Product Category
- Custom column formula:
if Text.Contains([Product Name], "Apple") then "Apple Product" else "Other Brand"
- You will now see a new column named Product Category added to your table.

Finally, click Close & Apply to load the updated data back into Power BI.
Add a Column If Contains Using Power Query M Code
Sometimes you may want to write the M code directly instead of using the Custom Column UI. This gives you more control and is useful when working with complex logic.
Here I will use the same example.
- In Power Query Editor, select the Orders table. Go to the View tab and click Advanced Editor.
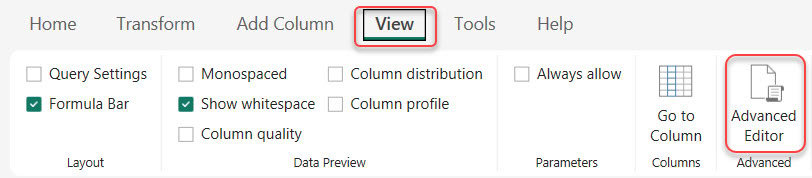
- In the Advanced Editor, you will see the existing M code for your query.

- Add the following line before the last line (just before in Source or the final output step):
#"Added Custom" = Table.AddColumn(Source, "Product Category", each if Text.Contains([Product Name], "Apple") then "Apple Product" else "Other Brand")- Make sure to replace Source with the name of the previous step, if different. Click Done.
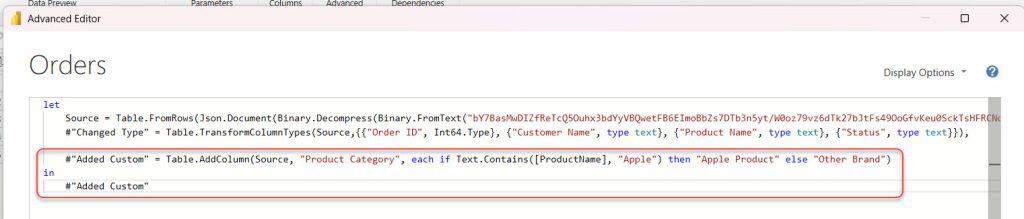
You will now see the Product Category column created using M code.

Multiple Keywords Using IF Contains in Power Query
Sometimes you want to check whether a text contains any one of multiple keywords.
For example, if a product name includes Gold, Premium, or Exclusive, I want to categorize it as High Tier; otherwise, Standard.
For this example, I am using the products table. Check the screenshot below:

- Open Power Query Editor -> Go to the Add Column tab. Click Custom Column.
- In the formula box, write a condition like:
if Text.Contains([Product Name], "Gold")
   or Text.Contains([Product Name], "Premium")
   or Text.Contains([Product Name], "Exclusive")
then "High Tier"
else "Standard"
- Then click on OK. After that, you can see the column in the Power Query editor.
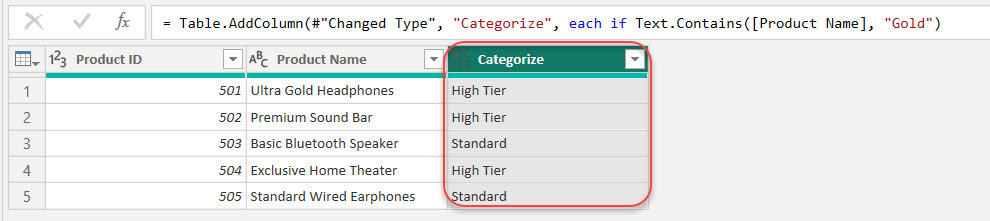
If you want this using M code, you can use the code below:
= Table.AddColumn(Source, "Product Tier", each
    if Text.Contains([Product Name], "Gold")
       or Text.Contains([Product Name], "Premium")
       or Text.Contains([Product Name], "Exclusive")
    then "High Tier"
    else "Standard")
Add Column If Contains Number / Special Text in Power Query
Sometimes text fields include numbers or special text patterns. For example, an Employee Code column may contain digits like 123, and you want to mark those rows as “Has Numeric Code”.
Table:
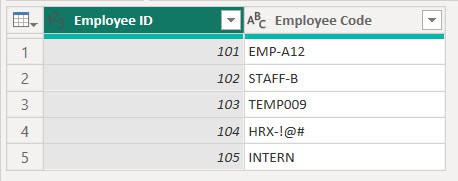
Now follow the steps below:
In the Power Query editor, add a Custom Column. In the formula box, write a condition like:
if Text.Contains([Employee Code], "0")
 or Text.Contains([Employee Code], "1")
 or Text.Contains([Employee Code], "2")
 or Text.Contains([Employee Code], "3")
 or Text.Contains([Employee Code], "4")
 or Text.Contains([Employee Code], "5")
 or Text.Contains([Employee Code], "6")
 or Text.Contains([Employee Code], "7")
 or Text.Contains([Employee Code], "8")
 or Text.Contains([Employee Code], "9")
then "Has Numeric Code"
else "No Numeric Code"
You will now see the Numeric Flag column created using a custom column in the Power Query editor.
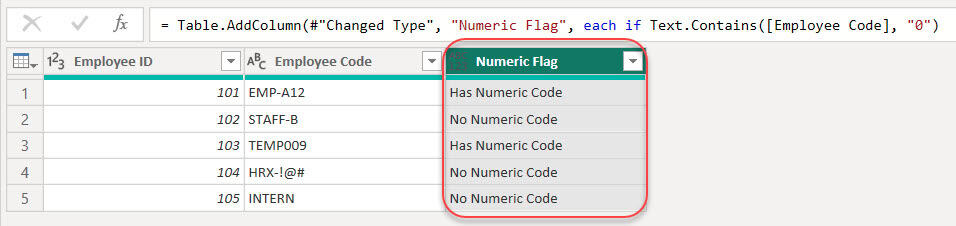
In M code, you can use:
= Table.AddColumn(Source, "Numeric Flag", each
    if Text.Contains([Employee Code], "0")
     or Text.Contains([Employee Code], "1")
     or Text.Contains([Employee Code], "2")
     or Text.Contains([Employee Code], "3")
     or Text.Contains([Employee Code], "4")
     or Text.Contains([Employee Code], "5")
     or Text.Contains([Employee Code], "6")
     or Text.Contains([Employee Code], "7")
     or Text.Contains([Employee Code], "8")
     or Text.Contains([Employee Code], "9")
    then "Has Numeric Code"
    else "No Numeric Code")
Add Column If Contains Text From Another Column using Power Query
Here we will check whether the text in one column appears inside another column.
For example: If the Department Name contains the Team Name, tag it as Match Found.
Table:

Steps to Create a Custom Column:
- In Power Query editor, go to Add Column -> Custom Column.
- Enter the following details:
- New column name: Dept-Team Match
- Custom column formula:
if Text.Contains([Department Name], [Team Name])
then "Match Found"
else "Not Matched"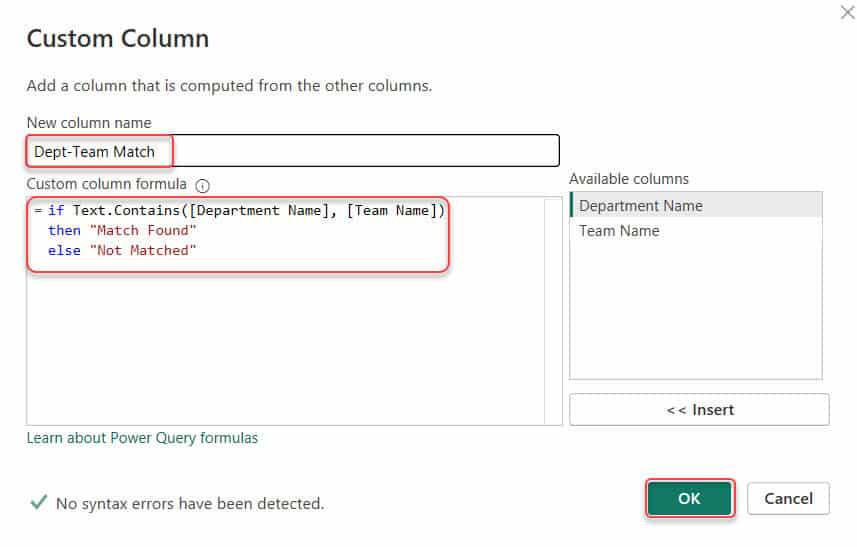
You will now see the Dept-Team Match column created using a custom column in the Power Query editor.

M Code:
= Table.AddColumn(Source, "Dept-Team Match", each
    if Text.Contains([Department Name], [Team Name])
    then "Match Found"
    else "Not Matched")
Add Column If Column Contains Blank or Null in Power BI
You may want to label rows where a column is empty. For example, if the Customer Email is blank or null, mark it as “Missing Email”.
Table:

Follow the steps below to create a custom column:
- Open Power Query Editor -> Go to the Add Column tab. Click Custom Column.
- In the formula box, write a condition like:
if [Customer Email] = null or [Customer Email] = "" or [Customer Email] = "null"
then "Missing Email"
else "Available"
Now, you will see the Dept-Team Match column created using a custom column in the Power Query editor.

M code:
= Table.AddColumn(Source, "Email Status", each
    if [Customer Email] = null or [Customer Email] = "" or [Customer Email] = "null"
    then "Missing Email"
    else "Available")
In this tutorial, you learned different ways to add a column in Power Query when a value “contains” specific text. I started with a simple example using the Custom Column option and the Text.Contains a function. Then I showed how to do the same using M code in the Advanced Editor.
You also learned how to check for multiple keywords, how to detect numbers or special text inside a column, how to match text from another column, and how to identify blank or null values.
You may like the following Power BI tutorials:
- Add an Empty Column in Power BI
- Add Column With a Fixed Value in Power BI
- Add Column from Another Table in Power BI
- Duplicate Column using Power Query in Power BI
- Convert Date Time From Local Time to UTC time Using Power Query

Hey! I’m Bijay Kumar, founder of SPGuides.com and a Microsoft Business Applications MVP (Power Automate, Power Apps). I launched this site in 2020 because I truly enjoy working with SharePoint, Power Platform, and SharePoint Framework (SPFx), and wanted to share that passion through step-by-step tutorials, guides, and training videos. My mission is to help you learn these technologies so you can utilize SharePoint, enhance productivity, and potentially build business solutions along the way.