
In my organization, when I am creating a Power BI dashboard, and many times I need to add new columns based on different conditions. Sometimes I must check multiple rules, use AND/OR, or handle errors in the data. I also need to add a column only if it doesn’t already exist. Power Query makes all these tasks easy with simple IF statements.
In this tutorial, I will show how to use different types of IF conditions in Power Query. We will look at examples using AND, OR, multiple IF statements, checking errors, and adding a column only when it is missing.
IF Statement in Power Query
In Power Query, the IF statement is used to check a condition and return a value based on whether the condition is true or false. It works just like IF in Excel, but the syntax is different.
IF Statement Syntax in Power Query:
if <condition> then <result_if_true> else <result_if_false>You can use it to classify data, check numbers, compare text, or create flags inside your dataset.
Example:
if [Quantity] > 1 then "Bulk Order" else "Single Order"
This checks the condition and returns the correct value based on the result.
For this example, I created an Orders table with the following data:
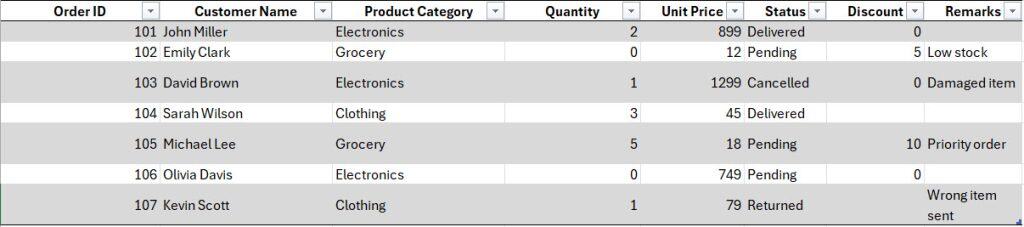
Add Column Using IF Statement With AND in Power Query
Sometimes you may need to check two conditions at the same time before assigning a value. For example, in the Orders table, I want to mark an order as High Priority only when the Quantity is greater than 1, and the Status is “Delivered.” If both conditions are true, the result should be High Priority; otherwise, it should be marked as Normal.
To do this, follow the steps below:
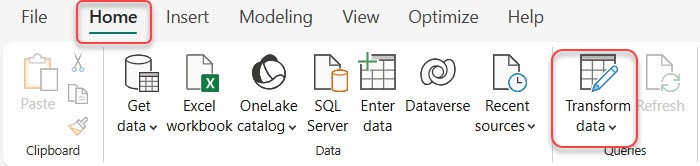
- First, load the table into Power BI Desktop. Then, in the ribbon, go to the Home tab and click Transform Data. This will open the Power Query Editor, where we will create the new column.
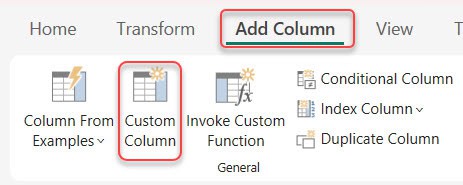
- Inside Power Query Editor, go to the Add Column tab and click Custom Column.
- A pop-up window will appear where you can enter the column details. Fill in the fields like this:
- New Column Name: Priority
- Formula:
if [Quantity] > 1 and [Status] = "Delivered"
then "High Priority"
else "Normal"
This formula checks both conditions at the same time. If Quantity is more than 1 and the Status is Delivered, the result will be “High Priority.” If any condition is false, it will return “Normal.”
- Then click on OK.

- You will now see a Priority column based on both conditions.
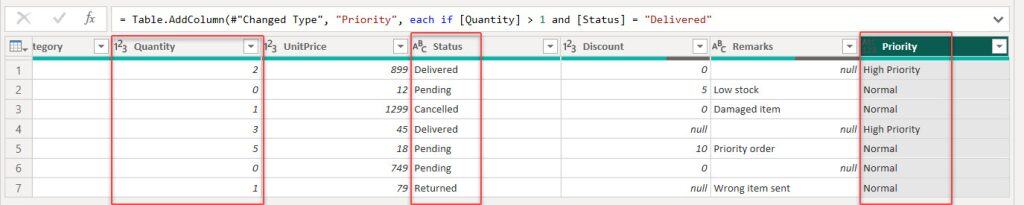
If you want to create the same column using M code directly, you can paste the code below into the Advanced Editor:
= Table.AddColumn(Source, "Priority", each
    if [Quantity] > 1 and [Status] = "Delivered"
    then "High Priority"
    else "Normal")
This will give you the same result using M code.
Add Column using IF Statement With OR in POwer BI Power Query
In this example, I need to check if any one of multiple conditions is true, and for that, you use the OR condition.
For example, in the Orders table, I want to mark an order as “Special Case” when the Status is “Pending,” or the Quantity is 0. If any one of these conditions is true, the order becomes a Special Case; otherwise, it should be marked as Normal.
Now follow the steps below:
- In Power BI Desktop, go to the Home tab and click Transform Data.
- In the Power Query Editor, go to the Add Column tab and click Custom Column.
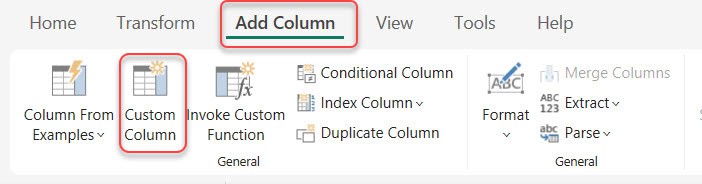
- A pop-up window will appear where we will create the new column. Enter the details like this:
- New Column Name: Case Type
- Formula:
if [Status] = "Pending" or [Quantity] = 0
then "Special Case"
else "Normal"
This formula checks if either the Status is Pending or the Quantity is 0. If any one of the conditions is true, the result will be “Special Case”. If both are false, it will return “Normal”.
After entering the formula, click OK. You will now see a new column named Case Type created based on the OR condition.
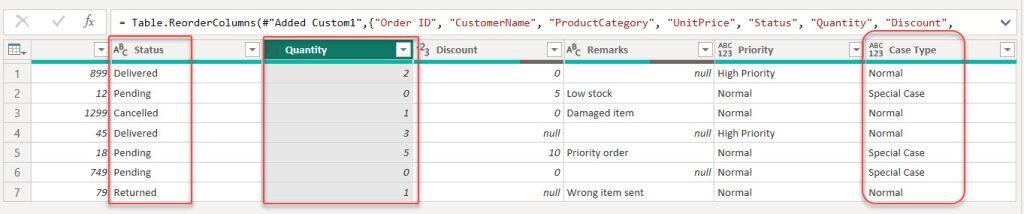
If you want to do the same thing using M code, use the code below:
= Table.AddColumn(Source, "Case Type", each
    if [Status] = "Pending" or [Quantity] = 0
    then "Special Case"
    else "Normal")
This gives the same result using the M code.
Add Column Using Multiple IF Statements in Power BI Power Query
In the Orders table, I want to categorize orders into three groups: if the Quantity is greater than 10, mark it as “Large Order”; if the Quantity is between 5 and 10, mark it as “Medium Order”; and if it is less than 5, mark it as “Small Order.”
Syntax: Multiple IF Statements in Power Query
if condition1 then result1
else if condition2 then result2
else if condition3 then result3
else defaultResult
To do this, follow the steps below:
- Load the table into Power BI Desktop, then on the Home tab, click Transform Data.
- The Power Query Editor will then open. Go to the Add Column tab. Select Custom Column.
- In the formula box, write your multiple IF conditions.
- New Column Name: Quantity Categorize
- Formula:
= if [Quantity] < 10 then "Low Stock"
else if [Quantity] >= 10 and [Quantity] <= 50 then "Medium Stock"
else if [Quantity] > 50 then "High Stock"
else "Not Available"- Click OK to create the new column.

- A new column will be added showing the Quantity Categorize based on your IF logic with AND conditions.

Add Column Using EACH IF in Power BI Power Query
In this example, I want to create a new column using the each + if method in Power Query. Each keyword applies the logic to every row, and the if statement helps us check conditions and return the correct value.
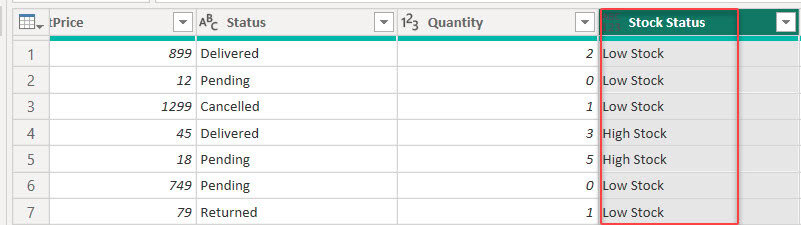
For example, in the Orders table, I want to categorize the orders based on Quantity. If the Quantity is less than 3, I want to mark it as “Low Stock”; otherwise, it should be marked as “High Stock.”
Now follow the steps below:
- Inside the Power Query Editor, go to the Add Column tab and click Custom Column.
- A pop-up window will appear where we will create the new column. Fill in the details like this:
- New Column Name: Stock Status
- Formula:
each if [Quantity] < 3
then "Low Stock"
else "High Stock"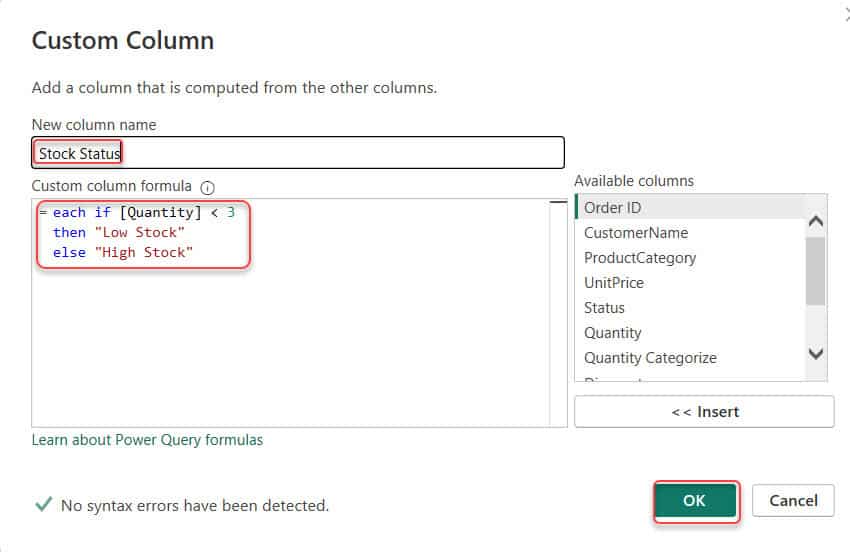
- After entering the formula, click OK. You will now see a new column named Stock Status, created using the each if condition.
Add Column If It Doesn’t Exist Using Power Query in Power BI
Now I want to add a column only if it doesn’t already exist in the table.
In this example, I want to check if the column “Discount” exists in the Orders table. If it does not exist, I will create the column and set its value to 0.
Now follow the steps below:
- In Power BI Desktop, go to the Home tab and click Transform Data.
- Inside the Power Query Editor, go to the Advanced Editor under the View tab, because this logic is added using M code.

- Replace or add this code inside the query:
,
    AddDiscountColumn =
        if List.Contains(Table.ColumnNames(Source), "Discount")
        then Source
        else Table.AddColumn(Source, "Discount", each 0)
in
    AddDiscountColumn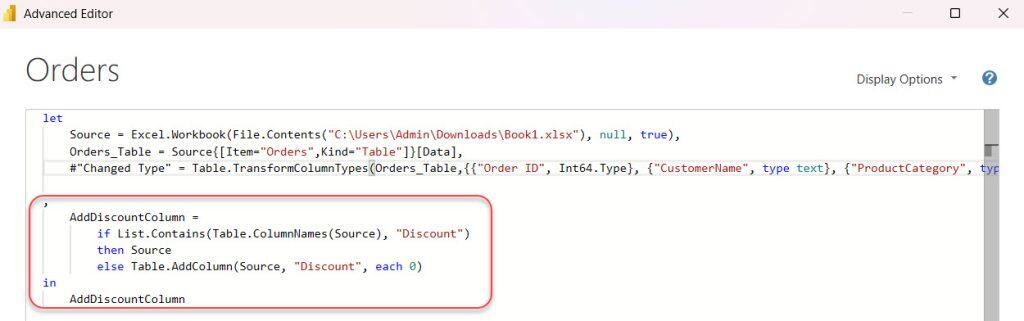
This code first loads the table and then checks whether the Discount column exists.
- If the column already exists, Power Query keeps the table as it is.
- If the column does not exist, Power Query automatically adds the Discount column and fills it with 0 for every row.
After adding the code, click Done, and you will now see the Discount column only when it was missing in the original data.
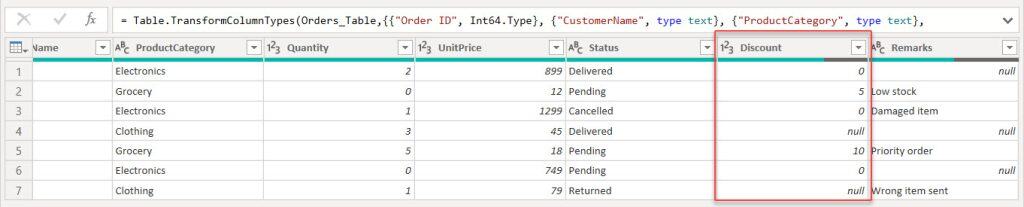
In my case, I have the column, so it is not added.
Add Column If an Error in Power BI Power Query
Sometimes your data may have errors, for example, dividing a number by zero or trying to convert a text value into a number. To avoid this, you can add a new column that checks if an error occurs and returns a safe value instead.
Syntax:
try [YourExpression] otherwise [DefaultValue]In the Orders table, let’s say we want to calculate Price Per Unit by dividing UnitPrice by Quantity. But you know our Quantity column has some zero values, so when we divide it, it will show an error. So we will add a new column that checks for errors and returns a default value instead of an error.
To do this, follow the steps below:
- Load your table into Power BI Desktop and open the Power Query Editor by clicking Transform Data.
- In the Power Query Editor, go to the Add Column tab and click Custom Column.
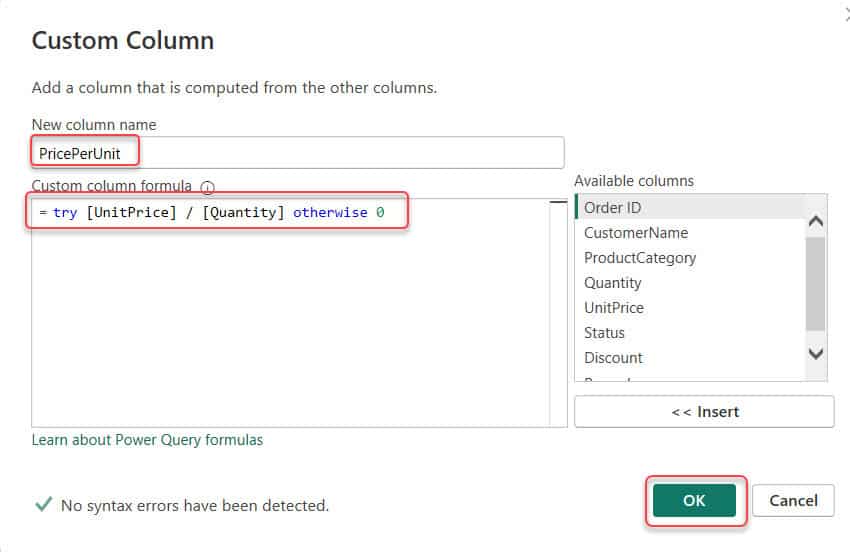
- A pop-up window will appear. Enter the details like this:
- New Column Name: PricePerUnit
- Formula:
try [UnitPrice] / [Quantity] otherwise 0This formula first tries to divide UnitPrice by Quantity.
- If the division works, it returns the correct value.
- If an error occurs (like Quantity = 0), it returns zero instead.
- You will now see a new PricePerUnit column added without any errors.
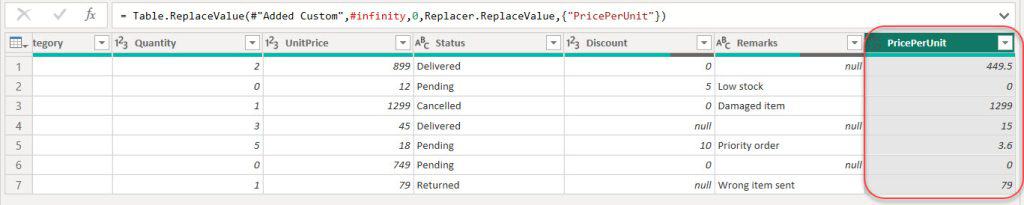
Note: If it is showing, ∞ then you can use the Power Query replace function.
Conclusion
In this tutorial, I explained different ways to use the IF statement in Power Query to handle real-life data problems in Power BI. You learned how to create new columns using AND, OR, and multiple IF conditions, and how to use the each + if method.
I also explained how to add a column only if it does not already exist, and how to handle situations where a calculation might cause an error by using the try…otherwise formula.
Furthermore, you may like some more Power BI tutorials:
- Add Column With a Fixed Value in Power BI
- Duplicate Column using Power Query in Power BI
- Add Column If Contains in Power Query Power BI
- Add a Column If Blank or Null in Power BI Power Query

Hey! I’m Bijay Kumar, founder of SPGuides.com and a Microsoft Business Applications MVP (Power Automate, Power Apps). I launched this site in 2020 because I truly enjoy working with SharePoint, Power Platform, and SharePoint Framework (SPFx), and wanted to share that passion through step-by-step tutorials, guides, and training videos. My mission is to help you learn these technologies so you can utilize SharePoint, enhance productivity, and potentially build business solutions along the way.