If you’ve been wanting to build custom web parts or extensions for SharePoint, the very first thing you need to do is set up your SharePoint Framework (SPFx) development environment.
With SPFx 1.22, things have changed. Microsoft has introduced a new build system called Heft, which replaces Gulp and handles the build process more structurally.
I’m going to walk you through every step — explain what each tool actually does, why you’re installing it, and flag the important gotchas along the way. By the end, your machine will be fully ready to build real SharePoint solutions.
This tutorial walks you through setting up your SPFx development environment using the Heft toolchain step by step. After this, i
This Guide Is for SPFx v1.22 and Above (Heft-Based Toolchain)
Here’s something you absolutely need to know before anything else: SPFx v1.22 introduced a brand-new toolchain called Heft, replacing the older Gulp-based build system that was used from SPFx v1.0 all the way through v1.21.1.
This matters because:
- If you’re building on SPFx v1.22 or newer → you’re on the Heft-based toolchain. This guide is for you.
- If you’re building on SPFx v1.0 through v1.21.1, including any on-premises SharePoint Server deployment → you’re on the Gulp-based (legacy) toolchain. Then check this: Set up your SharePoint Framework Gulp-based development environment.
Not sure which version you need? If you’re building for SharePoint Online with no constraints, just follow this guide — it uses the latest SPFx. If you need to support a specific version of SharePoint Server on-premises, check the version number requirements first before installing anything.
The toolchain change is significant. Build configurations, commands, and customizations all changed between these two toolchains. The command you’ll use to run your project locally, for example, is heft in the new toolchain — not gulp serve. I’ll cover all of that clearly as we go.
Let’s first understand what Heft is in SPFx.
What is Heft in SharePoint Framework (SPFx) and Why Do We Need This?
In SharePoint Framework (SPFx), Heft is the modern tool that handles everything required to build and package your solution. Earlier, SPFx relied on Gulp, which required developers to manage multiple tasks and configurations manually.
Heft simplifies this by providing a standardized and optimized way to run all build-related activities with minimal setup. For a beginner, you can think of Heft as the system that quietly takes your code, processes it, and prepares it so SharePoint can use it.
When you work on an SPFx project, you typically write code in TypeScript and use modern libraries like React. However, SharePoint cannot directly use that raw code. This is where Heft comes in. It compiles your code, bundles all the files together, checks for errors, and prepares the final package that can be deployed. All of this happens behind the scenes when you run simple commands in your terminal.
Heft provides a set of commands that you’ll use regularly during development. The most common one is:
heft build→ Compiles your project and prepares the build output.
If you want to remove old build files and start fresh, you can use:
heft clean→ Deletes previously generated files and clears the build cache.
For local development, especially when testing your web part in the browser, you’ll use:
heft start→ Starts the local development environment and serves your solution.
Once your solution is ready, you need to package it so it can be deployed to SharePoint. For that, Heft provides:
heft package-solution→ Creates the.sppkgfile used for deployment.
If you’re preparing your solution for production, you should use:
heft package-solution --production→ Generates an optimized, production-ready package.
During development, especially when testing locally over HTTPS, you might need:
heft trust-dev-cert→ Installs and trusts a development certificate for secure local testing.
In simple terms, Heft is what keeps your SPFx development smooth and consistent. Instead of worrying about how your code is compiled or packaged, you just run these commands, and Heft takes care of the rest. As you grow more comfortable with SPFx, you might explore customizing Heft, but for most developers—especially beginners—it works perfectly out of the box.
Check out How to Change Solution Name in SPFx
Set Up Your Microsoft 365 Tenant First
SPFx solutions run in SharePoint Online, so you need somewhere to test them. Before following the installation steps below, make sure you have a Microsoft 365 tenant ready. If you don’t have one, go to developer.microsoft.com and sign up for the free Microsoft 365 Developer Program — it gives you a sandbox tenant you can use freely for development.
You Can Use Any Operating System
One of the great things about SPFx is that you are not locked into Windows. You can use macOS, Windows, or Linux — all are fully supported.
Step 1: Install Node.js v22 LTS
The first thing to install is Node.js. Think of Node.js as the engine that powers all the SPFx developer tools. Without it, nothing else will work.
The version you need is Node.js v22 LTS (also known by its codename “Jod”).
This is the recommended version for SPFx v1.22.*. If you’re working on a project using a different SPFx version, verify that your Node.js version is supported for that particular SPFx release before installing.
LTS vs. Current — What You Need to Know
Node.js always maintains two release tracks simultaneously:
- LTS (Long Term Support): Stable, thoroughly tested, and the version that SPFx officially supports.
- Current: Has newer features but is not supported by SPFx. Avoid it for SPFx development.
Always install an LTS version. SPFx is only supported on LTS versions of Node.js, so do not install the “Current” release even if it looks newer on the Node.js website.
How to Download Node.js
Here’s how to find the right installer:
- Go to the Node.js website (
nodejs.org) and navigate to the Downloads page to find a specific version. - Windows users: Look for the
.msiinstaller files. There are usually two — one for x86 and one for x64 systems. The filenames look likenode-v{version-number}-x86.msiornode-v{version-number}-x64.msi. Most modern Windows machines are 64-bit, so you’ll want the x64 version. - macOS users: Look for the
.pkginstaller, usually namednode-v{version-number}.pkg.
Verify Your Installation
After installing Node.js, open your terminal (Command Prompt or PowerShell on Windows, Terminal on macOS/Linux) and run:
node --version
You should see a version number like v22.x.x. If that appears, Node.js is successfully installed, and you’re ready to move on.
Already have Node.js installed? Run
node --versionfirst. If you have v22 LTS already, you’re good to go. If you have a different version and need to work with multiple SPFx versions across different projects, consider using Node Version Manager (NVM) — more on that later.
Read How to Create a Modal Popup in SPFx
Step 2: Install a Code Editor
Next, you need a code editor to write your TypeScript and configuration files. You can use any editor you’re comfortable with — SPFx has no requirement here.
That said, I recommended using Visual Studio Code (VS Code) for all its examples, and I’d strongly recommend it for beginners and experienced developers alike. It’s free, cross-platform, has a built-in terminal (which is super handy for running SPFx commands without switching windows), and has excellent extension support.
If you prefer WebStorm from JetBrains, that’s also a perfectly valid choice.
Download VS Code from code.visualstudio.com and install it for your platform.
Step 3: Install the Development Toolchain Prerequisites
This is the most important step of the entire setup. SPFx’s build and development toolchain relies on several open-source tools. While most project-level dependencies install automatically when you create a new project, there are three tools you need to install globally on your machine:
- Heft — the build tool (new in SPFx v1.22)
- Yeoman (yo) — the project scaffolding wizard
- Yeoman SharePoint Generator — the SPFx-specific plugin for Yeoman
Microsoft gives you a helpful shortcut — you can install all three with a single command:
npm install @rushstack/heft yo @microsoft/generator-sharepoint --global
Or, if you prefer to install them one at a time and understand what each does, here’s the breakdown:
Install Heft
Heft is the new build toolchain introduced with SPFx v1.22. It replaces Gulp as the primary build engine and orchestrates other popular tools like TypeScript, ESLint, Jest, Webpack, and API Extractor under the hood. If you’re familiar with task runners like Gulp or Grunt, Heft plays a very similar role — but it’s designed for large-scale, consistent use across many projects.
To install Heft globally:
npm install @rushstack/heft --global
Why install it globally? Technically, Heft doesn’t need to be installed globally — it’s included inside each project you create. But installing it globally makes it much easier to run Heft commands directly from your terminal without navigating into each project’s local binaries. The Microsoft documentation recommends global installation for this reason.
Important — What if you’re on SPFx v1.21.x or older? You should not install Heft. Older projects use the Gulp-based toolchain, and their setup guide tells you to install
gulp-cliglobally instead. The tools are different, the commands are different, and mixing them up will cause confusion.
Install Yeoman
Yeoman (yo) is a project scaffolding tool. It asks you a series of questions in an interactive wizard and then automatically generates a complete, correctly structured SPFx project for you — with all the right folders, TypeScript configuration, build settings, and boilerplate code already in place.
To install Yeoman globally:
npm install yo --global
Install the Yeoman SharePoint Generator
The Yeoman SharePoint Generator is the SPFx-specific plugin that powers the wizard when you create a new project. Without it, Yeoman wouldn’t know how to scaffold an SPFx solution. It’s what makes Yeoman ask you things like “What type of component do you want to create?” and “Which JavaScript framework do you want to use?”
To install it globally:
npm install @microsoft/generator-sharepoint --global
Check out Bind SharePoint List Items to SPFx Fluent UI React Dropdown
Step 4: Install a Modern Web Browser
You’ll need a modern web browser for testing and debugging your solutions in the SharePoint workbench. The Microsoft documentation recommends any of the following:
- Microsoft Edge
- Google Chrome
- Firefox
All three are excellent choices with strong developer tools. Avoid Internet Explorer — it’s not supported for SPFx development.
Step 5: Trust the Self-Signed Developer Certificate
When you test an SPFx solution locally, it runs on a local development server that uses HTTPS by default. This local server uses a self-signed SSL certificate — a certificate that isn’t issued by a trusted certificate authority. By default, your operating system and browser will not trust this certificate, which means you’ll get a security warning or blocked page when you try to load the workbench.
To fix this, you need to register the certificate as trusted on your machine. SPFx includes a built-in Heft command to do this.
When to Run This Command
You can run this command either now or after you create your first project. I recommend running this command after you create your first project. The command needs to be run from inside an SPFx project folder (after running npm install to install the project dependencies), so if you haven’t created a project yet, you can come back to this step.
Once you have a project created and npm install has been run inside the project root, execute:
heft trust-dev-cert
Note for SPFx v1.21.x and older (Gulp-based projects): The equivalent command in the old toolchain was
gulp trust-dev-cert. If you’re working on a legacy project, use the Gulp command instead.
You only need to do this once per machine. After the certificate is trusted, all future SPFx projects on the same machine will work without needing to repeat this step.
Check out Customize SharePoint List Command Bar Download Button Using SPFx Extension
Step 6: Set the SPFX_SERVE_TENANT_DOMAIN Environment Variable (Optional but Recommended)
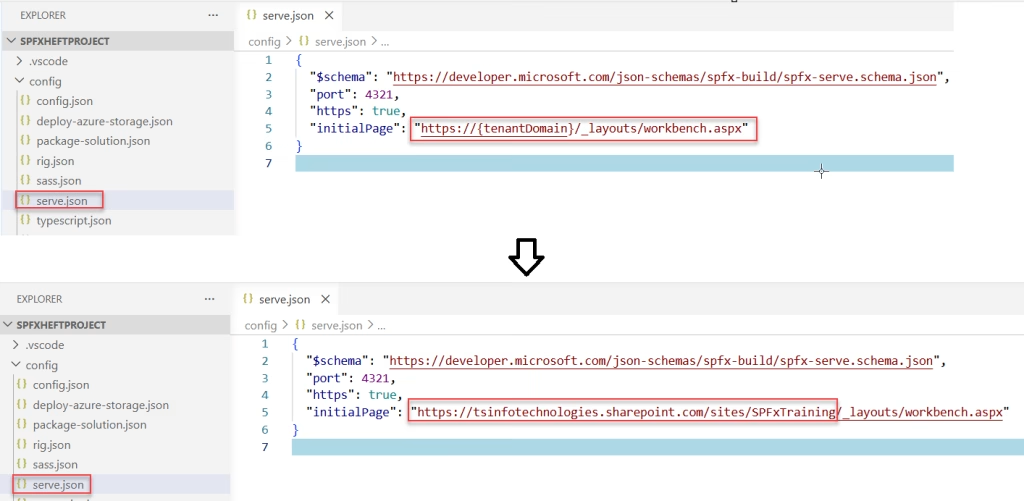
Starting with SPFx v1.17, the hosted workbench URL used during development was changed to use a dynamic placeholder. If you open a project’s ./config/serve.json file, you’ll see this:
{
  "$schema": "https://developer.microsoft.com/json-schemas/spfx-build/spfx-serve.schema.json",
  "port": 4321,
  "https": true,
  "initialPage": "https://{tenantDomain}/_layouts/workbench.aspx"
}
Notice the {tenantDomain} placeholder. When you run the serve command to test your solution, SPFx automatically replaces this placeholder with the value of an environment variable called SPFX_SERVE_TENANT_DOMAIN on your system.
This is useful because it means you configure your SharePoint tenant domain once at the operating system level, and every SPFx project you create picks it up automatically. You won’t need to manually edit the serve.json file in every project.
The variable supports not just the tenant domain but also full site URLs in other serve configurations — for example, if you’re building a Field Customizer and have a pageUrl in your serve config with a {tenantDomain} placeholder, it will be replaced the same way.
How to Set It
On Windows:
- Press
Win + Sand search for “Environment Variables” - Click “Edit the system environment variables”
- Under “User variables”, click “New”
- Set the Variable name to
SPFX_SERVE_TENANT_DOMAIN - Set the Variable value to your SharePoint tenant domain, e.g.,
contoso.sharepoint.com - Click OK and restart your terminal
On macOS/Linux:
Add the following line to your shell profile file (~/.zshrc for Zsh, ~/.bashrc for Bash):
export SPFX_SERVE_TENANT_DOMAIN=contoso.sharepoint.com
Then restart your terminal or run source ~/.zshrc to apply the change immediately.
Read Upload File to SharePoint Document Library With Metadata in SPFx
Quick Verification: Are All Your Tools Installed?
Once you’ve completed the steps above, you can verify everything is in place by running this command in your terminal:
npm list --global --depth=0
This lists all globally installed npm packages. You should see:
@rushstack/heftyo@microsoft/generator-sharepoint
If any of these are missing, re-run the install command for that specific package.
Develop Your First Client-Side Web Part using SPFx
With all the tools installed and your developer certificate trusted, your machine is completely set up for SharePoint Framework development. The next step is scaffolding your very first SPFx project. Now we will create our first SPFx client-side web part.
You can also create a folder:
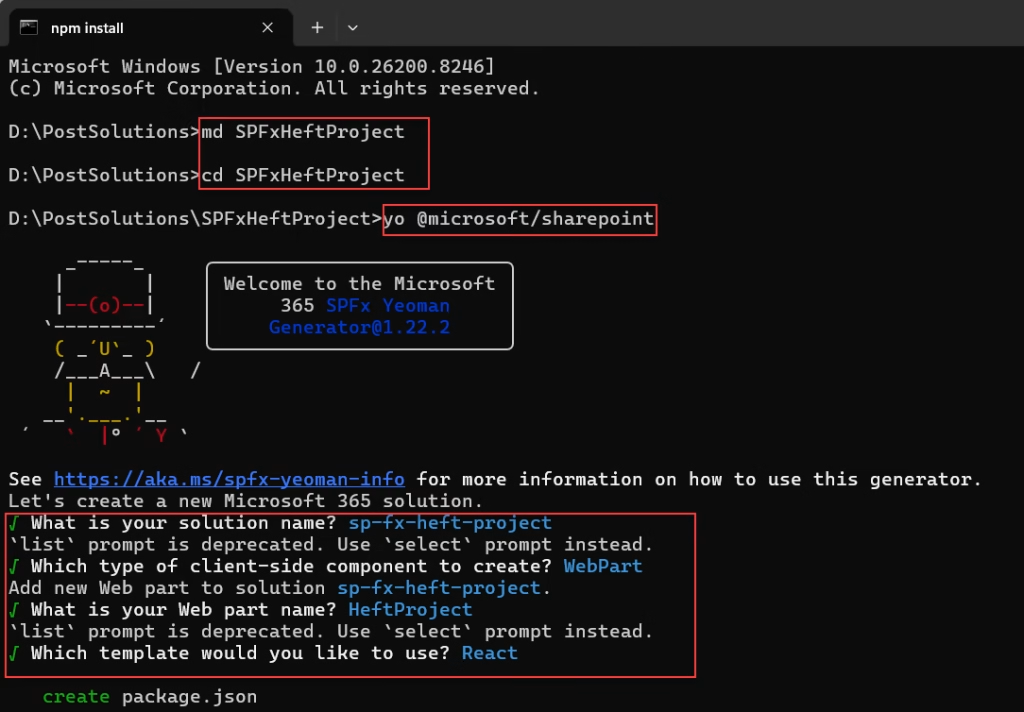
md SPFxHeftProject
cd SPFxHeftProject
Open your terminal, navigate to the folder where you’d like to create the project, and run:
yo @microsoft/sharepointYeoman will launch an interactive wizard. It will ask you for your solution name, the type of component you want to create (web part, extension, etc.), and your preferred JavaScript framework.
When prompted:
- What is your solution name? sp-fx-heft-project
- Which type of client-side component to create? WebPart
- Add new Web part to solution sp-fx-heft-project.
- What is your Web part name? HeftProject
- Which template would you like to use? React
Here is a screenshot for your reference.
Understand What Just Changed
When the generator runs, it defaults to the Heft-based toolchain. You’ll notice immediately that the generated project looks slightly different from older projects:
- There’s no
gulpfile.js - There’s a
./config/rig.jsonfile - There’s a
./config/sass.jsonthat extends the rig configuration - There’s a
./config/typescript.jsonfor TypeScript plugin settings - The
package.jsonscripts callheftinstead ofgulp
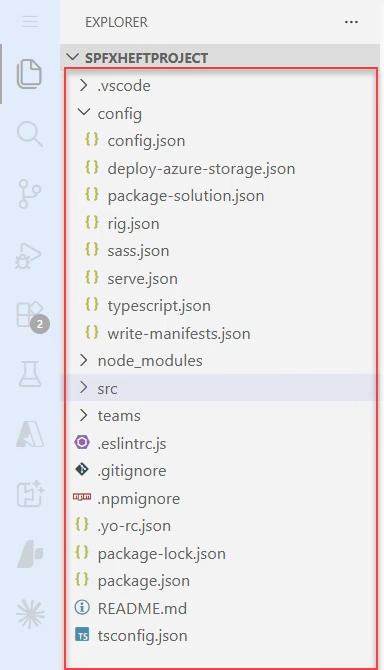
This confirms you’re using the new Heft-based build system. This is the key difference compared to older SPFx projects. The Gulf file is also not there.
Your new package.json scripts section will look like this:
  "scripts": {
    "build": "heft test --clean --production && heft package-solution --production",
    "start": "heft start --clean",
    "clean": "heft clean",
    "eject-webpack": "heft eject-webpack"
  }
You can refer to the screenshot below:
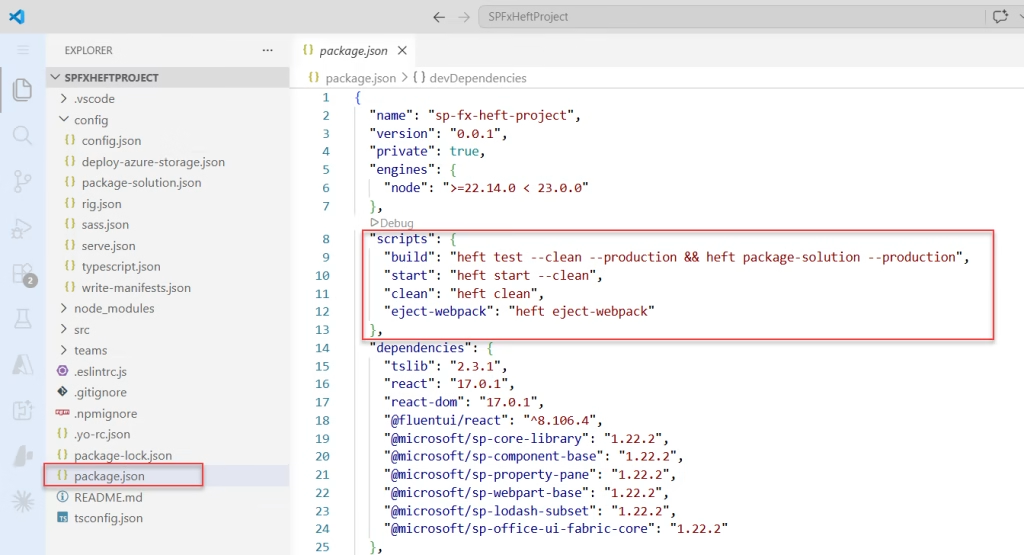
Notice a couple of things here. First, the bundle task is gone — in Heft, build handles both building and bundling in one step. Second, there’s a brand new deploy command (heft dev-deploy) that didn’t exist in the Gulp world.
After npm install finishes, if you haven’t already, run:
heft trust-dev-cert
Update the Workbench URL
Before testing your web part, make sure to update the initialPage in the serve.json file. Replace {tenantDomain} with your actual SharePoint tenant URL so the local workbench opens correctly in your environment. You can check the screenshot below.
Run the Project
Instead of the old Gulp command:
gulp serve
You now use:
npm run start
# or
heft start --clean
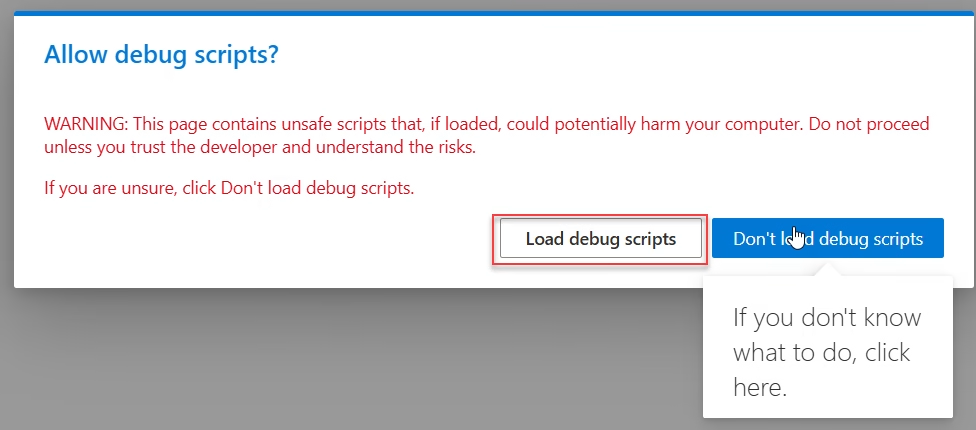
After running the command, the local workbench will open in your browser. At this point, you may see a prompt asking “Allow debug scripts?”. This is expected when running SPFx solutions locally, as the page is loading scripts from your development machine.
Since you are testing your own code, you can safely click “Load debug scripts” to proceed and continue testing your web part.
Then, the page below will open. Click the + Add icon and find your web part. You can either search for your web part name, and it will display.

Once you’re confident that your SPFx web part is working as expected, the next step is to prepare it for deployment. Run the command below to create the package, and once it completes, you’ll find the .sppkg file inside the sharepoint folder, as shown in the image below.
heft package-solution --production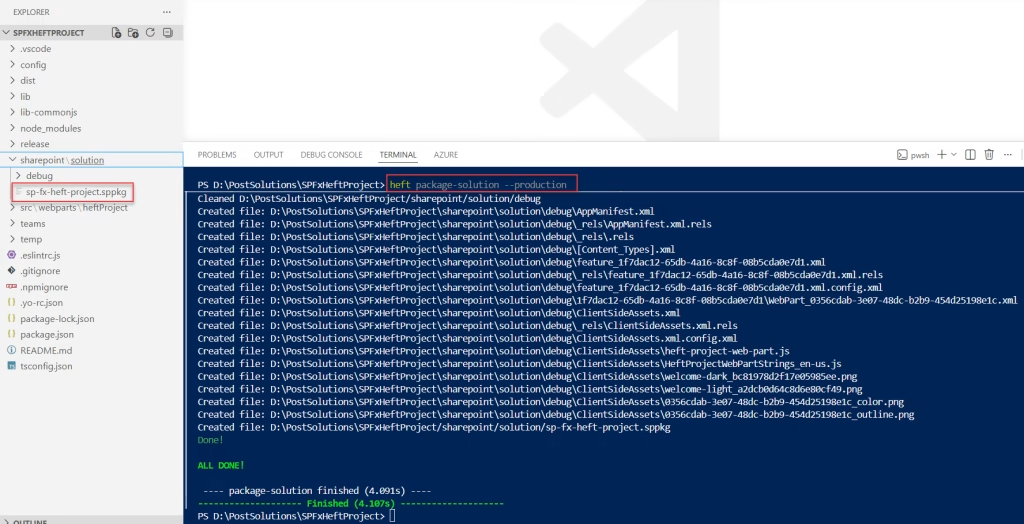
Now upload the generated .sppkg file to your tenant app catalog or site collection app catalog. The deployment process remains the same as before, so you can follow the usual steps you’ve already used for deploying SPFx solutions.
The Building Blocks: Actions, Phases, Tasks, and Rigs
Now you need to understand how Heft organizes work. It has a specific vocabulary, and once you know these four terms, everything clicks.
- Actions are the top-level commands you run from the CLI. For example, heft build, heft test, heft start. These are similar to the gulp tasks you used to have.
- Phases are logical groupings of work within an action. The
buildaction might contain abuildphase and atestphase. - Tasks live inside phases. A task is a single unit of work — like compiling TypeScript, compiling Sass, or running ESLint.
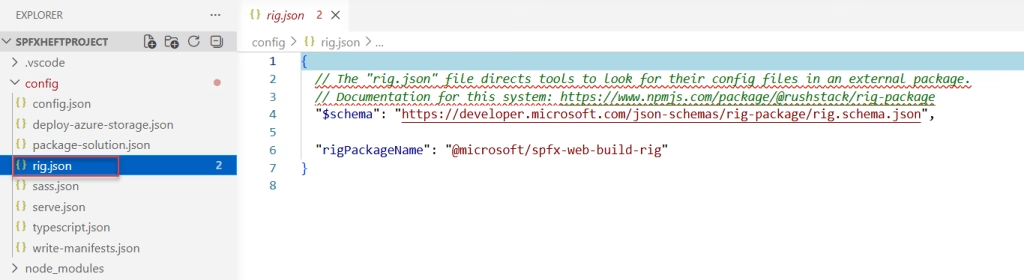
- Rigs are the really clever part. A rig is a shared, reusable configuration package. Instead of every SPFx project carrying its own massive
heft.jsonfile with all the build logic, your project points to a rig package (@microsoft/spfx-web-build-rig) that contains all the default build configuration. Your project only defines what’s different from the default.
In practice, a new SPFx v1.22 project has a very lean ./config/rig.json file that looks like this:
{
  "$schema": "https://developer.microsoft.com/json-schemas/rig-package/rig.schema.json",
  "rigPackageName": "@microsoft/spfx-web-build-rig"
}
That single file tells Heft: “use all the build phases, tasks, and configurations defined in the SPFx rig package.” Clean and simple.
Read Build a Custom Slides Manager in SPFx Web Part Property Pane
Heft vs. Gulp — A Clear Summary
Since this distinction causes a lot of confusion, let me summarize it clearly in one place:
| Heft-Based Toolchain | Gulp-Based Toolchain (Legacy) | |
|---|---|---|
| SPFx versions | v1.22.0 and above | v1.0 through v1.21.1 |
| Targets | SharePoint Online (latest) | SharePoint Online + on-premises |
| Global install | @rushstack/heft | gulp-cli |
| Local dev command | heft serve or npm run serve | gulp serve |
| Trust certificate | heft trust-dev-cert | gulp trust-dev-cert |
If you’ve been using the old toolchain, here’s the side-by-side comparison you need:
| What you used to run (Gulp) | What you run now (Heft) |
|---|---|
gulp build | heft build |
gulp bundle | (merged into heft build) |
gulp clean | heft clean |
gulp test | heft test |
gulp serve | heft start |
gulp package-solution | heft package-solution |
gulp package-solution --ship | heft package-solution --production |
gulp deploy-azure-storage | heft deploy-azure-storage |
gulp trust-dev-cert | heft trust-dev-cert |
| (didn’t exist) | heft dev-deploy |
If you’re starting fresh with SharePoint Online, always use the Heft-based toolchain. If you open someone else’s older project, check the SPFx version in package.json to know which toolchain applies.
Manage Multiple SPFx Versions on One Machine
As you work on more projects over time, you may encounter situations where different projects require different SPFx versions — and therefore different Node.js versions. This is common when maintaining legacy solutions alongside new ones.
The Microsoft documentation suggests these approaches:
- Node Version Manager (NVM): Install multiple Node.js versions side-by-side and switch between them with a single command. For macOS/Linux, use
nvm. For Windows, usenvm-windows. This is the most practical approach for most developers. - Virtual Machines: Run each environment in a completely isolated VM.
- Docker: Use Docker containers to fully isolate each environment.
For most developers, NVM is the simplest solution. Once it’s installed, switching Node.js versions is as easy as typing nvm use 22 or nvm use 18.
Conclusion
In this tutorial, I explained how to set up your SPFx development environment using the Heft toolchain step by step. The key things to remember are: use Node.js v22 LTS, install the Heft toolchain (not Gulp) since you’re on SPFx v1.22+, and trust your developer certificate before testing locally. If you ever switch machines or work with an older project that uses SPFx v1.21.1 or below, refer back to the Gulp-based setup guide — the commands and tools are different.
From here, every SPFx project you scaffold will follow the same pattern: run yo @microsoft/sharepoint, answer the wizard, run npm install, and start building.
Do let me know in the comments below if you face any issues.
You may also like the following tutorials:
- Build a SharePoint Folder Tree View Using SharePoint Framework (SPFx)
- SharePoint Framework (SPFx) Interview Questions and Answers
- Display SharePoint List Items in SPFx Web Part
- Fluent UI React Dropdown in SharePoint Framework (SPFx)

Hey! I’m Bijay Kumar, founder of SPGuides.com and a Microsoft Business Applications MVP (Power Automate, Power Apps). I launched this site in 2020 because I truly enjoy working with SharePoint, Power Platform, and SharePoint Framework (SPFx), and wanted to share that passion through step-by-step tutorials, guides, and training videos. My mission is to help you learn these technologies so you can utilize SharePoint, enhance productivity, and potentially build business solutions along the way.

