
In many organizations, not every request can be approved by just one person. Some requests, such as budget increases, purchase orders, leave requests, or project approvals, require approval from multiple people in a specific order. First, the team lead; then the manager; then the finance team; and sometimes even the director.
If any one person rejects it, the whole process should stop.
If they approve it, the request should automatically move to the next approver.
This step-by-step process is called a Sequential Approval, and Power Automate makes it very easy to build using the Approval type: Sequential Approval option.
In this tutorial, I will show you how to create a Sequential Approval Flow in Power Automate.
Create a Sequential Approval Flow in Power Automate
Imagine your company requires three levels of approval for purchasing new equipment:
- Team Lead
- Department Manager
- Finance Team
Let’s say an employee requests a new laptop. The approval should happen in this order: Team Lead -> Manager -> Finance.
Only when the current approver approves should the request move to the next. If any one approver rejects, the process stops immediately.
Note:
The reqursted only notify once the every approver will approver or any one reject the request.
For this example, I created a SharePoint list called Purchase Request. Check the screenshot below:

Now follow the steps below:
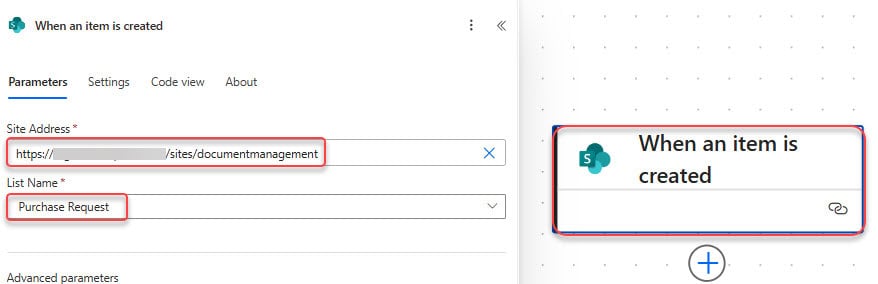
- Go to Power Automate -> Create an Automated Cloud Flow with a trigger, When a new item is created. Then provide the site address and list name.
- Next, add Start and wait for an approval, and provide parameters below:
- Approval type: Sequential Approval
- Title: Purchase Request – @{triggerBody()?[‘EmployeeName/DisplayName’]}
- Approval Steps: provide the information below, then click + Add new item to add more approvers.
- Assigned To – 1: @{triggerBody()?[‘TeamLead/Email’]}
- Assigned To – 2: @{triggerBody()?[‘DepartmentManager/Email’]}
- Assigned To – 3: @{triggerBody()?[‘FinanceTeam/Email’]}
- Details:
A new purchase request is awaiting your approval.

Employee: @{triggerOutputs()?['body/EmployeeName']}
Item: @{triggerOutputs()?['body/ItemRequested']}
Estimated Cost: ₹ @{triggerOutputs()?['body/EstimatedCost']}
Purpose: @{triggerOutputs()?['body/Purpose']}

Please review and take appropriate action.
- Add a Condition action to Check the Approval Outcome:
@{outputs('Start_and_wait_for_an_approval')?['body/outcome']} ends with Approve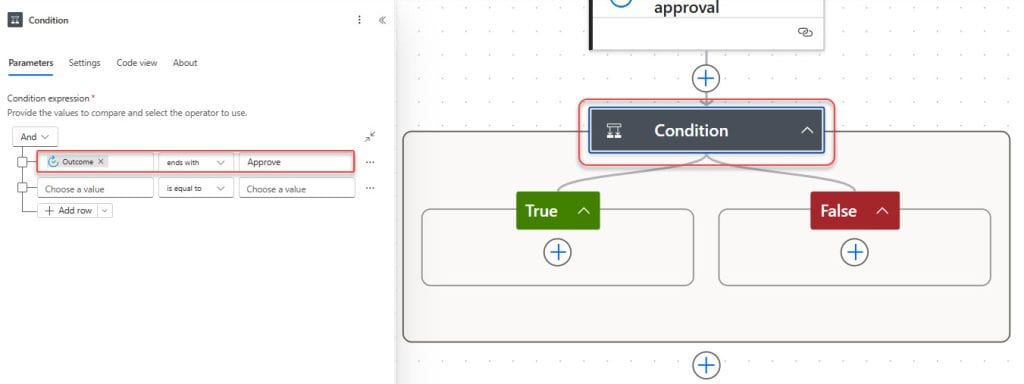
- In the TRUE Branch, add the Update item action and provide the parameters below:
- Site Address: Select the site address
- List Name: Purchase Request
- Id: Id from the dynamic content of the trigger
- Status Value: Approved
- Approval Summary: Response summary from the dynamic content of the approval action.

- Then add a Send an email action and provide the required parameters:
- To: @{Employee Email}
- Subject: Your purchase request is approved
- Body:
Hi @{Employee Name},
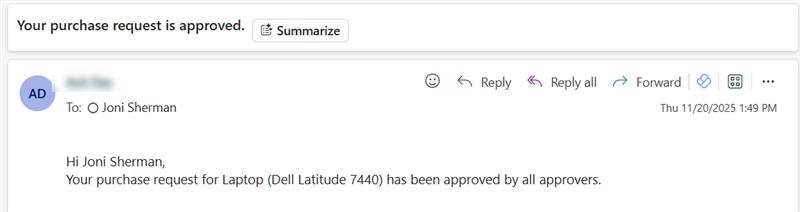
Your purchase request for @{Item Requested} has been approved by all approvers.
- In the same way, in the FALSE Branch, add an Update item action and send an email action:

Test the Sequential Approval Flow in Power Automate
Now that we have created the sequential approval flow, let’s test it. Go to the Sharepoint list and add a request:
| Field | Value |
|---|---|
| Employee Name | Join Sharma |
| Item Requested | Laptop (Dell Latitude 7440) |
| Estimated Cost | ₹ 92,000 |
| Purpose | For project development and client calls |
| Team Lead | Miriam Graham |
| Department Manager | Patti Fernandez |
| Finance Team | Lidia Holloway |

The first approver (Team Lead) receives the approval in:
- Outlook
- Microsoft Teams (Approvals app)
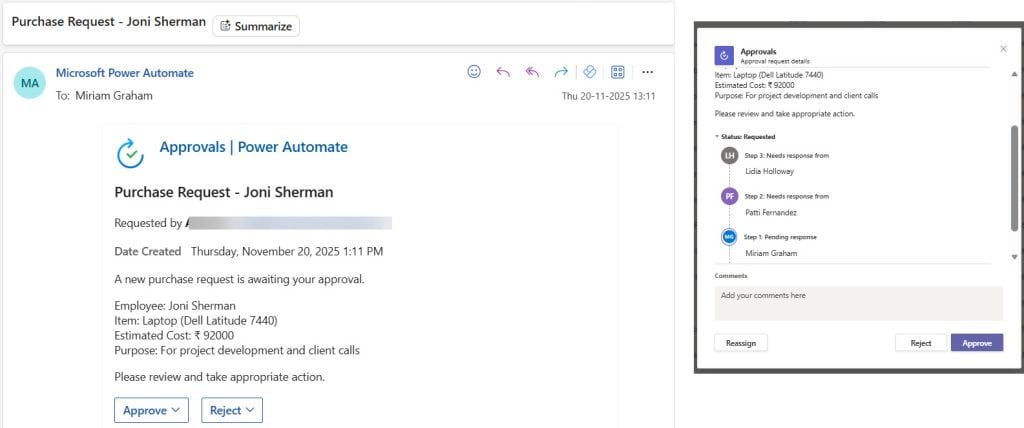
After the Team Lead approves, -> request goes to the Manager.
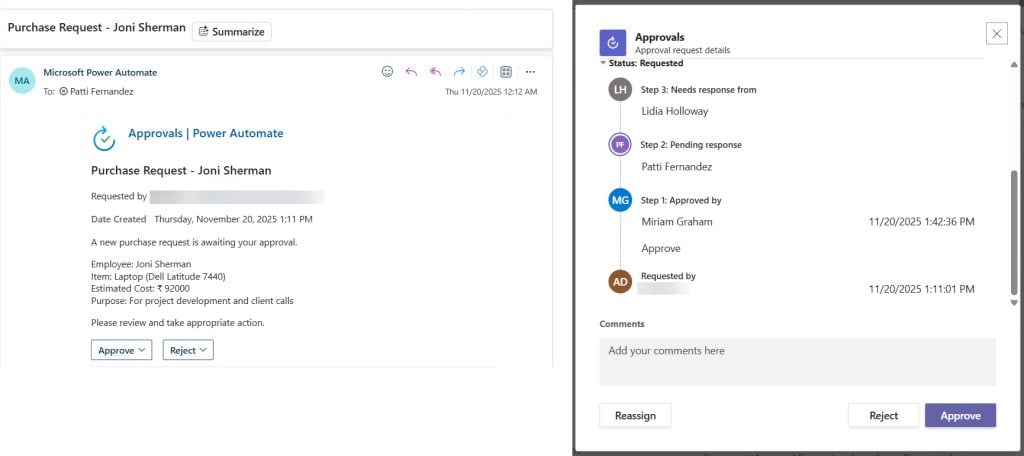
After the Manager approves, -> request goes to Finance.

After Finance approves, -> flow status changes to Approved.
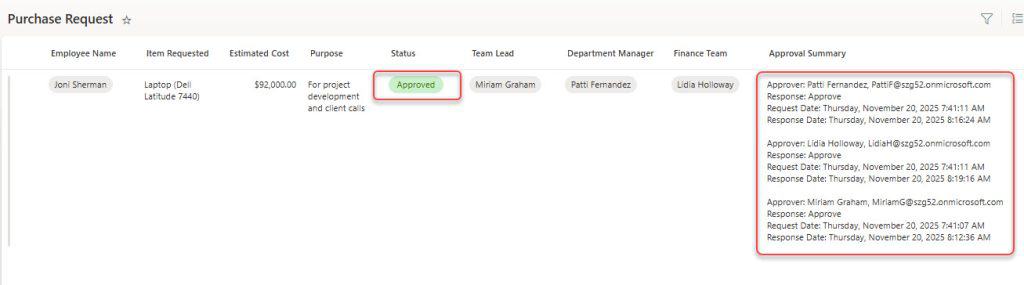
Employee receives final confirmation email.
If any approver rejects at any stage, -> process stops immediately.
In this tutorial, I explained how to build a Sequential Approval Flow in Power Automate, from setting up each approval stage to ensuring the process moves smoothly from one approver to the next.
Here, I have not added the attachment. If you want to add, you can check Add Power Automate Approval Attachments.
You may also like:
- Power Automate save email attachment to SharePoint
- Delete all files in a SharePoint folder using Power Automate
- Copy List Items To Another List In SharePoint Using Power Automate
- AttachmentContentNotValidBase64String Error in Power Automate

Hey! I’m Bijay Kumar, founder of SPGuides.com and a Microsoft Business Applications MVP (Power Automate, Power Apps). I launched this site in 2020 because I truly enjoy working with SharePoint, Power Platform, and SharePoint Framework (SPFx), and wanted to share that passion through step-by-step tutorials, guides, and training videos. My mission is to help you learn these technologies so you can utilize SharePoint, enhance productivity, and potentially build business solutions along the way.