
Retention policies in SharePoint help your organisation manage how long files and documents are kept and when they should be deleted.
Think of it like this: some documents are important and need to be kept for a specific period (for example, financial reports or employee records), while others may only be useful for a short time (like draft files or old notes).
In this SharePoint tutorial, I will explain the need to set up a retention policy in SharePoint Online and how to create Site Retention Policies in SharePoint step by step.
Why We Create SharePoint Site Retention Policies
By setting up a SharePoint retention policy, we can:
- Keep important documents safe for as long as you need them.
- Automatically delete old or unnecessary files after a specific time to save space and stay organised.
Example:
- For HR documents, a retention policy can keep employee records for 5 years after an employee leaves, and then automatically delete them.
- For Project sites, you can set a policy to keep all project documents for 2 years after the project is finished. After 2 years, SharePoint will automatically delete those old files to free up storage space and keep things organised.
Create Site Retention Policies in SharePoint
To create SharePoint site retention policies, follow the instructions below:
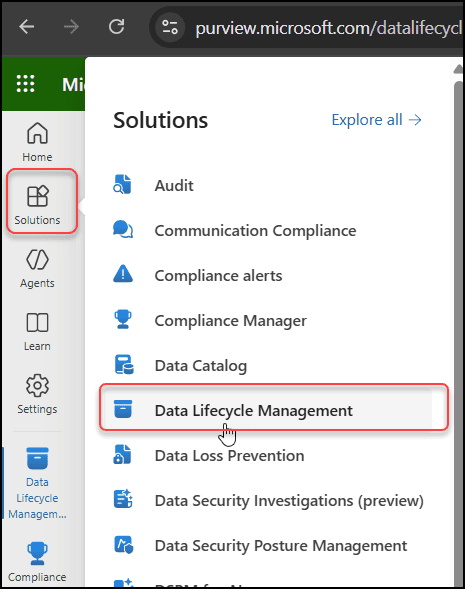
- Open Microsoft Purview -> Go to Solutions -> Select Data Lifecycle Management.
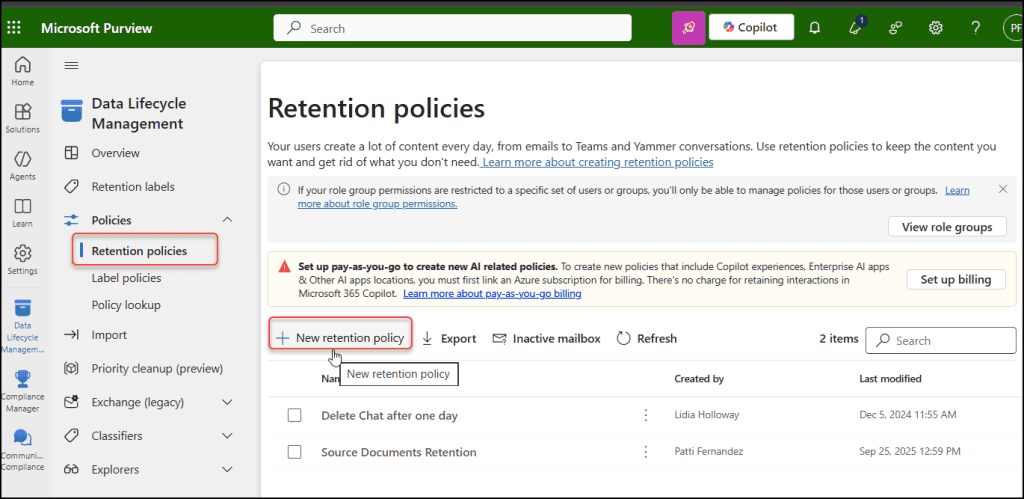
- Expand Policies -> Retention policies.
- Click on + New retention policy.
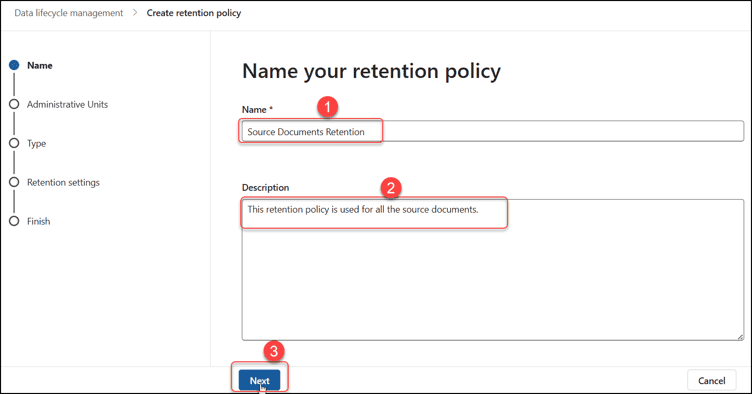
- On the next page, provide the fields below:
- Name: Provide retention policy name. (Mandatory)
- Description: Provide some description about it. (Optional)
Click Next.
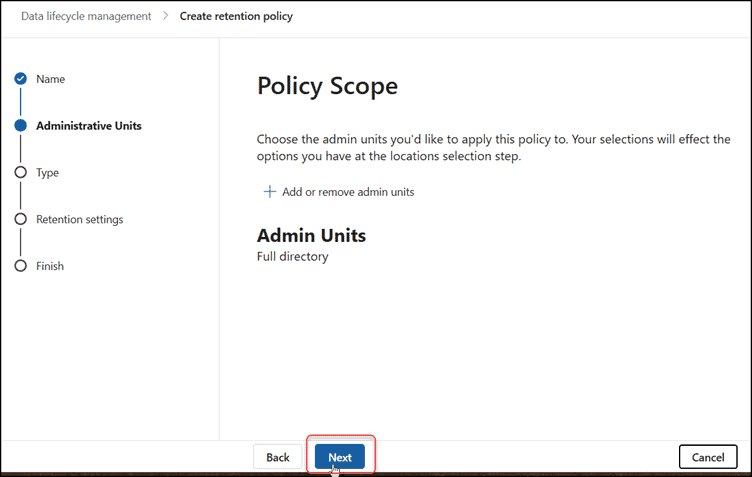
- The next screen is optional and lets you assign Admin Units to your policy. Admin Units are especially useful in large organisations where different departments manage different regions or sites. If your organisation already uses Admin Units, this is where you can apply them. Click Next.
- On the next screen, you’ll need to choose the type of policy you want to create — Adaptive or Static. An Adaptive policy scope, on the other hand, allows you to dynamically assign the policy based on specific site attributes, such as the Site Title or Site URL.
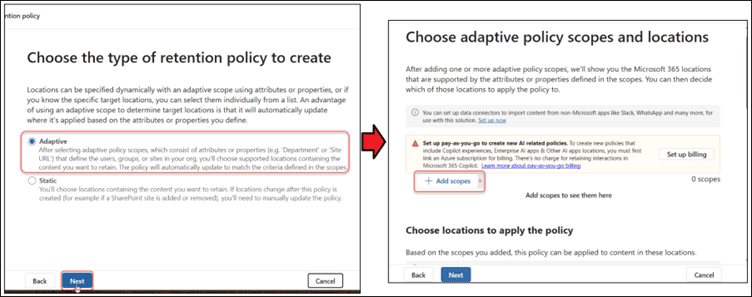
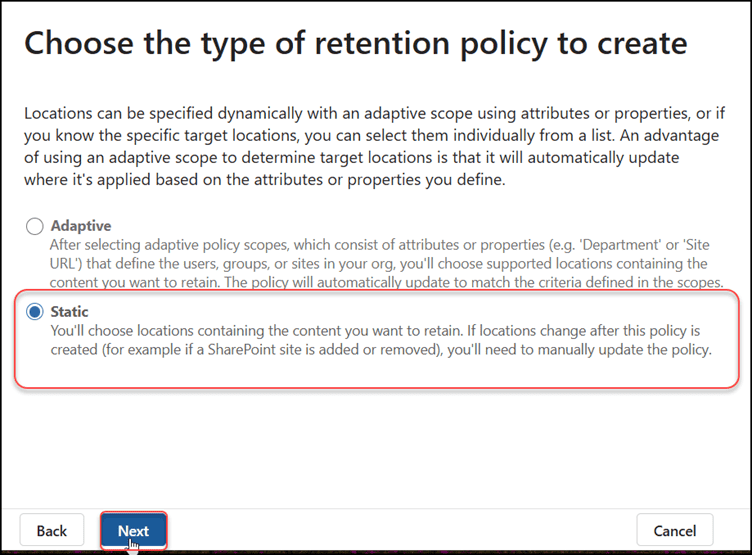
- A Static policy scope requires you to select specific sites where the policy will be applied manually. For this article, I selected Static. Click Next.
- On the next screen, select the option where you want to apply this policy. In addition to SharePoint sites, we can also apply the policy to Exchange mailboxes.
In our case, we are applying the policy to a SharePoint site. The available options may vary depending on whether the site is connected to a Microsoft 365 Group or not.
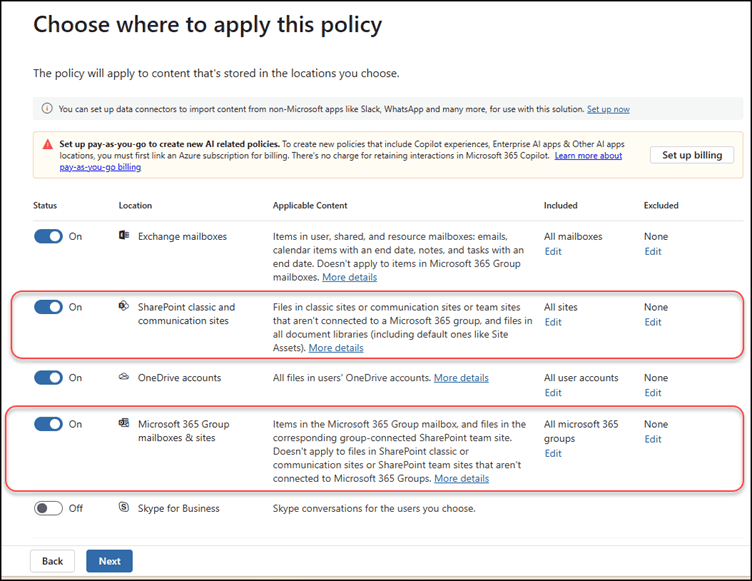
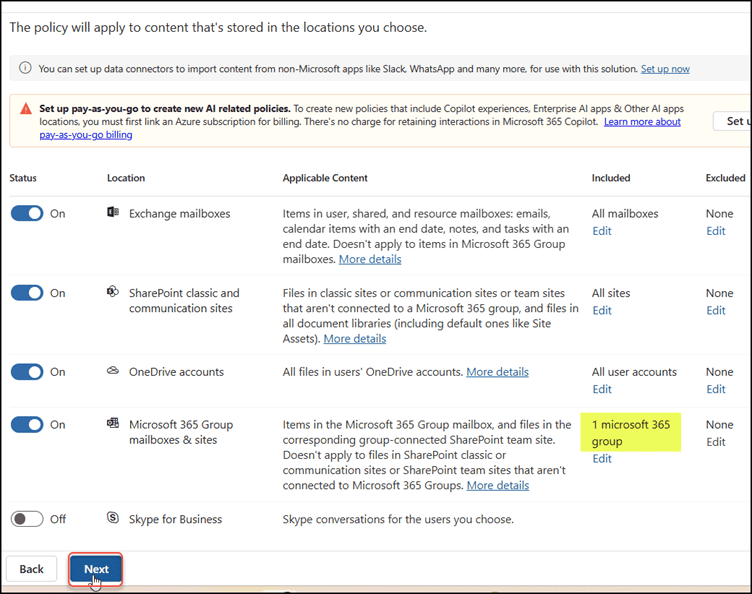
- In this case, I’m using a Team Site that’s connected to a Microsoft 365 Group, so I’ll select the option shown below. By default, it applies to all group sites, but I only want to target a specific site. To do that, click Edit.
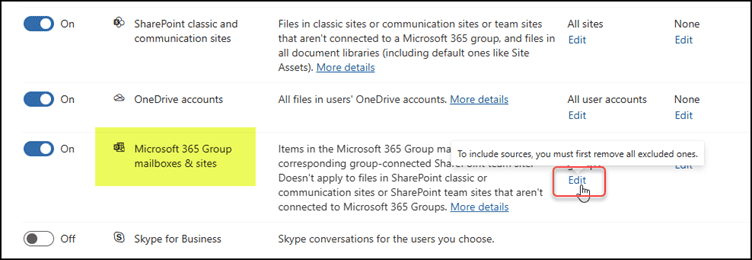
- On the next page, select the specific SharePoint site(s) that you want to apply the retention policy to. Click Done.
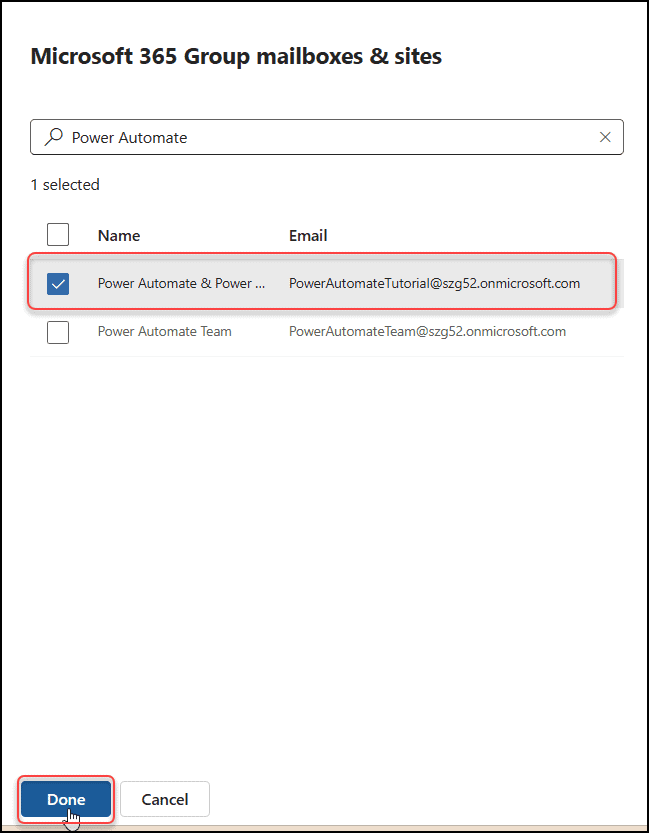
As I have selected only one SharePoint site, that’s why it’s showing only one Microsoft 365 group, as highlighted below.
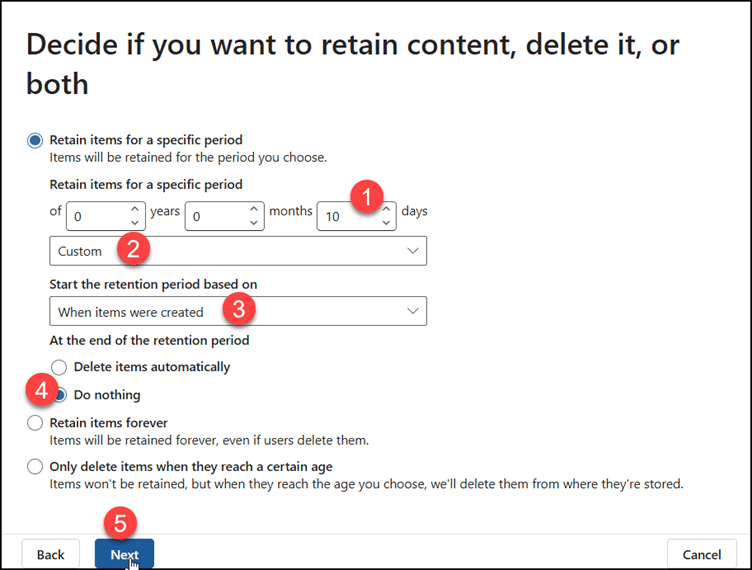
- On the next screen, you’ll set how long you want to keep your files. You can choose to keep them forever, keep them for a specific amount of time, or even set a policy to delete them after a certain period automatically.
- Here, in my case, I have set the retention period to only 10 days.
- Select Custom from the dropdown menu.
- Specify the custom start retention period based on (e.g. when items were created).
- Specify the end of the retention period, whether to delete the items automatically or do nothing.
- Click Next.
- On the next screen, you’ll get a chance to review your policy settings. If everything looks good, click Submit to publish it.
- At this stage, the policy is being published to the selected SharePoint sites. Please note that, as mentioned in the message below, it may take up to a week for the changes to take effect. Click Done.

You can see the retention policy has been added, as shown below.

What Changes Occur Once a Retention Policy is Published On a SharePoint Site
Once we publish the retention policy to a specific SharePoint site, the following things will happen:
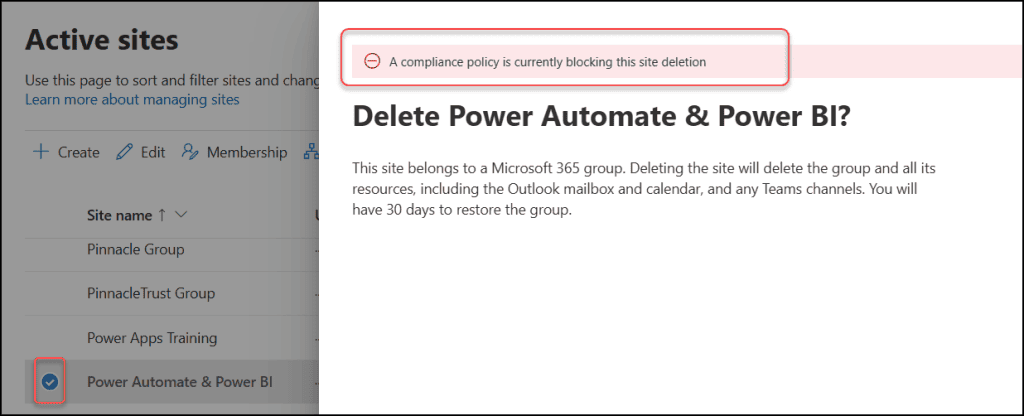
- Cannot Delete a SharePoint Site: If you attempt to delete the site, either from the SharePoint Admin Centre or directly from the site itself, the action will not be allowed. Instead, you’ll see an error message stating: “A compliance policy is currently blocking this site deletion,” as shown below.
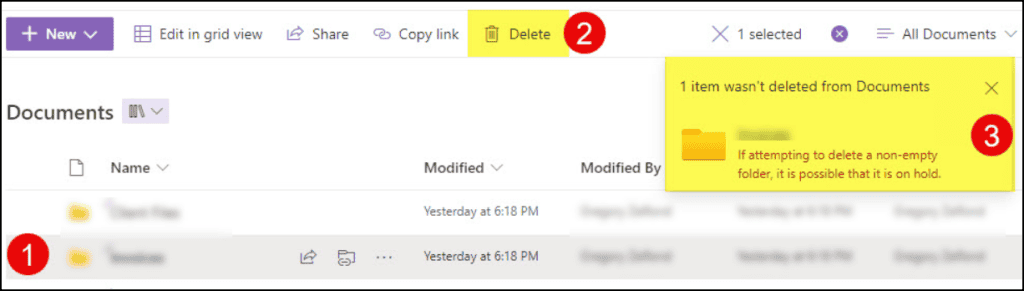
- Cannot Delete Non-empty Folders: If you attempt to delete a folder that isn’t empty, you’ll see the following error message: “If attempting to delete a non-empty folder, it is possible that it is on hold.” To delete the folder, you must first remove all the items and subfolders within it.
Delete/Disable SharePoint Retention Policies
We can remove any unnecessary or unwanted SharePoint retention policies to keep things clean and organised. However, if you prefer not to permanently delete a policy, you also have the option to disable it.
When a policy is disabled, it will no longer be applied to any content. However, you can easily turn it back on later if you need to use it again.
- Delete Retention Policy: To delete a retention policy, select it and click the Delete option. It will be deleted permanently.
- Disable Retention Policy: To disable a policy, select the specific policy and click the “Disable Policy” option.

I hope you found this article. If we implement this retention policy, we will keep important business documents for the appropriate amount of time and automatically remove outdated files. This helps us maintain compliance and security while keeping our SharePoint site clean, organised, and easy to use.
Also, you may like some more SharePoint tutorials:
- Set Up Expiration Guest Access to SharePoint Site
- Create a New SharePoint List By Creating a Form
- Set SharePoint Pages Read-Only for Members
- Change Browser Tab Title in SharePoint
- Create a SharePoint List or Library Using No Framework in SPFx Web Part

Hey! I’m Bijay Kumar, founder of SPGuides.com and a Microsoft Business Applications MVP (Power Automate, Power Apps). I launched this site in 2020 because I truly enjoy working with SharePoint, Power Platform, and SharePoint Framework (SPFx), and wanted to share that passion through step-by-step tutorials, guides, and training videos. My mission is to help you learn these technologies so you can utilize SharePoint, enhance productivity, and potentially build business solutions along the way.