A few days ago, while working on a client project, I needed to create multiple columns in a SharePoint list using Power Automate. Everything went smoothly until I realized the Include Time option was enabled by default when I made a Date and Time column. However, the client specifically wanted only the date without the time.
Now, we can manually disable this in SharePoint, but the challenge was that multiple Date and Time columns needed this change, and doing it manually wasn’t practical. So, I researched and found a way to disable the Include Time option directly within Power Automate while creating the column.
I will show you how to disable the Include Time option in a SharePoint Date and Time column using Power Automate in this tutorial.
Disable Include Time Option in SharePoint List Date Time Column Using Power Automate
I assume you have a SharePoint list named ‘Project Deadlines‘ and would like to create a ‘Date and Time’ column called ‘Due Date, ‘ but you do not want to track the time. To do this, follow the steps:
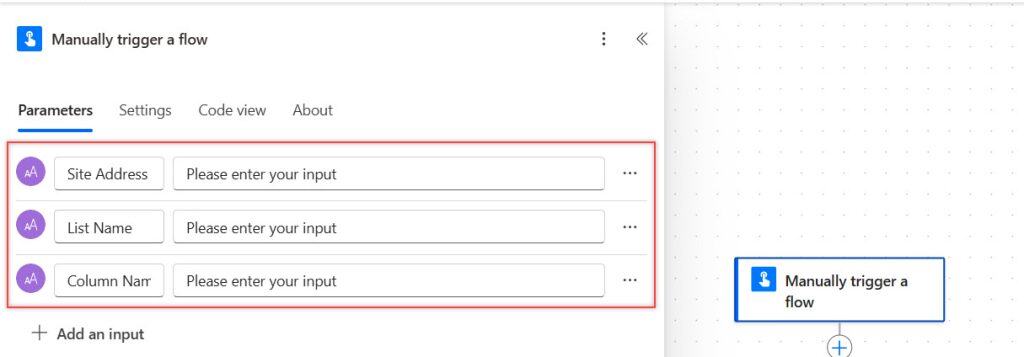
1. Open Power Automate, click on Create, and select Instant Cloud Flow. Choose the Manually trigger a flow trigger. Then, click + Add an input and add three text inputs:
- Site Address – Enter the SharePoint site URL
- List Name – Enter the Display Name of the SharePoint list
- Column Name – Enter the Internal Name of the SharePoint list
2. Add the Send an HTTP request to SharePoint action to create a Date and Time Column. Provide the action with the following parameters:
- Site Address: Select the SharePoint Site Address from the dynamic content.
- Method: Select POST as the method
- URI: Provide the below URI:
_api/web/Lists/getByTitle('@{triggerBody()?['text_1']}')/fields- Header: Use the below headers to make REST API calls to SharePoint:
{
  "content-type": "application/json;odata=verbose"
}- Body:
{
  "__metadata": { "type": "SP.FieldDateTime" },
  "Title": "@{triggerBody()?['text_2']}",
  "FieldTypeKind": 4,
  "DisplayFormat": 0
}
Here:
- Replace @{triggerBody()?[‘text_2’]} with the name of the column you want to create.
- FieldTypeKind = 4 (Specifies that this is a Date and Time column).
- DisplayFormat = 0 (Ensures that only the Date is stored, without the Time.) If you want to add time, change 0 to 1.

Run the flow to Disable Include time in SharePoint List Date and Time Column
Now, save the flow -> Click Test (top-right corner) -> Select Manually and click Test again. Then, enter the SharePoint Site Address, List name, and Column name in the input fields.

Click Run flow and wait for execution. After the flow runs successfully, go to that SharePoint list. Then, you can see the date and time column created, and the ‘Include’ option is not enabled.

Conclusion
In this tutorial, we explored how to disable the Include Time option when creating a Date and Time column in a SharePoint list using Power Automate. Instead of manually adjusting the column settings, we automated the process by using the Send an HTTP request to SharePoint action.
By setting DisplayFormat to 0, we ensured that only the date is stored without the time. Finally, we tested the flow by providing the SharePoint Site Address, List Name, and Column Name, confirming that the column was created correctly with time disabled.
Related Power Automate tutorials:
- Disable Title As Mandatory Field From SharePoint List Using Power Automate
- Create SharePoint List Lookup Column Using Power Automate
- Rename SharePoint List Using Power Automate
- Check if SharePoint List Already Exists in Power Automate
- Get and Delete a SharePoint list view using Power Automate
- Send Email Reminders From a SharePoint List Using Power Automate

Hey! I’m Bijay Kumar, founder of SPGuides.com and a Microsoft Business Applications MVP (Power Automate, Power Apps). I launched this site in 2020 because I truly enjoy working with SharePoint, Power Platform, and SharePoint Framework (SPFx), and wanted to share that passion through step-by-step tutorials, guides, and training videos. My mission is to help you learn these technologies so you can utilize SharePoint, enhance productivity, and potentially build business solutions along the way.

