Microsoft provides a list of controls to make Power Apps applications more attractive and responsible. Power Apps Barcode Scanner allows scans of barcodes, QR codes, and data matrix codes in Android, iOS, and Windows devices.
In this Power Apps tutorial, I will explain the Power Apps barcode scanner and its properties. Also, we will discuss the topics below:
- Working with PowerApps barcode scanner to text input
- How to use PowerApps barcode scanner SharePoint list
- Power Apps barcode scanner multiple scans
- How to display an error message if scanning barcode is not matched in Power Apps
Power Apps Barcode Scanner
Power Apps Barcode Scanner Control is similar to a Power Apps camera control. It helps scan Barcodes, Data Matrix codes, and QR codes on an Android or iOS device.
The only difference between a Camera control and a Barcode Scanner control is that the camera works in continuous capture mode, where the barcode scanner detects the QR code in focus mode or view mode.
NOTE:
The Power Apps Barcode Scanner Control does not work in the Web browser. It only supports Android and iOS devices. If you will use this scanner control in any other platform, then it may show any warning message that some features of the app won’t work.
Power Apps Barcode Scanner Properties
Next, we will discuss the Power Apps barcode scanner properties. Have a look at the below table.
| Properties | Description |
| OnScan | When a barcode is scanned successfully, then it shows how the app responds |
| OnCancel | When a user has canceled the barcode, then it shows how the app responds |
| Type | It is the output property that contains the type of code that was most recently scanned |
| Value | It is the output property that contains the text value of code that was most recently scanned |
| BarcodeType | You need to specify the barcode type to scan. You can target multiple barcode types by concatenating them. Ex. BarcodeType.Code128 & BarcodeType.Code39 |
| BeepOnScan | The barcode reader will play a beep sound while scanning if this option is selected |
| FlashLightEnabled | It specifies whether the flashlight is enabled automatically or not when the scanner is opened |
| PreferFrontCemara | It specifies whether the front-facing camera is enabled or not when a user is using the scanner |
| VibrateOnScan | When a barcode is scanned, the barcode reader will vibrate if this property is enabled |
Supported Barcode Types in Power Apps
The table below represents what types of Powerapps Barcodes are supported in Android and iOS devices.
| Barcode Type | Android | iOS |
| QR_CODE | Yes | Yes |
| DATA_MATRIX | Yes | Yes |
| UPC_A | Yes | Yes |
| UPC_E | Yes | Yes |
| EAN_8 | Yes | Yes |
| EAN_13 | Yes | Yes |
| CODE_39 | Yes | Yes |
| CODE_93 | Yes | Yes |
| CODE_128 | Yes | Yes |
| CODABAR | Yes | No |
| ITF | Yes | Yes |
| RSS14 | Yes | No |
| PDF_417 | Yes | Yes |
| RSS_EXPANDED | Yes | No |
| MSI | No | No |
| AZTEC | Yes | Yes |
NOTE:
PDF_417 and AZTEC aren’t supported in Auto mode.
PowerApps Barcode Reader Example
Here, we will see how we can use the barcode scanner control in the Power Apps screen with a simple example.
Power Apps Barcode Scanner to Text input
In Power Apps, there is a Barcode scanner control and a Text input control. Whenever the user Scans a Barcode using the camera, It will scan the Barcode and store the Barcode value in the text input control.
Have a look at the screenshot below:

To work around this, follow the below steps. Such as:
1. On the Power Apps Screen -> Insert a Barcode scanner [Insert -> Media -> Barcode scanner].

2. When you insert the Barcode scanner, it will appear as a Button with an Auto Border Type. Apply this below formula on its OnScan property as:
OnScan = Set(
    varScan,
    First(bar_Scanner.Barcodes).Type
)
Where,
- varScan = Power Apps variable name
- Bar_Scanner = Barcode Scanner name

3. Now, insert the Text input control and set its Default property as:
Default = varScan
4. Once your app is ready, Save, Publish, and Preview it. Whenever you click on the barcode reader control to scan, you will receive an error message notification: “To read barcodes, open this app in the Power Apps mobile app on a capable device. Click here to view device requirements and learn more.”

5. The barcode scanner control is not supported in the web browser. You need to install Power Apps on your mobile to use it.
Preview the PowerApps Barcode Scanner app on Mobile
If you open the Power Apps in your Mobile browser and preview the app, it will tell you to install the Power Apps for mobile, as shown below. Just click on the Get Power Apps link to install the Power Apps on your Mobile.

After Installation, sign in to Power Apps with your Microsoft credential (on the Phone only). Go to the Apps section -> Click on your Barcode Scanner app, as shown below.

Now, you can see the Barcode Scan button with a Text input control in your app. When you click on the Scan button, the camera opens, helping you scan a barcode.

You can scan a Barcode using the camera, as in the below screenshot.

Once you scan the Barcode, its value will be saved in the text input control(Barcode Scan Result), as shown below.

Power Apps Barcode Scanner SharePoint List
Normally, people would have questions about where they can store the barcode scanned value, including the barcode type, the person who recently scanned, the barcode scanner time, etc.
In this case, a SharePoint List or an Excel spreadsheet is a better option for storing the PowerApps Barcode Scanner details.
I have created a SharePoint List named “Barcode Scans“. This list has below fields with different data types.
| Column Name | Data Type |
| Barcode Scanned Value | Its is a default single line of text |
| Scanned Person | A single line of text |
| Scanned Time | Date and time (Inculding time) |

Now, I would like to scan the barcode using Mobile Power Apps and store the details in the SharePoint list, as shown in the screenshot below.

To achieve it, follow the below steps. Such as:
1. Open Power Apps, select the App object and set its OnStart property as:
OnStart = Set(
    varBarcodeValue,
    First(bar_ScanerValue.Barcodes).Value
)
2. On the Power Apps Screen -> Insert a Barcode scanner button and set its OnScan property to the code below.
OnScan = Patch(
    'Barcode Scans',
    Defaults('Barcode Scans'),
    {
        Title: varBarcodeValue,
        'Scanned Person': User().FullName,
        'Scanned Time': Now()
    }
)
Where,
- Barcode Scans = SharePoint Online list
- varBarcodeValue= Power Apps Variable name

3. Now, on your phone, open the scanner app and click the “Scan Barcode to SP List” button, as shown below.

4. It will capture the Barcode and store the details in the SharePoint List, as shown in the screenshot below.
This way, you can work store the barcode details from Power Apps to SharePoint list.

Power Apps Barcode Scanner Multiple Scans
Now, we will see how to scan and record multiple barcodes using Power Apps barcode reader control and display the results on the data table. The screenshot below shows the output.
Output:

To do so, follow the below steps.
1. On the Power Apps Screen -> Insert a Barcode scanner and set its ScanningMode property to the code below.
ScanningMode = 'BarcodeReader.ScanningMode'.ScanMultiple
2. Next, insert a Data table control and set its Items property as:
Items = bar_ScanerValue.Barcodes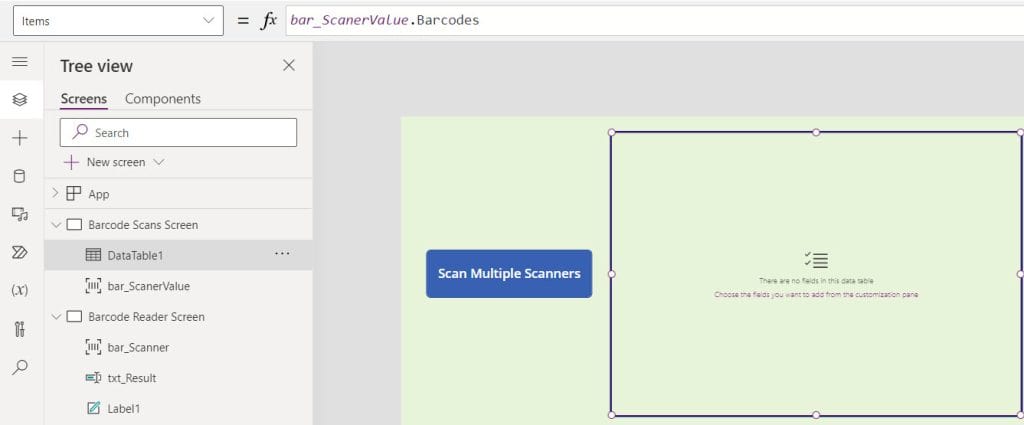
3. To display the data table fields, click on the Edit fields and choose the respective fields as shown below.

4. Save, Publish, and Preview the app and open it via your mobile. Now, click on the Barcode Reader control, scan a barcode, and click the Tick button.
5. Similarly, you can scan multiple barcodes. Here, I have scanned three barcodes and clicked on the Submit button.

6. Now, multiple barcode records will appear on the Power Apps data table, as shown below.

This is how we can scan the multiple barcode scanners using the Power Apps barcode scanner.
Display error message if Scanning Barcode is not matched
Here, we will see how to display an error message if the scanning barcode is not matched. That is, if the scanned barcode value does not match the stored SharePoint list barcodes or if it is invalid, then it will notify the user via an error message.
Below, I have displayed a screenshot of me trying a random barcode from the browser. As the scanned value does not match the data source’s barcode values, it displays an error message.

To implement this, the following steps are:
- On the above canvas app, insert the below expression on the Power Apps Barcode Reader Control’s OnScan property.
OnScan = If(
    First(Product_BarcodeReader.Barcodes).Value in 'Products Purchased'.'Bar Code',
    true,
    Notify(
        "Invalid Barcode",
        NotificationType.Error,
        4000
    )
)
That’s it! Now, we can see that while scanning a barcode, it will check whether the scanned barcode value matches the stored barcodes. If it is matched, then it will display the respected product; otherwise, it will notify an error message.
Also, you may like:
- Capture a Power Apps Digital Signature
- Container in Power Apps
- Power Apps Disable Button
- Power Apps Lower, Upper, and Proper Function
I hope this Power Apps tutorial taught in detail information about the Power Apps barcode scanner control. Also, we discussed how to work with PowerApps barcode scanner to text input and Power Apps barcode scanner SharePoint list.
Additionally, we saw how to do multiple scans using the Power Apps Barcode and display an error message if the Power Apps scanning barcode is not matched with examples.

Hey! I’m Bijay Kumar, founder of SPGuides.com and a Microsoft Business Applications MVP (Power Automate, Power Apps). I launched this site in 2020 because I truly enjoy working with SharePoint, Power Platform, and SharePoint Framework (SPFx), and wanted to share that passion through step-by-step tutorials, guides, and training videos. My mission is to help you learn these technologies so you can utilize SharePoint, enhance productivity, and potentially build business solutions along the way.


Hi, great guide thank you. I have a weird problem though. I created a tablet app first and it worked OK but looked weird on an iphone – obviously 🙂 I then created a phone app and every time I hit the scan button it just says “The barcode scanner is not configured to scan a valid barcode type.” at the top of the screen. It doesn’t matter what I set for barcode type, including leaving it on auto. All I ever get is the same error. And this is all on the same device? Any idea?
Hi there, Thanks for this. Very useful. One question? In my QR code I have embedded several fields. And I would like to split those fields once the QR Code is being scanned. How can I do this instead of passing a single line of text?
Thanks in advance
Is there a way to create a single barcode scanner to populate the scanned data into selected text input?
Hi.. can anyone help in QR Scanner? in my case once open the qr scanner it will not close and navigate to the success screen automatically… If the user clicks on the back button from mobile then only it shows success screen.
Hey Bijay, This has been quite helpful. The only thing I am still struggling to do is on scan, move to a edit screen. The QR Codes we are creating are holding a few bits of data contained within the Dataverse table. I’d like to be able to scan the code and directly open the edit screen that corresponds to that QR Code in my PowerApp. I realize there is a new control and I have been using the new.
Hi Mr Bijay, I was wondering if there is a way to automatically display the quantity of a scanned item, that is scan once, the item quantity would automatically be 1, then, if you scan twice, the item quantity would automatically be 2? Thank you.