
Imagine you’re the only HR person in a company of 300 employees, and your inbox is full of questions like “How many casual leaves do I have left?” and “What’s the maternity leave policy?”. You know these answers live in PDFs, SharePoint sites, and long policy emails, but people keep asking you directly.
A Microsoft Copilot Studio agent is basically a smart chatbot you build for your organization so it can answer these questions for you using topics, which are conversation paths triggered by what the user types.
In this article, we’ll use a simple HR leave helpdesk Copilot as our running example, and I’ll walk you through two powerful ways to build a custom topic that handles leave-related questions and actions end-to-end.
In this article, I’ll show you 2 ways to create custom topic in Microsoft Copilot Studio.
What Is a Topic in Microsoft Copilot Studio?
Before you start wiring up flows and generative answers, it helps to be very clear about what a topic actually is. Think of a topic as a small, self-contained conversation about one specific thing your copilot can help with, like applying for leave, checking leave balance, or explaining maternity leave policy.
In Microsoft Copilot Studio, a topic defines how a segment of the conversation progresses from the moment it’s triggered until it ends or hands off to another topic. Each topic has three core parts:
- Trigger – what starts the topic, such as trigger phrases (“apply for leave”, “leave policy”) or a generative description when you use AI-based authoring.
- Conversation path – the actual flow of messages, questions, conditions, and actions that guide the user step-by-step.
- End or redirect – how the topic finishes, either by ending the current topic, ending all topics, or redirecting to another topic like “HR – Apply for Leave”.
Types of Topics in Microsoft Copilot Studio
When you open the Topics page for your HR Leave Helpdesk agent, you’ll see two main types of topics: system topics and custom topics. Understanding the difference helps you decide what you should build and what Copilot Studio already handles for you.
- System topics – These are built-in topics that come with every new agent and handle common events like Greeting, Goodbye, Fallback, Escalate, and End of Conversation. For example, Greeting kicks in when someone starts a chat, and Fallback responds when Copilot Studio can’t match the user message to any topic. You don’t need to create these from scratch, but you can open them, read the wording, and customize them to match your HR tone.
- Custom topics – These are the topics you design for your own scenarios, like HR – Apply for Leave, HR – Leave FAQ and Request, or HR – Check Leave Balance. You choose the trigger phrases, build the conversation path, and connect tools as Power Automate flows or generative answers so your HR agent can actually do useful work.

Method 1 – Create a Custom Topic from Blank
Use this method when you want complete control over your conversation. Starting from a blank topic allows you to design every message, question, condition, and response exactly as your business requires. This approach is ideal for scenarios where you have a well-defined conversation flow and want to customize every interaction.
Imagine you’re building an HR Helpdesk Agent for your organization. Employees frequently ask questions such as:
- What is the company’s leave policy?
- How many annual leave days do employees receive?
- What is the work-from-home policy?
- What documents are required for onboarding?
Instead of answering these questions manually, you can create a custom topic that guides employees through a structured conversation and provides the appropriate information.
Step 1: Create a Blank Topic
Open Microsoft Copilot Studio and select your agent. Navigate to Topics, click Add a topic, and then choose From blank. Enter a meaningful name for your topic, such as HR Policy Assistant, and save it.

How does this work?
Choosing From blank creates an empty topic with no predefined conversation. This gives you complete flexibility to build the conversation from scratch by adding trigger phrases, questions, conditions, messages, variables, and other conversation nodes.
Step 2: Configure Topic Discovery
After creating the topic, select The agent chooses as the trigger method. Instead of adding trigger phrases, provide a clear description of what the topic is designed to handle.
For example:
Help employees answer questions about HR policies, including annual leave, work-from-home guidelines, employee benefits, onboarding requirements, and other company policies. Use this topic whenever a user asks for HR-related information or policy guidance.

How does this work?
When you select The agent chooses, Copilot Studio uses AI to determine when this topic should run. Rather than matching specific trigger phrases, the agent analyzes the user’s message, compares it with the topic description, and decides whether this topic is the best fit for the conversation. This approach makes the topic more flexible because users can ask the same question in many different ways without requiring you to define every possible trigger phrase.
Step 3: Build the Conversation
Start by adding a Message node to welcome the user.
For example:
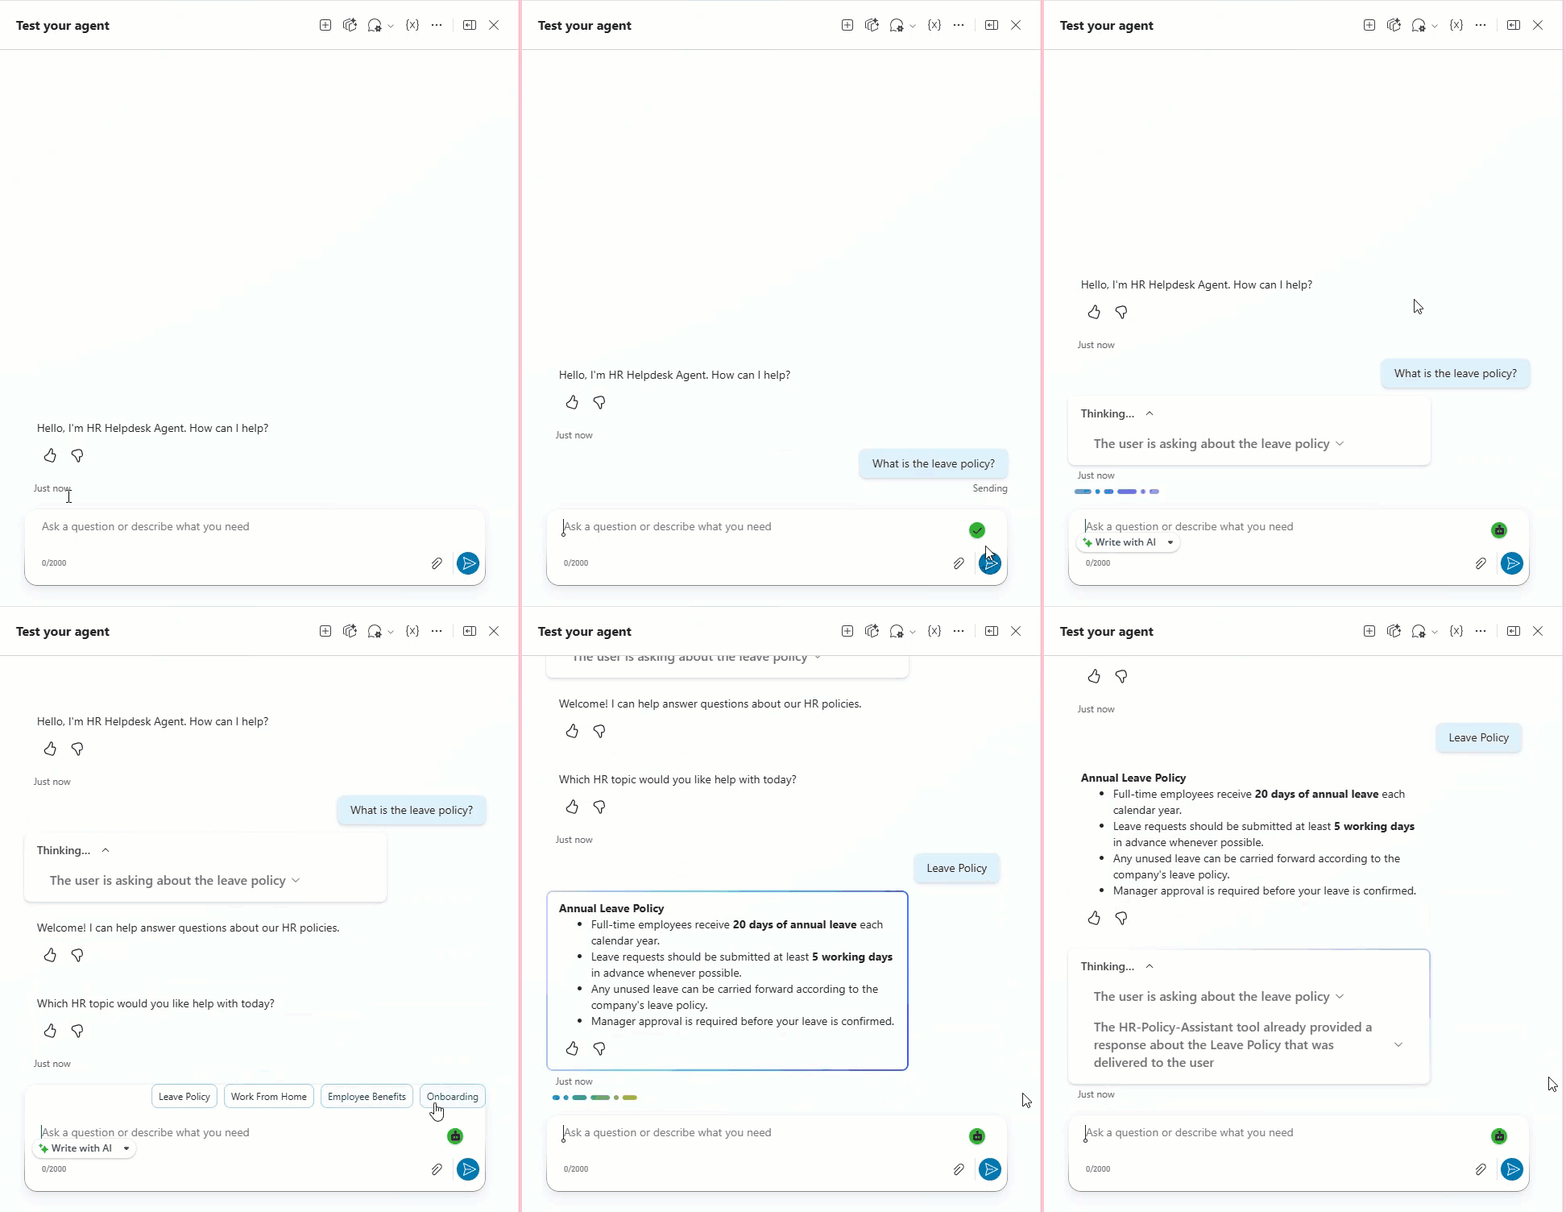
Welcome! I can help answer questions about our HR policies.

Next, add a Question node asking which policy the user wants to learn about. Provide options such as Leave Policy, Work From Home, Employee Benefits, and Onboarding. Store the user’s selection in a variable named PolicyType.

How does this work?
Message nodes display information to the user, while Question nodes collect structured input and store the response in variables. These variables can later be used to determine which conversation path the topic should follow.
Step 4: Add Conditions
Add a Condition node that evaluates the value stored in the PolicyType variable. Depending on the option the user selected, display a different message with the relevant HR information.
For example:
If PolicyType = Leave Policy
Display a Message node:
Annual Leave Policy
- Full-time employees receive 20 days of annual leave each calendar year.
- Leave requests should be submitted at least 5 working days in advance whenever possible.
- Any unused leave can be carried forward according to the company’s leave policy.
- Manager approval is required before your leave is confirmed.

If PolicyType = Work From Home Policy
Display a Message node:
Work From Home Policy
- Employees may work remotely for up to three days per week, depending on their role.
- Availability during standard business hours is required.
- Team meetings and important client calls must be attended as scheduled.
- Any exceptions should be discussed with your manager.

If PolicyType = Employee Benefits
Display a Message node:
Employee Benefits
Our company offers a range of benefits, including:
- Comprehensive health insurance
- Paid annual and sick leave
- Employee wellness programs
- Professional training and certification support
- Performance-based bonuses and recognition programs
If PolicyType = Employee Onboarding
Display a Message node:
Employee Onboarding
Before your first day, please ensure you have:
- Submitted all required identity documents
- Completed your HR forms
- Activated your company account
- Reviewed the Employee Handbook
- Scheduled your onboarding session with HR

How does this work?
The Condition node evaluates the value stored in the PolicyType variable and directs the conversation to the appropriate branch. Each branch displays information specific to the user’s selection, allowing a single topic to support multiple HR scenarios while keeping the conversation organized and easy to maintain.
Step 5: Complete the Conversation
After providing the requested information, add a final message asking whether the user needs additional assistance. You can either end the conversation or redirect the user to another topic, such as Contact HR or Frequently Asked Questions.

How does this work?
Ending the topic tells Copilot Studio that the conversation has been completed successfully. Redirecting to another topic allows you to create modular conversations that are easier to maintain and reuse.
Step 5: Test the Topic
Once you’ve finished building the conversation, use the Test your agent pane in Copilot Studio to verify that the topic behaves as expected. Start a new conversation and ask questions related to your HR policies, such as:
- What is the leave policy?
- Tell me about employee benefits.
- Explain the work-from-home policy.
- I need onboarding information.
If the topic starts correctly, select different options from the multiple-choice question and verify that the appropriate message is displayed for each selection. If you notice any issues, update the conversation flow, conditions, or messages and test again until everything works as expected.
Method 2 – Create a Custom Topic Using Copilot
If you want to create topics much faster, Microsoft Copilot Studio can generate an initial conversation for you using AI. Instead of manually adding every node, you simply describe the conversation you want, and Copilot creates a draft topic that you can review and customize.
Suppose you’re building the same HR Helpdesk Agent, but instead of creating the conversation manually, you want AI to generate the topic automatically. You simply describe what the topic should do, and Copilot builds the initial conversation structure for you.
Step 1: Generate the Topic with Copilot
Navigate to Topics, click Add a topic, and select Add from description with Copilot.
Enter a description such as:
Create an HR helpdesk topic that helps employees learn about leave policies, work-from-home guidelines, employee benefits, and onboarding documents. Ask users which policy they need, provide the appropriate information, and then ask if they need further assistance.
Click Create.

How does this work?
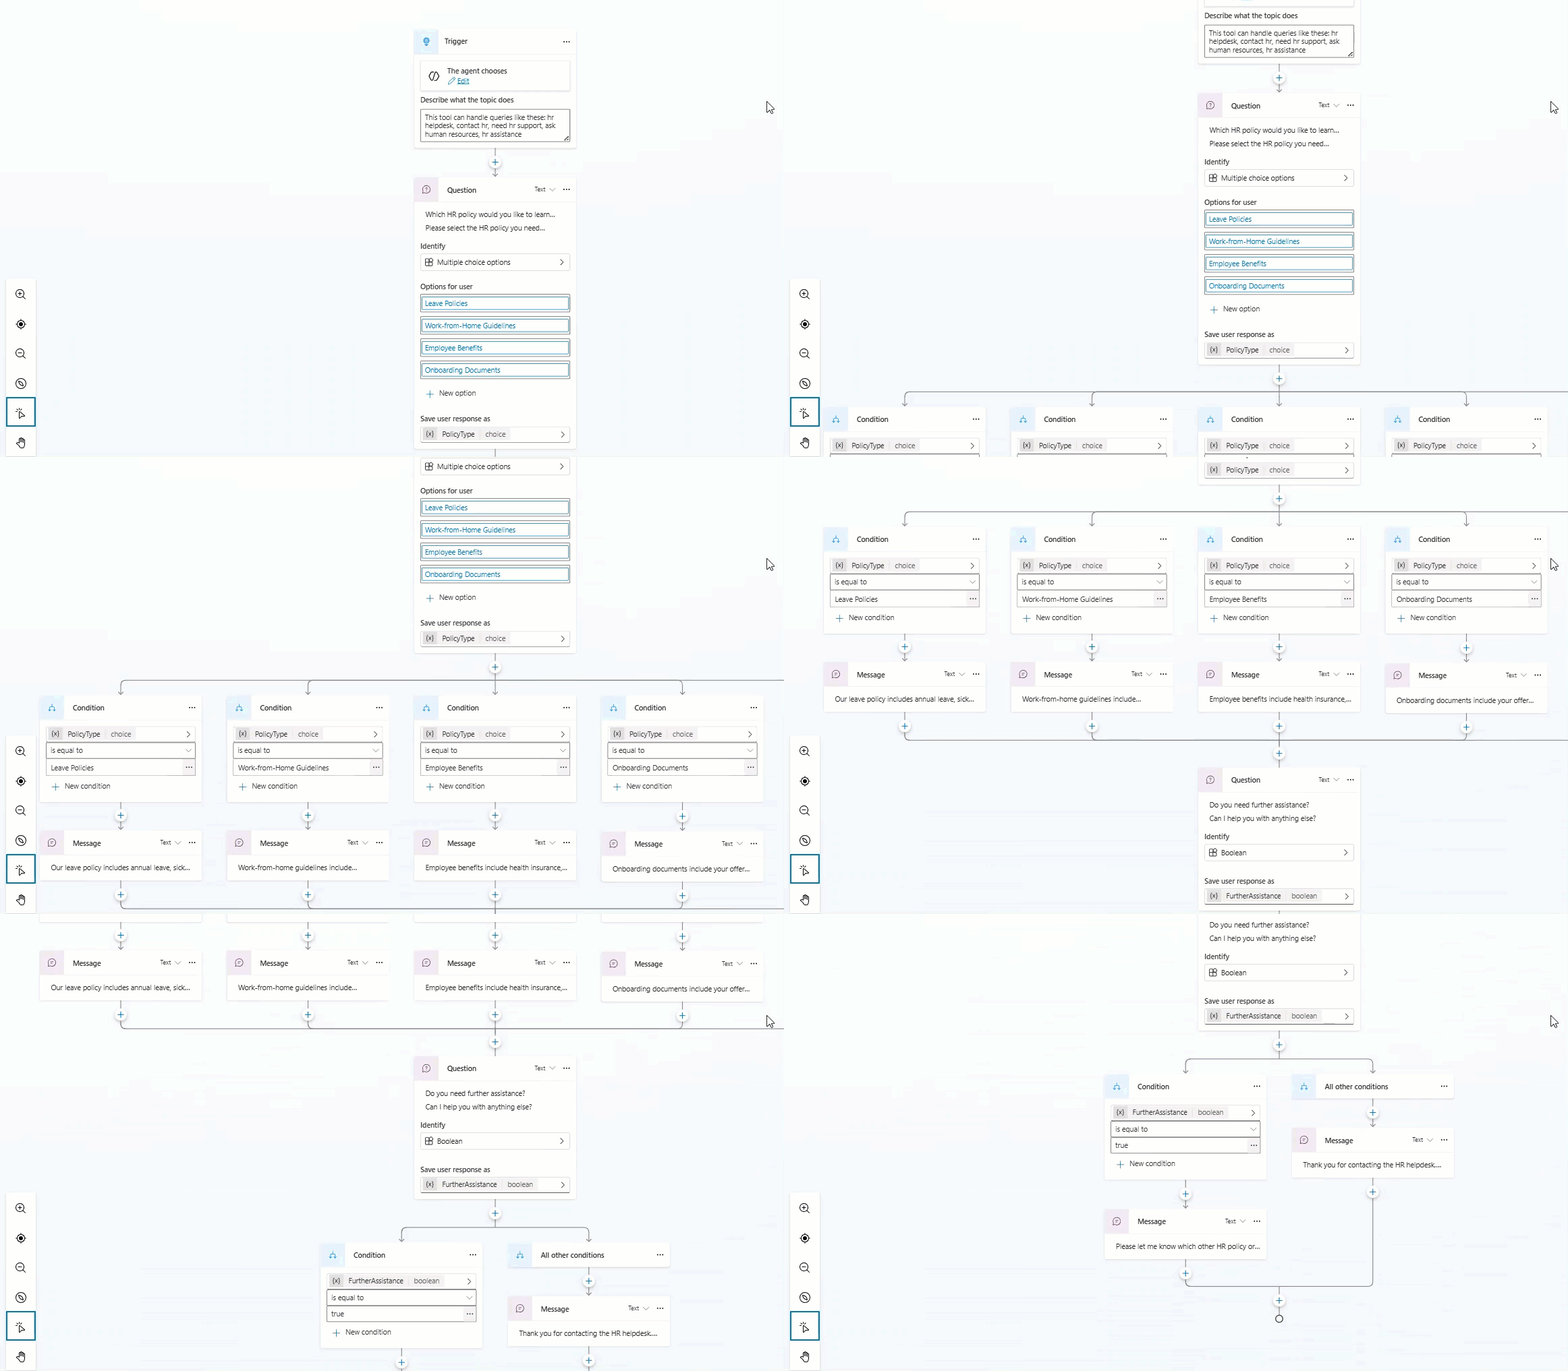
Copilot analyzes your description using generative AI and automatically creates a draft topic. It generates trigger phrases, conversation messages, questions, variables, and branching logic based on the scenario you described.
Step 2: Review the Generated Topic
Once Copilot finishes generating the topic, review the conversation flow. Check the trigger phrases, welcome message, questions, conditions, and responses to ensure they match your business requirements.
How does this work?
The generated topic serves as a starting point rather than a finished solution. Reviewing the conversation allows you to verify that the AI correctly understood your requirements before publishing the topic.
Step 3: Customize the Conversation
Modify any part of the generated topic as needed. Update trigger phrases, edit messages, rename variables, add additional conditions, or insert new conversation nodes to support more business scenarios.
Step 4: Test the Topic
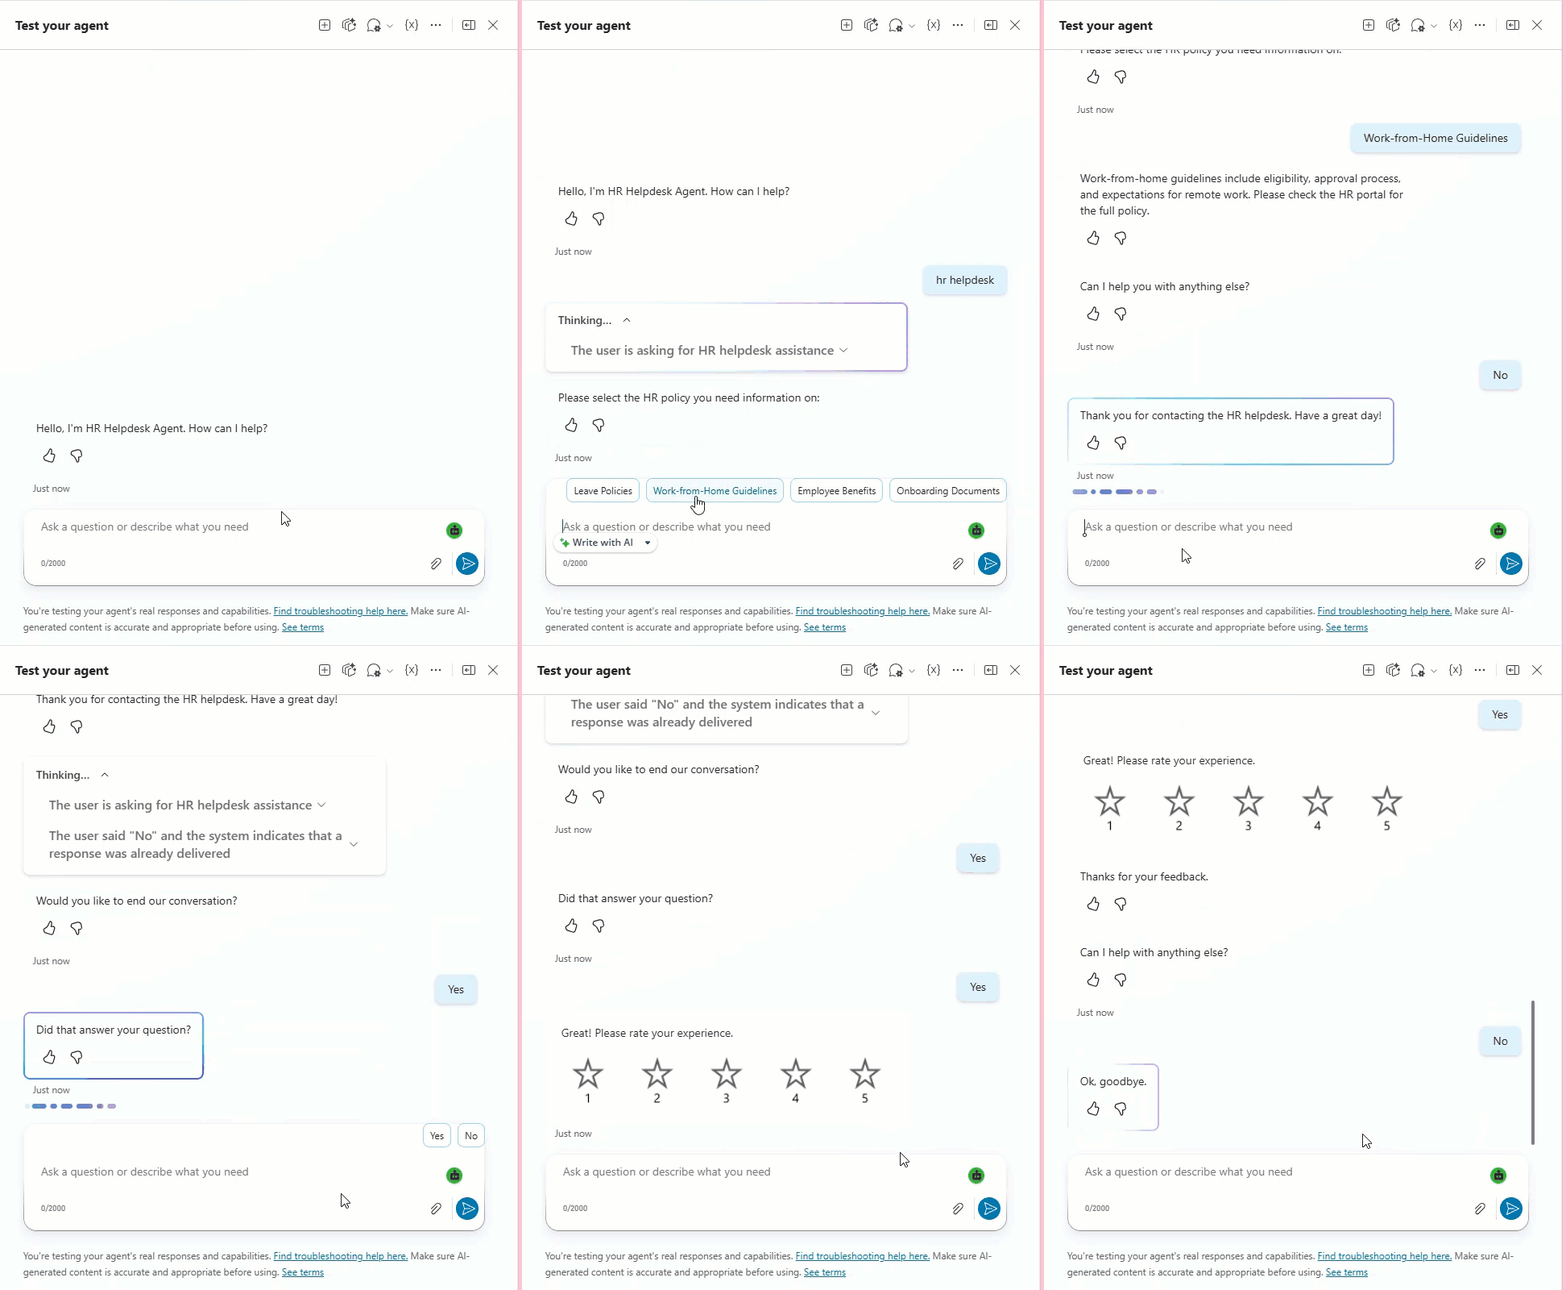
Open the Test your agent pane and try different prompts such as:
- What is the leave policy?
- Tell me about employee benefits.
- Explain the onboarding process.
- Can I work from home?
Verify that the conversation flows correctly and that each response matches the intended scenario.
Step 5: Save and Publish
After making any necessary changes and completing your testing, save the topic and publish the agent. The new topic is now available to users across the channels where your Copilot agent is deployed.
Things to Keep in Mind
- Environment and solutions – Always build your Copilot Studio agent and Power Automate flows in the same environment, ideally inside solutions, so tools and flows show up correctly in topics.
- Topic trigger conflicts – If two topics share similar trigger phrases, Copilot Studio might pick the wrong one, so make phrases specific and regularly review trigger intent in testing.
- Generative vs authored topics – Generative answers are great for open-ended HR questions, but use authored topics for structured processes like applying for leave so you keep control over data collection and validations.
- Power Automate authentication – When calling flows from topics, check the connection and user authentication settings to avoid “flow not found” or permission errors during conversation.
- Channel and licensing limits – Some channels (like Teams vs Web) and features require specific Microsoft 365 or Power Platform licenses, so confirm what’s allowed for your tenant before rolling out the HR leave copilot widely.
- Topic status and errors – Use the Topic checker and the Errors column on the Topics page to find misconfigured nodes and then test after every change instead of waiting until the end.
You’ve now seen two powerful ways to create custom topic in Microsoft Copilot Studio for an HR leave helpdesk agent: one that logs real leave requests through Power Automate, and one hybrid topic that mixes generative HR FAQs with backend actions. Use the Power Automate method when you must create or update records in your HR system, and use the hybrid generative method when you want one topic to answer policy questions and then smoothly guide users into the application flow. I hope you found this article helpful.
Also, you may like some tutorials:
- Create a Multi-Agent in Copilot Studio
- SharePoint List as Knowledge in Copilot Studio
- Set up Manual Authentication in Microsoft Copilot Studio

Hey! I’m Bijay Kumar, founder of SPGuides.com and a Microsoft Business Applications MVP (Power Automate, Power Apps). I launched this site in 2020 because I truly enjoy working with SharePoint, Power Platform, and SharePoint Framework (SPFx), and wanted to share that passion through step-by-step tutorials, guides, and training videos. My mission is to help you learn these technologies so you can utilize SharePoint, enhance productivity, and potentially build business solutions along the way.